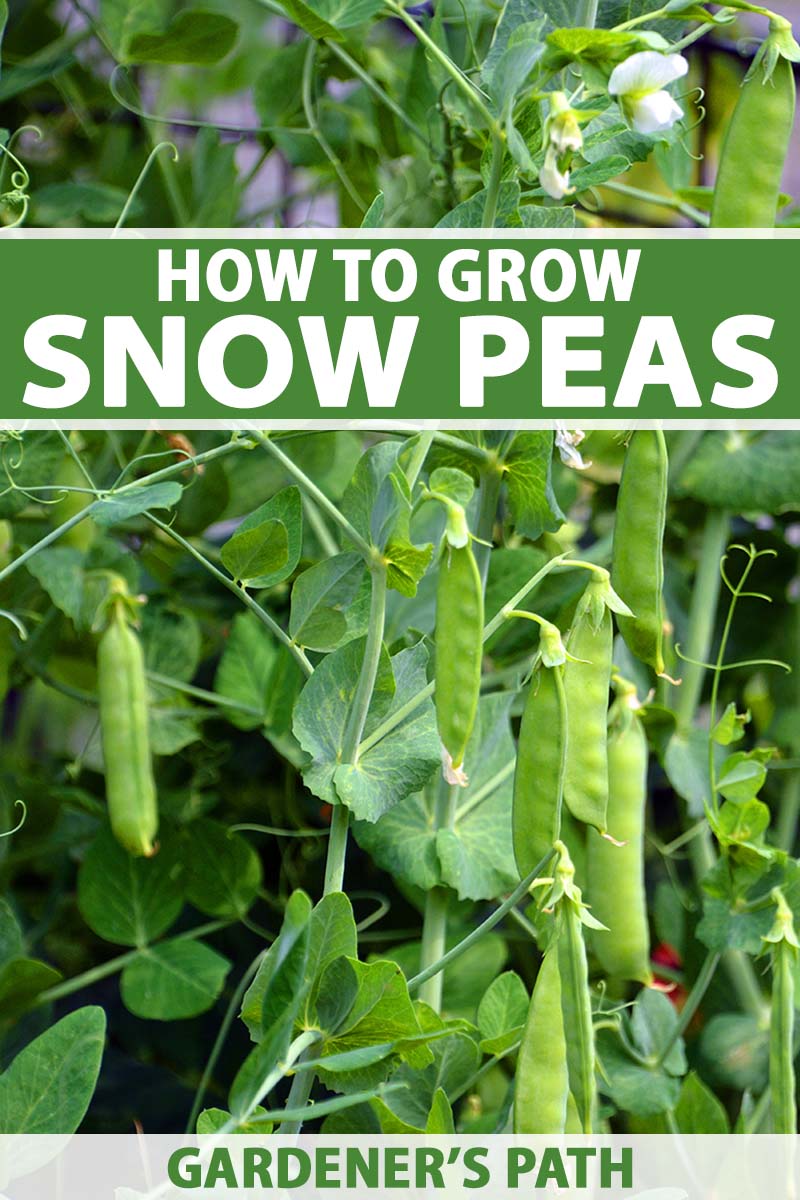
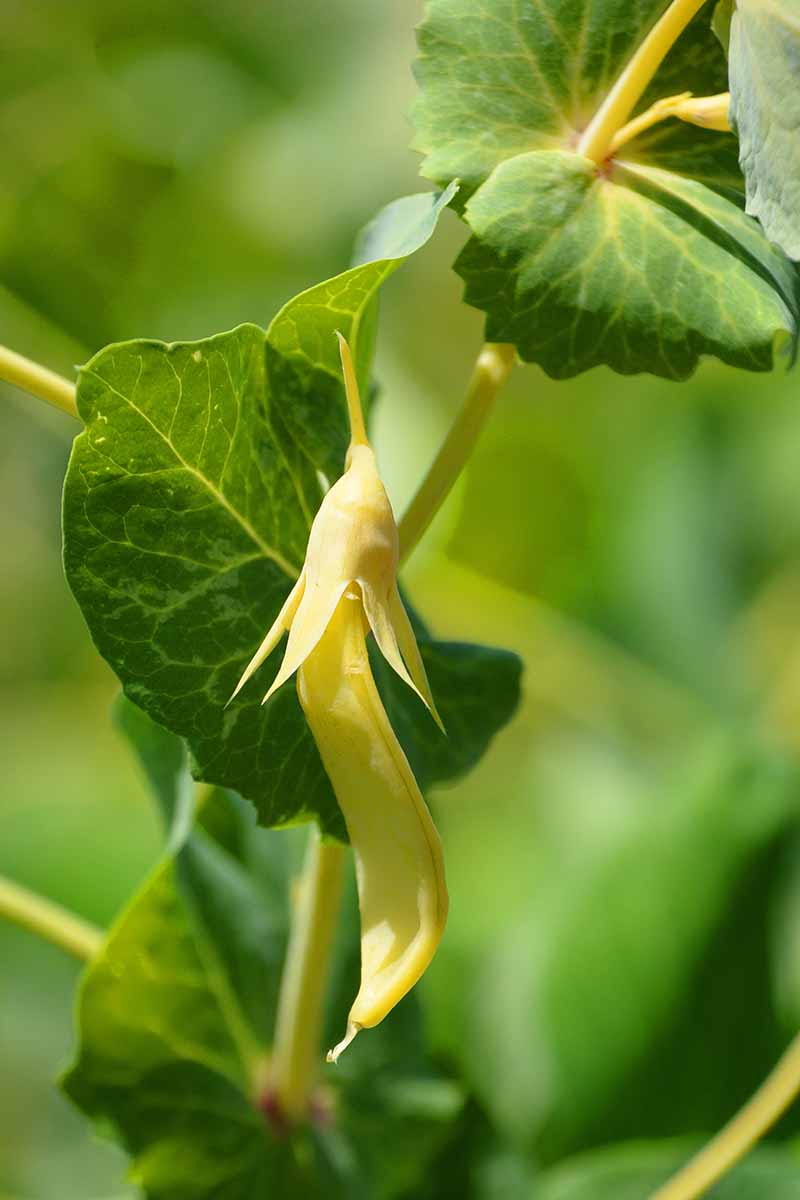
Pisum sativum var. macrocarpum
Part of the joy of growing Pisum sativum var. macrocarpum in the garden is right there in the name: snow pea.
This vegetable thrives in cool – even snowy – weather, producing well ahead of other garden favorites like squash, tomatoes, and green beans. This crop is best planted at the tail end of winter, about a month ahead of the last frost.
Snow peas will withstand a few light freezes and the occasional snow flurry during their two seasons, spring and autumn.
We link to vendors to help you find relevant products. If you buy from one of our links, we may earn a commission.
Besides being one of the first available when you’re longing for homegrown vegetables, these legumes are crispy, crunchy, and nutritious.
If you do grow a substantial harvest, you’ll probably find yourself enjoying lots more stir fry, salad, and vegetable snacks with snow peas as a prime ingredient.
Kids love nibbling on raw snow peas, too, especially if you take care to plant them in cool weather and harvest them at their sweet best.
When they are deprived of ample water or growing in temperatures above 85°F, they produce pods that are stringy and tough.
As the weather warms, the plants languish, and soon won’t flower at all.
To maximize the time you do have, you can also plant extra seeds to harvest the edible flowers, tendrils, or pea shoots, another name for tender pieces clipped when the young vines or bushes are just a few weeks old.
Those blooms or bits of greenery are delicious in salads or eaten out of hand.
But I’m getting ahead of myself here. Before we consider the many ways to consume snow peas, let’s dive into the steps involved to grow a healthy, delicious crop.
Here’s what I’ll cover:
What You’ll Learn
Cultivation and History
Snow peas, sometimes called sugar peas or Chinese pea pods, are part of the legume family and they have edible pods. They are one of the triumvirate of tasty varieties of P. sativum to grow in the home garden.
The best known snow pea relatives are the English peas you shell before eating. The other type of pea with an edible pod, the snap pea, was introduced only in 1979, and combines the plumper, sweeter seeds from English peas with a crispy, edible shell.

Pea plants were domesticated in 6,000 BCE, and it’s generally believed that this happened in Thailand and Burma, the Middle East, and/or Ethiopia.
However they spread from one culture to another, peas were commonly grown on both continents as early as 1,000 BCE, and historic evidence indicates Ancient Greeks and Romans cultivated many shelling pea varieties as well over the millennium to follow.
The flat-podded snow pea has been gracing dinner tables only since the 16th century.
Again, the provenance of this variety is a little murky, with the debate centering on this variety either originating in China, or being first grown in Europe and traveling to Asia with the Dutch.
Today, snow peas are a popular ingredient in Asian-American cuisine, and the shoots of all types of P. sativum are the darlings of farm-to-table cooks and salad makers.
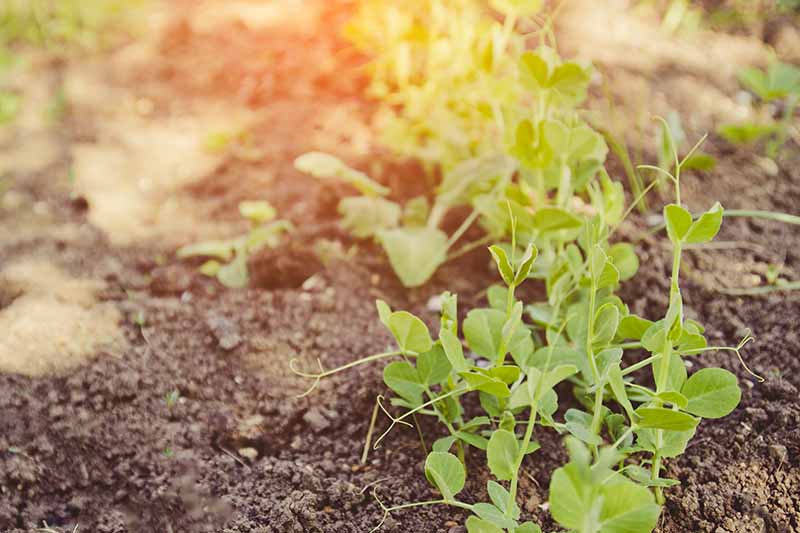
Snow peas share growing habits with the other varieties of edible pea, and are available in both bush and vining cultivars.
At my house, I plant a long line of the vining, or pole, variety down a makeshift eight-foot fence as early as the soil can be worked in the spring.
All through February and March I look forward to my annual ritual of standing to graze on the fresh pods on spring evenings after work.
Are you up for that? Let’s dive right into the best way to plant and care for snow peas, starting with sowing.
How to Sow
By far the most reliable method for propagating snow peas is direct seeding into containers, raised beds, or gardens.
You can technically start the seeds indoors and transplant them, but the roots are sensitive to transplant shock. If you can possibly swing it, I recommend direct sowing.
At the very least, if you opt to start seeds indoors, be sure to use biodegradable pots so you can transplant the seedling and pots all at once, without harming any roots.
Or, compromise by starting the seeds in containers large enough that you won’t have to relocate the plants for the rest of the season once you move them outside.
Keep in mind, since you can plant the seeds so early in spring, you gain very little advantage from planting them earlier indoors. I’m sure you’re getting my point: Sow your seeds outside if that’s possible.
To learn more about the vegetable varieties that are best to sow outdoors, check out our guide.
Ahead of sowing, obtain a soil test to make sure the soil you’ll use is with the optimum pH range, between 6.0 and 6.8 – just a bit on the acidic side.
Look for a full-sun location for your snow peas. You can get away with sowing them in part shade if need be, but the plants won’t grow as vigorously or produce as many pods as they would in full sun.
Plant in well-draining soil you’ve amended with plenty of composted manure or other organic material.
Before planting vining varieties, go ahead and install the trellis or other supports they’ll need once they’re larger.
You don’t want to disturb the shallow, sensitive roots by trying to place stakes or fences after the plants have started growing.
Even the bush or short-vine snow peas that only attain 20 to 30 inches in height may need a few bamboo stakes or a piece of chicken wire to help them support an abundance of pods.
Be sure to place the more minimal supports in the ground or container ahead of sowing, too.
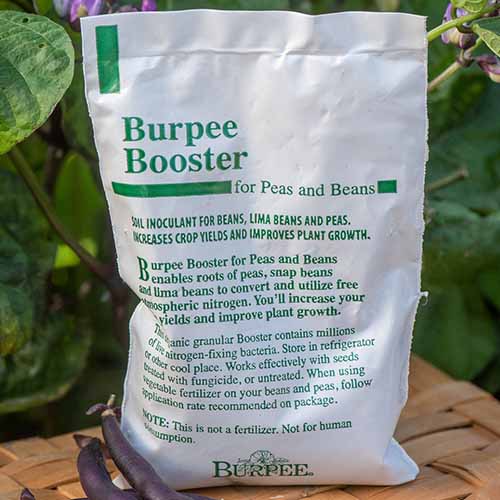
You’ll also want to inoculate your seed with the beneficial bacteria that helps legumes like snow peas to form root nodules that extract nitrogen from the air, and convert it to ammonia that provides the plants with nutrition.
There are inoculants that you can apply directly to the seeds with some water shortly before planting.
I find it simpler to use the type you sprinkle along the furrow before sowing, like Burpee Pea and Bean Booster, which is available direct from Burpee.
Take a look at this guide for more extensive information about using soil inoculants in the home garden.
I’d also recommend soaking the seeds in a glass of tap water overnight or for eight hours before you inoculate them.
That will speed up germination, which is important, since the seeds can rot before they sprout if the soil gets too wet.
Once you’ve laid the groundwork, four to six weeks before your average last frost date, sow seeds two inches apart and an inch deep. If you are planting a bush variety, follow the spacing recommendations on your seed packet.
Dig furrows about four inches away from the trellis, fence, or other supports, and space rows 18 to 24 inches apart so you have space to walk between them.
When you’re sowing in a raised bed, you can skip the spacing between rows, as long as you can easily reach the growing area to weed and harvest.
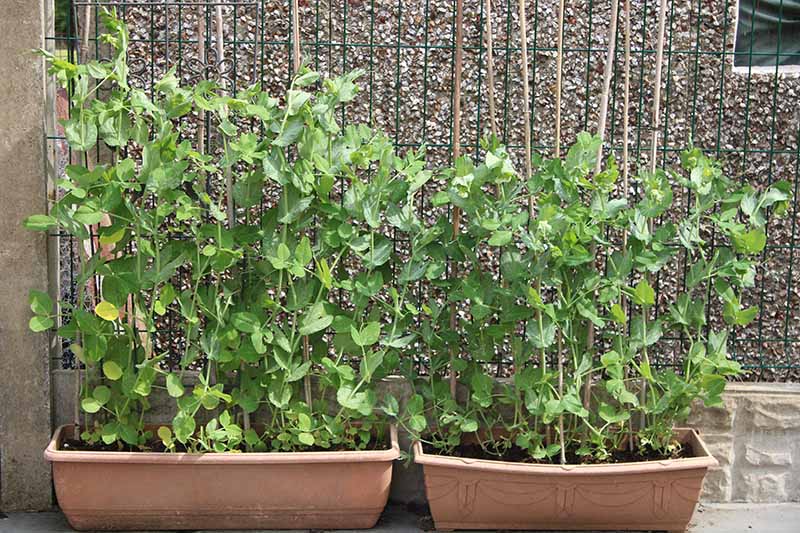
When you’re planting a container, just three or four seeds per 12-inch pot will do the trick. Be sure to choose a pot with drainage holes, made from a material that will help retain water, like plastic, vinyl, or metal – not uncoated clay.
I can tell you from experience it’s important to firm the soil over the top of the seeds. I literally step on the rows after I plant them.
Pea seeds have an annoying habit of rising to the soil surface after the first spring rain, and assertively compacting the soil on top of them will usually prevent that.
If the seeds do come out of their holes, poke them back into place and firm the soil on top of them again.
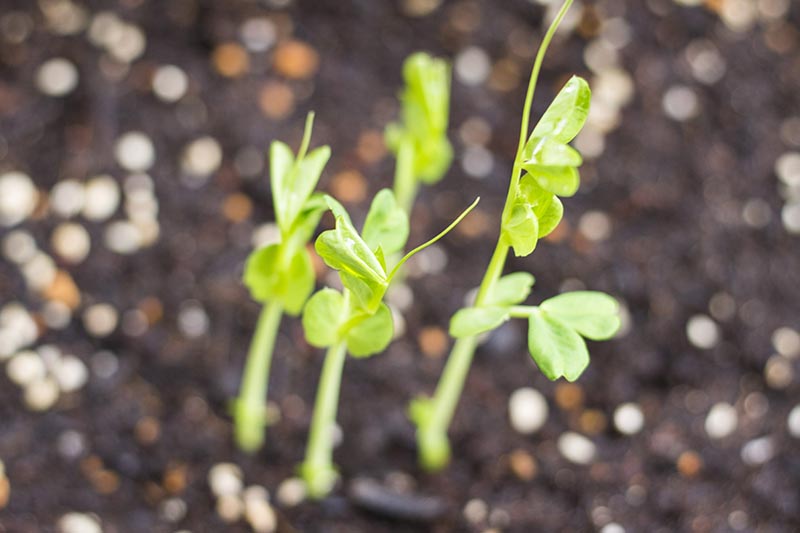
They should germinate in five to 10 days, but the process can take longer if the soil temperature is below 60°F.
You may need to replant if only a few seeds sprout, but don’t fret too much if you do. The newbies will soon catch up with your original planting as the soil starts to warm up.
If you know your family will eat a lot of snow peas, you may want to succession plant by sowing more seeds in a second location two weeks later, and every two weeks to follow until they won’t have time to produce a harvest ahead of the temperature becoming too hot for peas.
Plan to sow a second crop in autumn if you like, too. But keep in mind, the plants will grow a little more slowly as the temperatures start to plummet at that time of year.
Be sure to add a couple of weeks to the number of days it will take your snow peas to mature, based on the seed packet information.
Opt for the fastest-growing variety you can find and choose one that’s resistant to downy mildew when you’re planning a fall crop, since it’s a bigger threat at that time of year.
How to Grow
Once snow peas have germinated, most of the hands-on gardening work is over until harvest begins. Here are the limited chores you should complete for the healthiest crop and the highest yields:
Trellising
Supports are important for keeping snow peas off the ground where certain pests and rot can’t reach them.
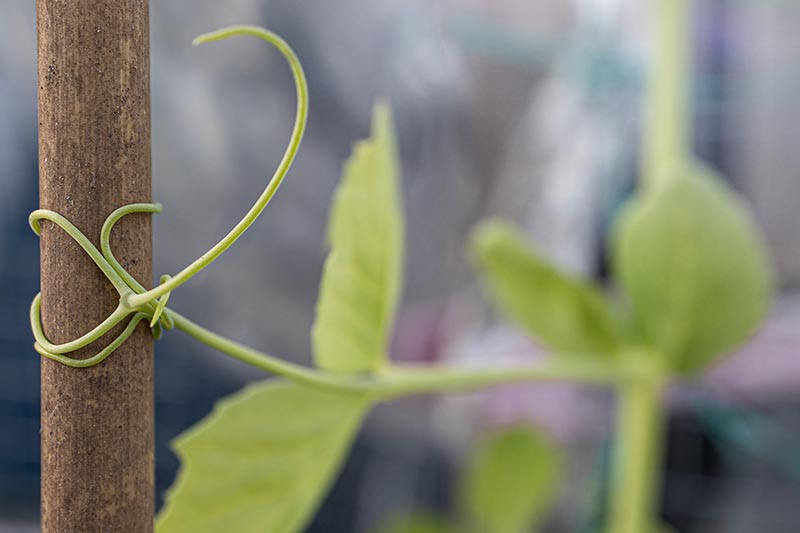
For the vining types that grow as tall as six feet, trellis netting or chicken wire suspended from poles will also help the plants grow towards the sun, and keep them from falling over when they’re laden with pods.
I’ve used tomato cages to support a circle of three or four plants, in a pinch.
Gardener’s Supply Company offers a particularly handy option, an expandable pea trellis that stands 37 inches tall and can expand to 116 inches – that’s almost 10 feet!
It’s made of weather-resistant, powder-coated steel and designed to zig-zag between rows of peas spaced about six inches apart.
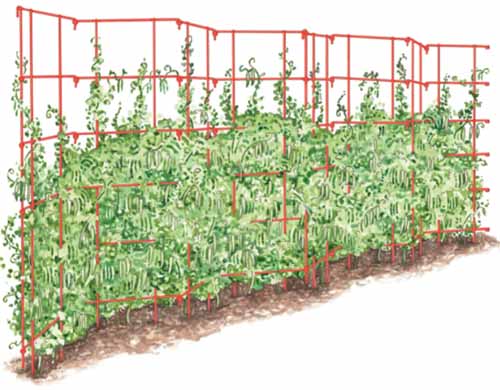
You can readily remove it at season’s end, and it folds to be reused for several more years.
The expandable pea trellis is available in red, green, or blue from Gardener’s Supply Company.
Watering
All P. sativum varieties need ample water to produce tasty pods or seeds, but they’re also susceptible to root and seed rot from overly wet soil.
The solution is sowing in well-draining soil, and also giving the seedlings supplemental water any week when they don’t receive an inch already via rainfall. A rain gauge can help with this.
To learn more about using soil moisture meters to determine when the plants need water, consult our guide.
Be sure to water at the soil line, not from overhead, to minimize the risk of disease.
And when you’re growing this crop in containers, be extra vigilant to provide supplemental water, adding it to the container until you see the water running out of the drainage holes.
Mulching
To help retain moisture and suppress weeds, apply a two-inch layer of mulch around the seedlings when they’re a couple of inches tall.
Make sure to use natural materials that haven’t been treated with fungicide or herbicide, like grass clippings, shredded leaves, or pine straw.
Thinning
There’s a mild discrepancy in experienced gardeners’ views of thinning peas, but I fall into the camp that says “no thinning.”
There’s some benefit to taking out shorter vines or thinning bush varieties so the remaining snow peas stand three to six inches away from each other.
This can allow a bit more air circulation, but I maintain that the bigger threat is accidentally uprooting the plants while you’re trying to make the spacing perfect.
If more compact varieties seem to be growing too close for comfort and you decide to thin, only cut them at the soil line, and use scissors. Unless they’re diseased, leave the roots in the soil until the end of the season.
When you try to pull extra seedlings up using your hands or a hoe, the whole group might come out of the soil together, and there’s no way to put them back.
When you’re growing pole varieties, thinning is unnecessary. They expand aerially, not from side to side.
Weeding
Snow peas have shallow roots that make it tough for them to compete with weeds for water or nutrients.
Keep the area well weeded, especially in dry weather. Use your hands instead of a hoe to avoid accidentally uprooting the plants with the undesirable competitors.
Plants Not Producing Pods?
If your plants are affected by lack of water or light or poor soil fertility, or if they are affected by disease, they may not produce pods. We have a troubleshooting guide to help you figure out what the issue(s) may be.
Growing Tips
- Place trellises and other supports for pole varieties ahead of sowing the seeds.
- Plant in full sun or part shade.
- To retain moisture, mulch young plants with a couple inches of grass clippings, pine straw, or shredded leaves.
- Weed beds by hand so you don’t disturb their shallow root systems.
Cultivars to Select
If you’re mostly familiar with snow peas from take-out Chinese food, it’s a pleasant surprise to find out how much variety this type offers for the home gardener.
The range includes pods that are far larger and a bit smaller than average, along with flowers and pods in different colors.
Here are a few of my favorite cultivars:
Golden Sweet
I grew this tender yellow Indian heirloom for the first time a couple of seasons ago, and it has quickly become one of my go-to’s.
The light yellow pods are so attractive on a plate or in the garden, and so are the bicolor, mauve-purple, edible blossoms.
The plants take 65 days from sowing to produce a crop.
The pods are at their tender best when harvested at three inches long. They become tough and may form strings if you let them get any older before you pick them.
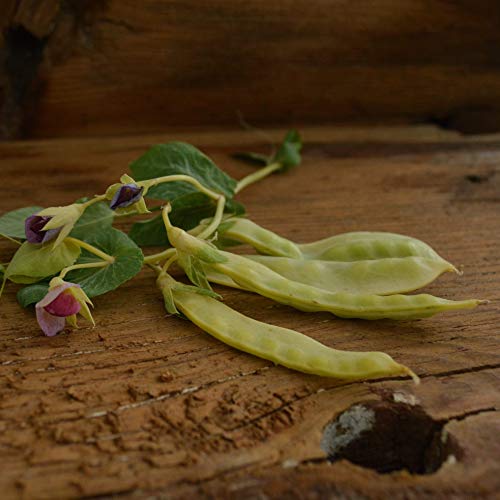
I haven’t tried this yet, but you can also forgo the edible pods and grow this variety until they plump up and the mottled buff and magenta seeds inside dry, and then store them to cook.
This space-saving vining variety grows six feet tall and needs support.
‘Golden Sweet’ is available in 50-seed packets from Thresh Seed Co. via Amazon.
Little Snowpea Purple
While it may still require a short trellis, this variety is ideal for containers since it grows two feet tall, tops.
The pods are green, extra crunchy, and very flavorful. Some do have strings on the seams.
They’re easily removed, but if you’re planning to cook big batches of the produce you grow in the garden, you might want to opt for a stringless variety instead.
The pods are preceded by beautiful, edible, purple blooms, hence the cultivar name.
This type also grows relatively quickly, producing in 50 in 54 days.
Mammoth Melting
Even if it didn’t taste great and produce huge yields, I would appreciate this variety based on the evocative name alone. Doesn’t it sound like a horror movie, or an extra-large ice cream concoction?
This cultivar does produce mammoth pods that are four or five inches long and stringless. They grow on six-foot vines that require trellising.
‘Mammoth Melting’ matures fairly slowly, taking 60 to 90 days from sowing to produce a harvest.
If you live where spring quickly turns to hot summer, this isn’t a good choice.
But for gardeners with short summers and long, cool springs, ‘Mammoth Melting’ will deliver pounds of vegetables to sample from the vine, steam, or stir fry.
‘Mammoth Melting’ seeds are available from Eden Brothers in one-ounce packets.
Oregon Sugar Pod II
This disease-resistant variety grows on short vines that reach only 28 inches long at maturity.
It takes 60 days from sowing to start yielding a bonanza of four-inch pods, two per cluster.
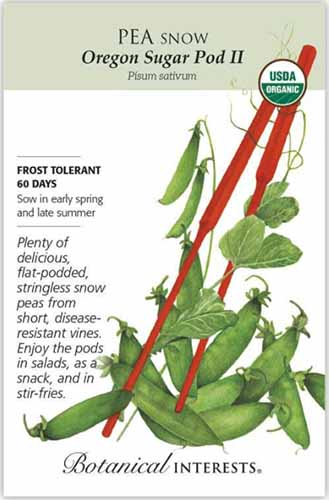
If you’ve had trouble with powdery mildew, this variety developed in the Pacific Northwest could be the solution. It also resists pea enation mosaic virus and leaf roll.
‘Oregon Sugar Pod II’ is available in 36-seed organic packets or 60-seed conventional packets from Botanical Interests.
Find more tips on growing this variety here.
Snow Max
This variety produces an abundance of semi-stringless, three-and-a-half-inch green pods on bush plants.
‘Snow Max’ is a great choice if you’re unable or unwilling to cope with trellising, though you should be prepared for the plants to grow four feet tall and three feet wide, and space accordingly.
A later entry into the snow pea category, ‘Snow Max’ was bred to resist downy and powdery mildew. It matures about 70 days after sowing.
Find ‘Snow Max’ in 2,000-seed packets from Burpee.
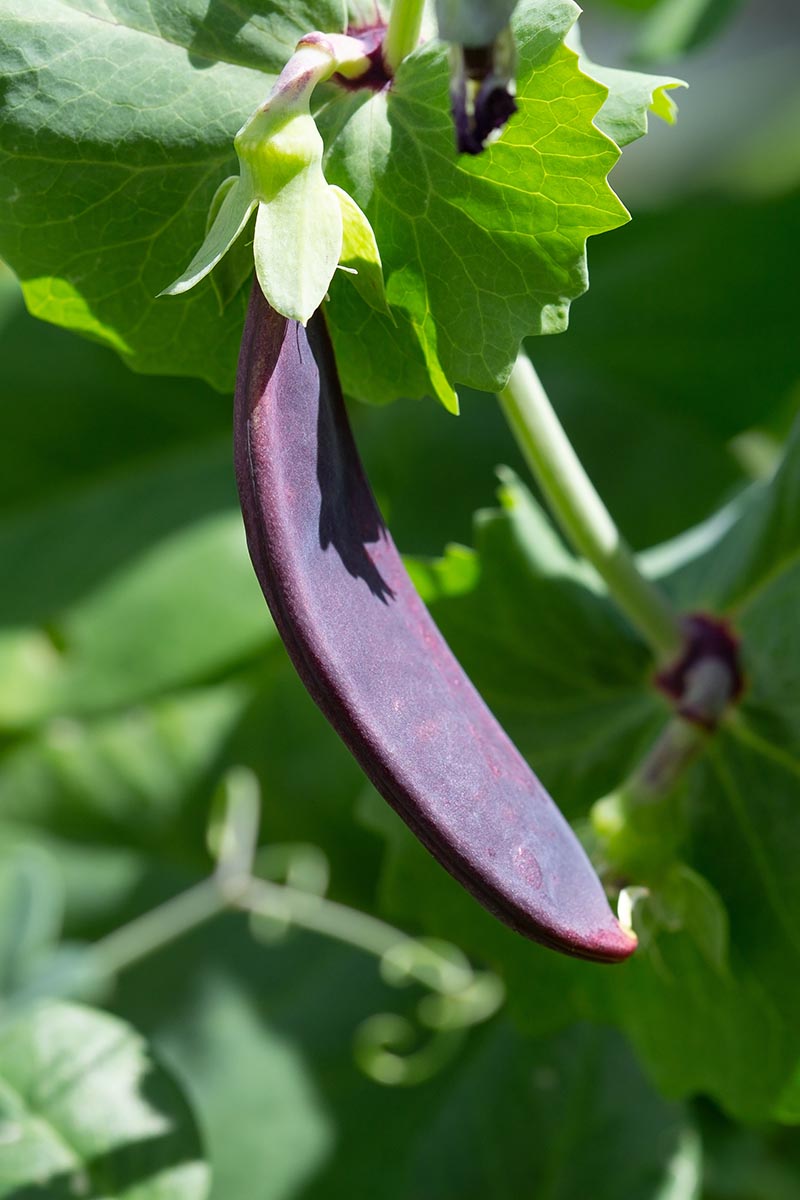
Snow Royal
Are you into edible landscaping? With their pink blooms and purple pods, 30-inch ‘Snow Royal’ vines look pretty in patio containers or grown in flower borders. They’re attractive in vegetable gardens, too.
This variety produces masses of three-inch pods ready for harvest in about 60 days.
Lightly steamed, the pods will retain their purple hue, but they turn mustard-brown and sad-looking if you cook them too long.
So plan to shred them into slaws or use them in quick stir-fries, instead of in dishes that require stewing or boiling.
‘Snow Royal’ is available in 100-seed packets from Savoir via Amazon.
Managing Pests and Disease
Snow peas are prone to a handful of diseases and a bevy of pests find them irresistible.
Happily, most of the damage done is cosmetic, and you can prevent many issues by selecting disease-resistant varieties, and keeping the plants healthy so they’re less susceptible to potential damage.
Here’s what to watch for:
Pests
Humans aren’t the only ones drawn to snacking on fresh snow pea pods in the garden. Numerous mammals and insect pests also consume or otherwise attack snow peas, like these:
Herbivores
Deer, mice and other rodents, and rabbits all love a pea seedling salad bar. If they discover the plants after they’ve begun bearing fruit, the pods are fair game, too.
Placing row covers on the seedlings as soon as they germinate can prevent herbivores from devastating your crop from the start. A buried barrier may stave off voles.
There are other deterrents for rabbits. Read about those in our guide.
You may be able to thwart deer with a fence. We share instructions in this guide.
Here are the some of the bugs that are most likely to attack snow peas:
Aphids
Aphids (Aphis spp. and Macrosiphum euphorbiae) are a bit icky. They look like squirming, live larvae and are about 1/16 to 1/8 of an inch long. Typically green, you may also spot aphids that are yellow, pink, brown, or black.
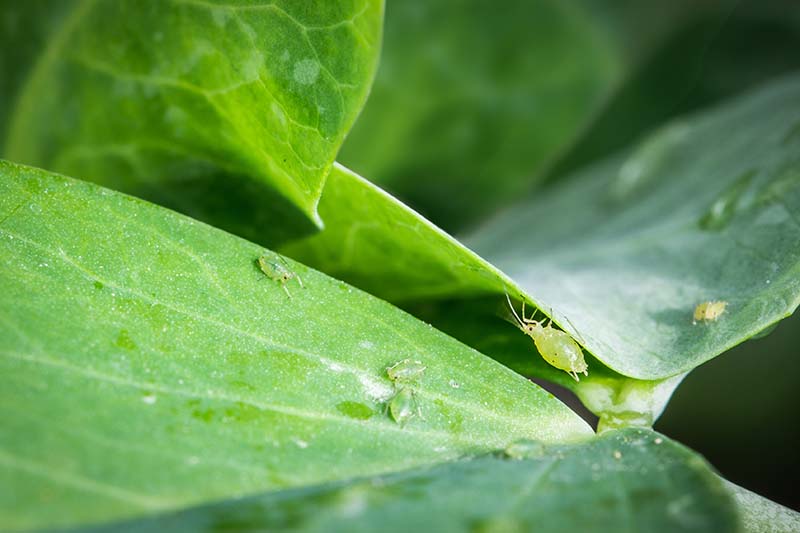
They are sap-suckers and happy to feed on most any type of legume’s foliage. This will slow the plants’ growth and delay pod production.
Aphids are a bigger issue in the early spring than they are at other times of year. Once the weather gets a little warmer, their natural predators will usually take care of them for you.
In the meantime, though, if you spot them, wash them off with spray from the hose.
If there are more than a few, insecticidal soap may be the way to go.
Read more about controlling aphid infestations here.
Bean Leaf Beetles
These little dudes are actually kind of cute, resembling ladybugs with their yellow-brown bodies and three black spots on each wing.
The adults and larvae both eat the undersides of leaves, though. It looks bad but doesn’t do much harm to the plants unless your garden is filled with huge numbers of bean leaf beetles.
If you end up with a lot of adults, they’ll also chew the stems and eat the pods.
To deal with these beetles, handpick the adults and either squash them (gross, I know) or place them in a sealed plastic bag for disposal.
Also get rid of the bright yellow egg masses on the underside of the leaves by wiping them off with a damp paper towel or cotton ball. And be sure to remove any damaged foliage and destroy it.
To prevent an infestation, be sure to rotate your garden crops so you’re not growing peas or other legumes in one spot more often than every three years.
Leaf Miners
The term “leaf miner” describes immature insects that burrow beneath the surface of leaves, causing those distinctive light lines that look like maps drawn by a child.
They mostly just destroy foliage, so plan to remove affected leaves.
Read more about identifying, treating, and preventing leaf miners in our guide.
Pea Moths
This pest can impact your dreams of a bumper crop, since it affects the edible portion of the pea plant.
Pea moths, Cydia nigricana, are nondescript grayish-brown moths with a wingspan of just 15 millimeters. They lay eggs that hatch into tiny yellowish-white larvae that feed on the pods.
If they lay siege to your Chinese pea pods, the best tactic is just to pick the larvae off the plants. Then cut and destroy any damaged pods. It’s not fun, but it’s effective.
Slugs and Snails
These gastropods are active at night, and you’ll know they’ve visited if you spot a slimy trail across the leaves.
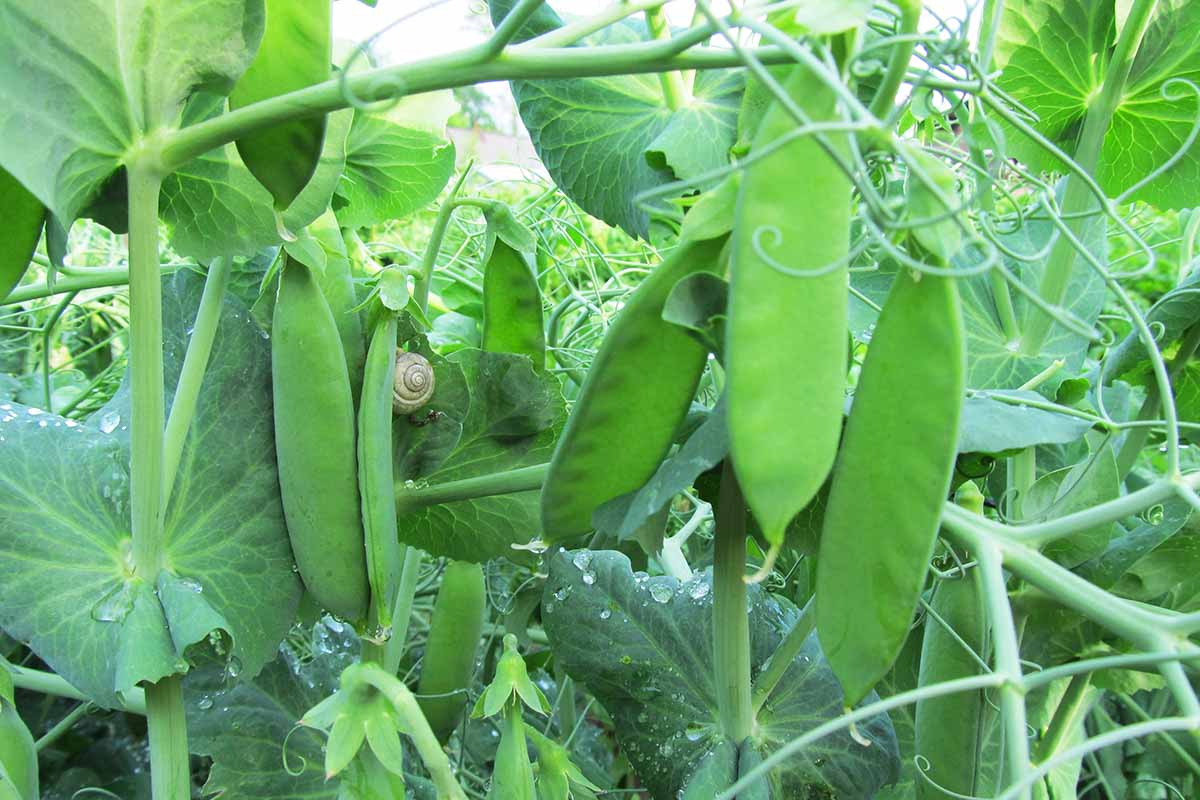
They’ll eat huge holes into the leaves, which can slow the growth of the plant.
There are numerous ways to combat slugs. I recommend a mix-and-match approach involving hand-picking and diatomaceous earth.
Learn more techniques for coping with slugs in the home garden in our guide.
Diseases
I’m glad to report there are many varieties of snow peas that have been bred to resist the most prevalent diseases. So the main way to prevent disease is right at your fingertips: Buy seeds for resistant varieties.
You can also deter disease by avoiding overhead watering, being careful not to replant peas where you’ve grown legumes in the previous couple of seasons, and removing and destroying any affected plant materials.
These are the main diseases you might have to cope with:
Damping Off
Rhizoctonia or Fusarium fungal species and Pythium water molds live in the soil and cause damping off.
This disease attacks new seedlings and very young plants at the roots, and will usually kill them quite quickly.
Read more about damping off and how to treat and prevent it here.
Fusarium Wilt
Especially if you’re planting in a garden where you’ve grown vegetables in years past, beware of fusarium wilt, caused by the fungus Fusarium culmorum. It can stunt larger vines, and kill younger plants outright.
Worse yet, it lives in the soil for years and years.
You can tell fusarium wilt is at work if the lower leaves on plants become yellow, wither, and then turn brown and dry.
The fungi are waterborne, so the wilt is most likely to occur after days of rain or in wet conditions due to other causes.
Preventing fusarium wilt on snow pea plants entails conscientious crop rotation. Also, use only clean trellises, stakes, and containers to keep fungus from seasons past from affecting this year’s plants.
Pea Enation Mosaic Virus
The pea enation mosaic virus (PEMV), from the family Luteoviridae, creates clear flecks along leaf veins, along with tiny growths that look like blisters.
The damage is unattractive, and will also stunt the plants’ growth and produce gnarled pods.
Aphids transmit this virus, so eliminating them goes a long way to preventing infection.
If you’re already seeing those clear windows of damage along leaf veins, and the little bubbles that accompany them, be sure to remove entire damaged plants from the garden and destroy them before they can infect others.
Powdery Mildew
Powdery mildew can be caused by any one of hundreds of species of fungi. All of them will leave floury white spots that appear on the tops and undersides of the leaves and the stems.
Left unchecked, powdery mildew spreads quite quickly. The pods also take a hit in the form of brownish spots.
Your whole crop will dwindle, with infected plants producing fewer pods, and pods with little flavor.
To prevent powdery mildew, make sure to rotate peas and all other legume crops with vegetables from a different plant family.
Also make sure to space the plants according to the advice on your seed packet so they’ll receive enough air circulation.
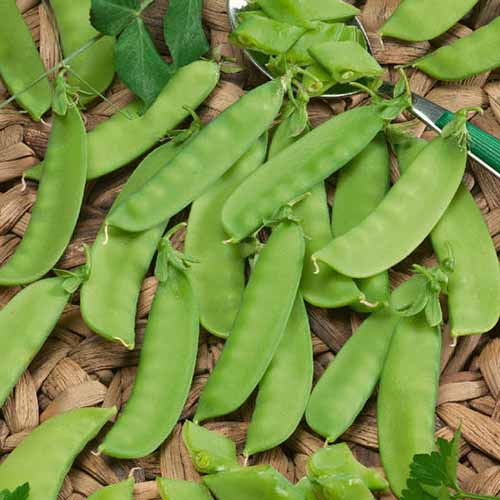
Harvesting and Storage
Unless you’ve treated them with some sort of chemical, all parts of the snow pea plant are edible.
I’ve never sampled the roots, but I can vouch for the other harvests, from blooms to shoots to full-size pods.
Here’s how to handle each of those for peak flavor and to improve the plants’ vigor where possible:
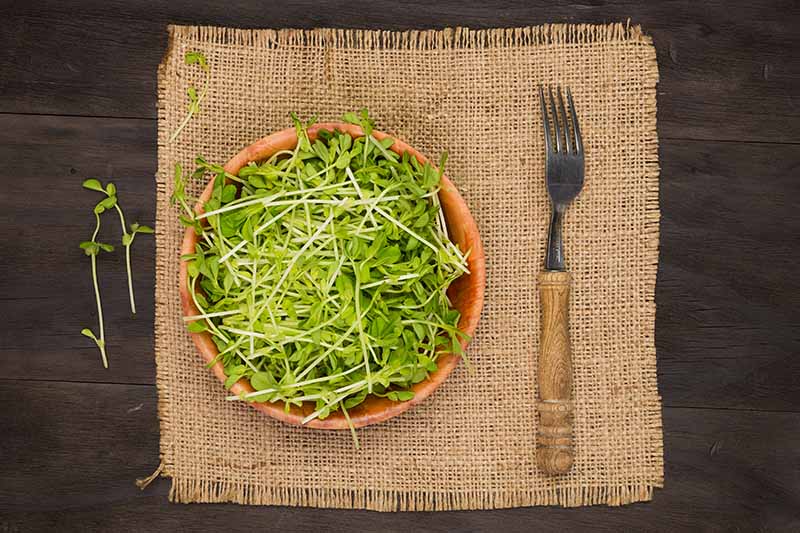
Shoots
The shoots include the top couple of inches of young stems and leaves on a snow pea plant.
They taste sweet and vegetal, a bit like peas from shelling types of P. sativum.
As I mentioned earlier, you can grow extra plants solely for the shoot harvest. But if you want to pick shoots and pods from the same plants, wait until the seedlings are about 10 inches tall to harvest the shoots.
This may take anywhere from a few weeks to 40 days, depending on the growing conditions and the variety.
Harvesting shoots may encourage the remaining plant to branch further and eventually produce more pods than it would otherwise.
But don’t overdo it. One or two cuts from the same seedling may help branch formation, but after that you’ll need to leave the plants alone.
They need time to grow taller and produce blooms before the weather gets too hot, or before hard freezes arrive if you’re harvesting shoots in autumn.
Picking shoots is easy.
Early in the morning, after the dew has dried but before the sun is beating down on the vulnerable plants, pinch a two- or three-inch shoot from a stem, making sure the plant still has at least two sets of true leaves left to continue growing.
Repeat until you have enough shoots for that day.
You can eat these bits out of hand, toss them in salads, or add them to stir fries. You’ll want to eat them as close to harvest as possible.
If you need to store them, wrap them in a clean, dry tea towel or paper towel and slip them into an open plastic zipper bag. They’ll stay fresh for just a couple of days, so make sure to use them as soon as you can.
Learn more about growing and harvesting pea shoots here.
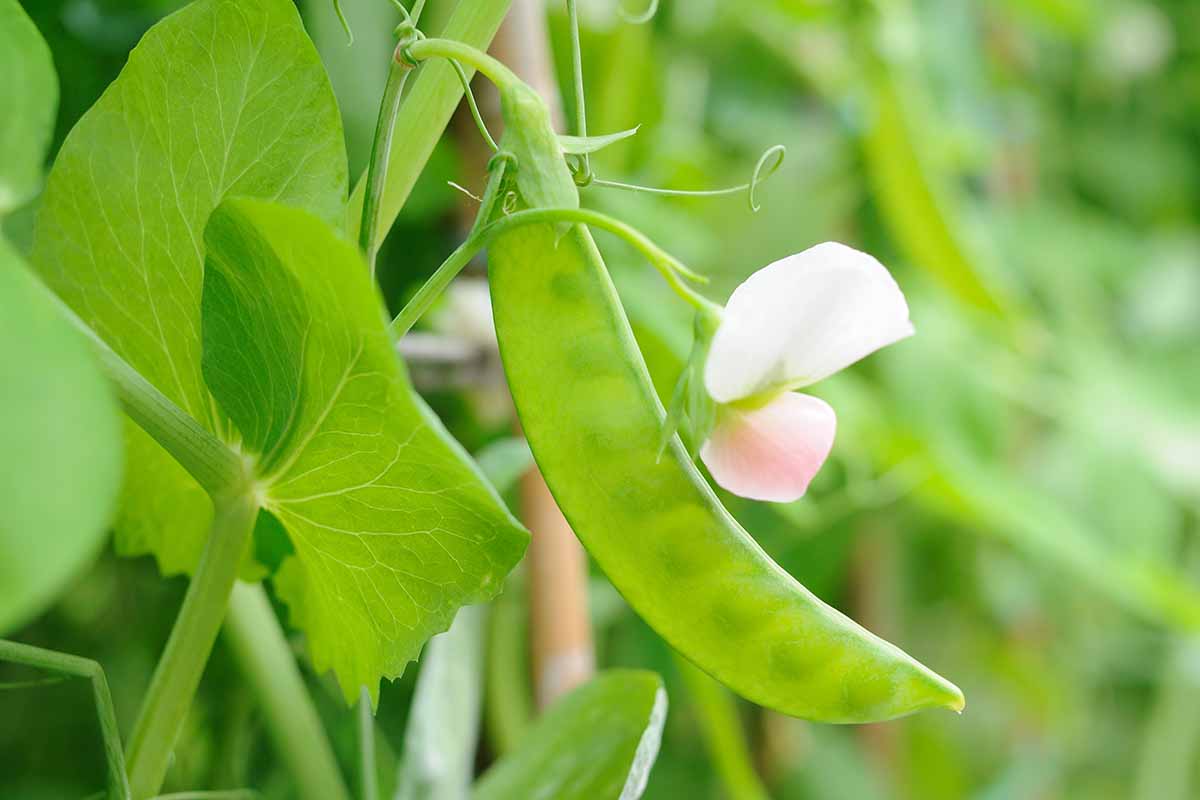
Edible Flowers
Flowers from the ornamental, common sweet pea, Lathyrus odoratus, are mildly toxic and humans and pets should not ingest them. But snow pea flowers, on the other hand, are not just edible but beautiful as well.
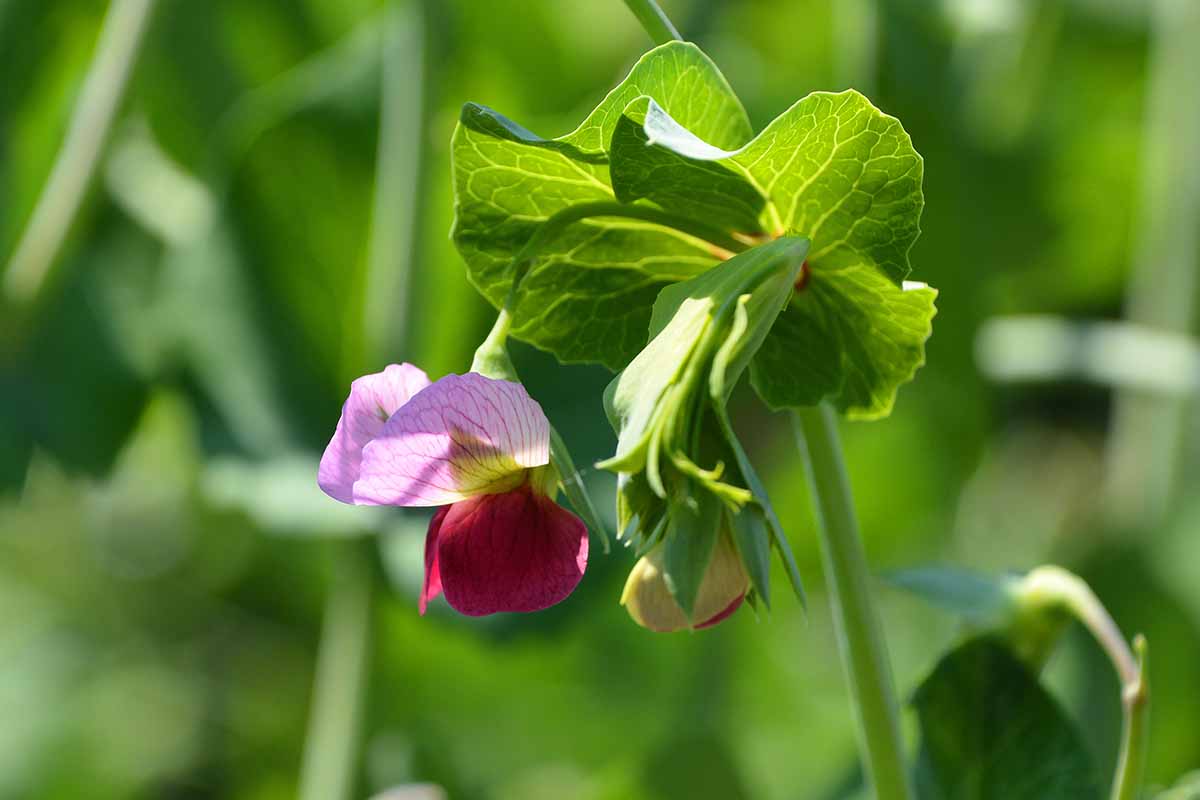
Depending on the variety, they may be pink, mauve, purple, or white, and both the colorful and the white ones are quite tasty – just a little sweet, with a soft, slightly crunchy texture.
Of course, when you harvest pea blooms to sprinkle on salads, use as a garnish, or eat while you stroll through the garden, you take away their potential to form pods.
When you’ve got loads of blooms, you may be willing to make that sacrifice.
To harvest the flowers, use your fingers or scissors to pinch them off in the late morning, just as you would with shoots.
Blooms usually form at stem junctions. When there are two at one junction, which is common, try to pluck just one. The remaining bloom will likely form a bigger pod when it does develop.
A handful of the blossoms make a beautiful garnish for cakes or spring soups, like cream of asparagus.
If you’re disciplined enough to pick them now and use them later instead of gobbling them before you get back to the house, stash them wrapped in a paper towel in an open zip-top bag in the fridge for a day or two.
When they absolutely must be washed before consuming, make sure to let them dry thoroughly before using them as a decoration or garnish.
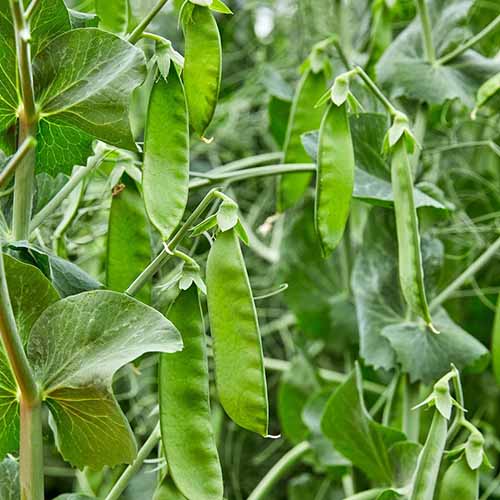
Pods
You’ll probably get the idea to eat full-size snow pea pods straight from the vine without any prompting from me.
But I will encourage you to keep a clean pair of scissors ready for the task. When you use your hands to tug pods from the vines, you risk uprooting the whole plant.
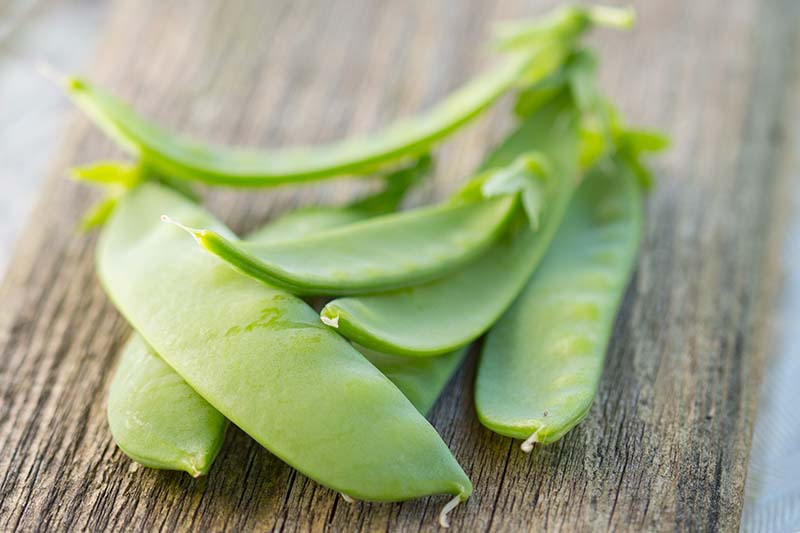
Instead, just snip each pod individually, right where it meets the stem. If two pods are growing from the same junction, cut them together.
As critical as it is to snip the pods with scissors, it’s even more important to time your snow pea harvest properly.
You’ll want to pick them just as they reach their optimal size. Once the pods get too big, they’ll become tough. Also, having overgrown pods on board makes plants stop blooming, essentially halting the harvest.
Consult your seed packet to see how many days your variety takes to mature. Start checking for flowers a couple of weeks ahead of that date, and keep checking once every couple of days thereafter until you see the pods.
It’s helpful to note all of these potential dates on your calendar or in your gardening journal. It’s so dismaying to bear with pea plants for 50 to 70 days only to miss the optimal harvest window, so that extra effort is well worth the time it takes.
Also, make yourself familiar with the mature size for whatever type you’re growing. If that’s ’Sweet Golden,’ for example, you’ll want to start picking once the pods are three inches long.
For ‘Mammoth Melting,’ you’ll be watching for the pods to reach four or five inches.
The pods for this variety of pea should be flat at harvest time. If they start bulging with seeds or the surfaces become hard or dull, they won’t taste good.
If you quickly notice they’re overgrown, you can clip and compost the pods, and hope the plant will produce new, tender, sweet ones.
Once you’ve harvested the first viable pods, keep picking and the plants will keep growing new pods up until the weather gets too hot.
Check for new snow peas daily, or as often as you can.
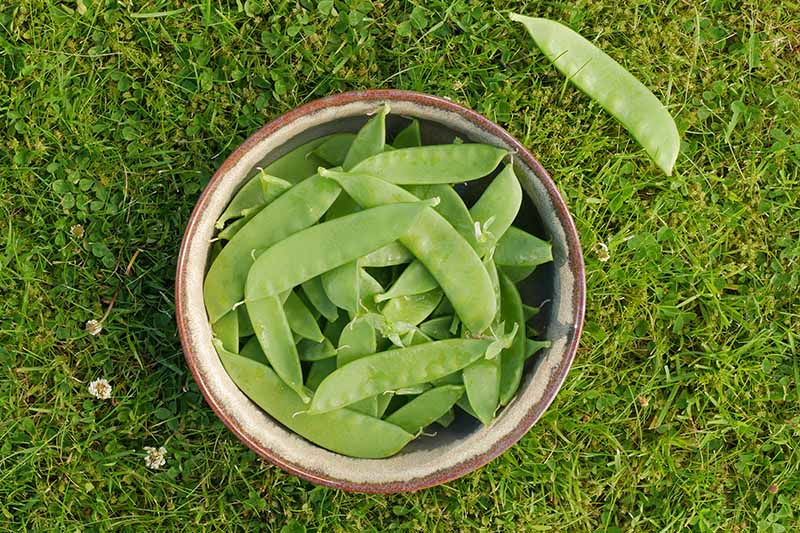
Any that you pick before you’re able to eat or cook them can be stored in the fridge in an airtight container for up to five days.
Wash them and spin them dry only right before you use them, though, since too much moisture during storage can make them start rotting more quickly.
You can also freeze them. Directions for that are coming right up.
Preserving
Freezing is the only viable way to preserve this veggie, and I’m not going to pretend it will ever match the flavor and texture of snow peas you pick fresh from the garden and serve within the hour.
The frozen version does compare quite favorably with other frozen vegetables, however, and it’s a great way to extend your food budget and expand your stash of quick-prep veggies for healthy weeknight meals.
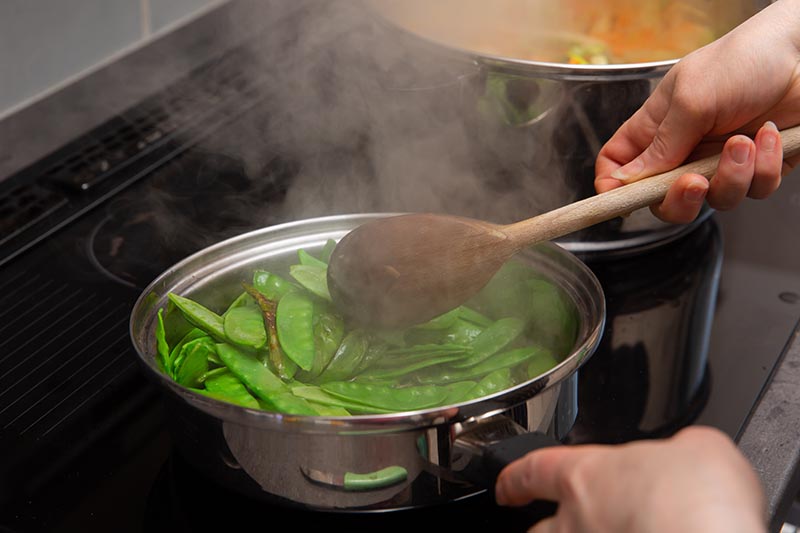
Start by washing them in cold water, stringing the pods as needed, and trimming the ends.
Then blanch them, first boiling them in a large pot of salted water for two minutes, then plunging them into an ice water bath, then draining them and allowing them to dry on a clean tea towel.
Divide them into portions you’re most likely to use, and place them in freezer bags, small freezer-safe canning jars, or airtight containers to freeze.
You can use the frozen pods for up to nine months after freezing.
You can also freeze Chinese pea pods as part of a stir fry.
It’s best to undercook the stir fry by a couple of minutes. The firm veggies will maintain their texture after freezing better than those that have been cooked until they’re soft.
Also, freeze and defrost any sauce separately. Add it just before serving, after you reheat the thawed stir fry with a bit of oil in a frying pan over medium heat.
Recipes and Cooking Ideas
Unlike soft, plump English peas, Chinese pea pods are not suitable for use in stews, soups, or trendy pea pesto recipes, though you could use the shoots for this final preparation.
But that still leaves plenty of options!
Stir fry is the most obvious, since flat, crunchy pea pods add crisp flavor and a vibrant color to any number of Asian-style vegetable dishes cooked quickly in a wok or heavy frying pan.
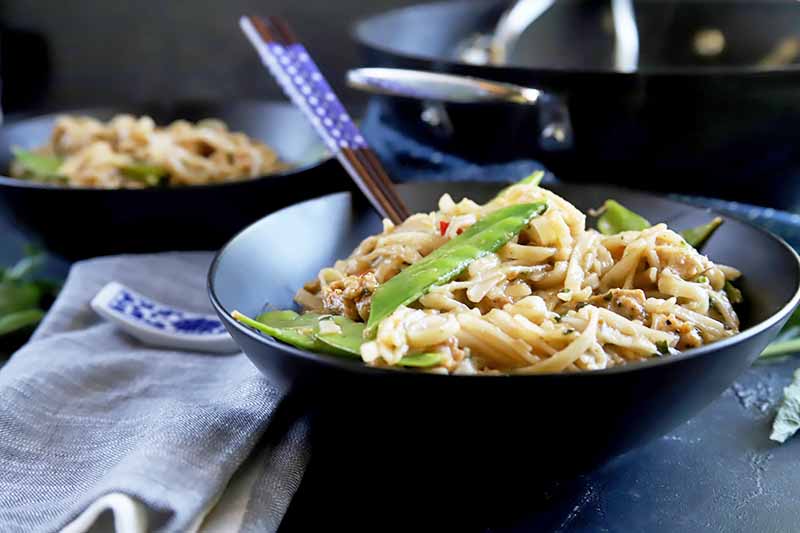
Homemade chicken chow mein is only 15 minutes away when you follow the recipe from our sister site, Foodal, for example.
The ingredient list includes snow peas, orange juice, chicken sausage, and hoisin sauce, and the results taste better and fresher than most takeout and all similar frozen entrees.
With a substantial harvest of Chinese pea pods on hand, you’ll be able to experiment with various cooking methods, too.
You may want to learn to grill snow peas, for example, and this recipe from Foodal recipe for grilled veggie and soba noodle salad provides instructions.
Don’t forget the simple pleasure of a bowl of steamed pods, or chilled, raw Chinese pea pods dunked in hummus or creamy dip.
This recipe for creamy roasted red pepper dip from Foodal pairs nicely with the crunchy vegetables, and the rosy color complements the fresh green of the pods.
Snow peas also work well slivered and tossed in Asian-style chopped salads or noodle bowls.
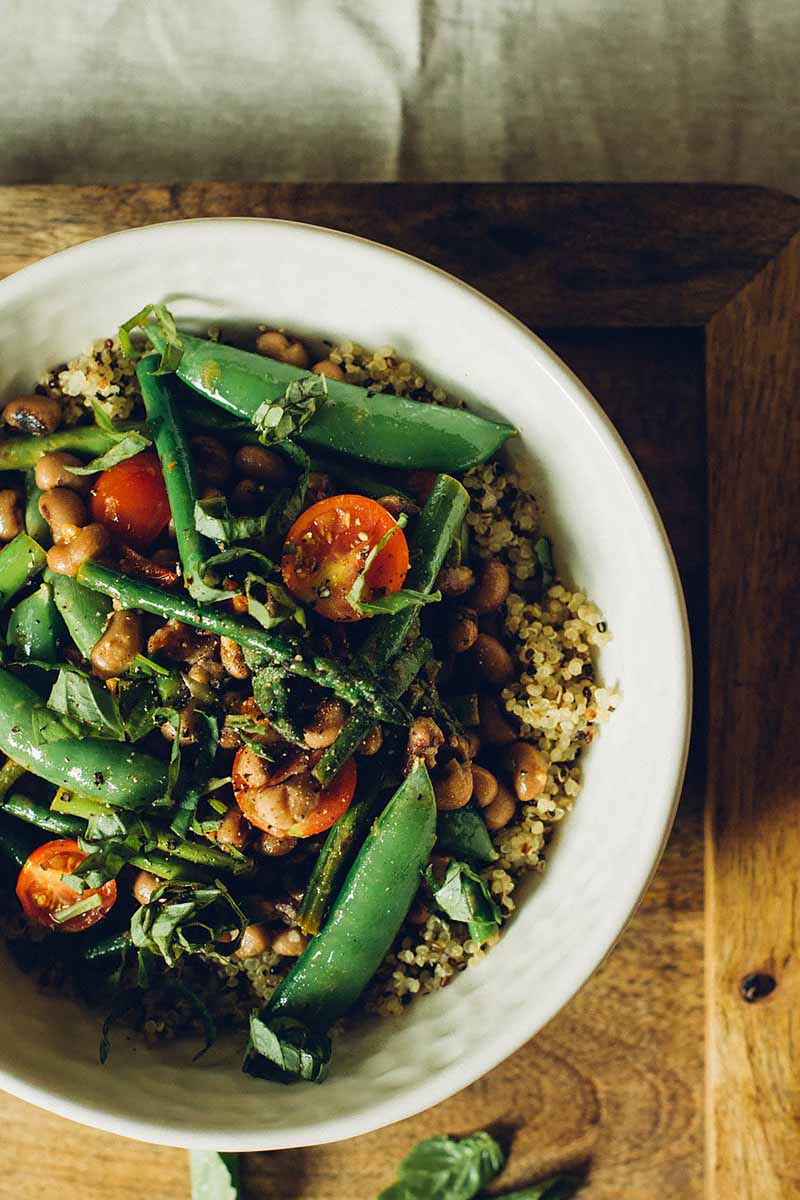
Asparagus and snow pea salad with black-eyed peas provides an excellent option to use the garden-fresh legumes as a foil for fresh basil, sherry, and cherry tomatoes. Get the recipe on Foodal.
Quick Reference Growing Guide
| Plant Type: | Annual vegetable | Tolerance: | Frost, part shade |
| Native to: | Europe, North Africa, and Western Asia | Soil Type: | Fertile soil rich in organic matter |
| Hardiness (USDA Zone): | 3-11 | Soil pH: | 6.0-6.8 |
| Season: | Spring and fall | Soil Drainage: | Well-draining |
| Exposure: | Full sun | Attracts: | Bees and other pollinators |
| Time to Maturity: | 50-90 days | Companion Planting: | Alyssum, carrot, lettuce, mint, radish, spinach, thyme, turnip |
| Spacing: | 2-3 inches (plants); 2-3 feet (rows) | Avoid Planting With: | Alliums |
| Planting Depth: | 1 inch | Order: | Fabales |
| Height: | 18-30 inches (bush), 2-7 feet (vines) | Family: | Fabaceae |
| Spread: | 2-8 inches | Genus: | Pisum |
| Water Needs: | Moderate | Species: | Sativum |
| Maintenance: | Low | Variety: | Macrocarpum |
| Common Pests: | Aphids, bean leaf beetles, deer, flea beetles, pea moths, rabbits and other herbivores, slugs | Common Diseases: | Damping off, fusarium wilt, pea enation mosaic virus, pea leaf roll virus, powdery mildew, root rot |
Frosty’s Favorite Homegrown Vegetable?
I’ve had the pleasure of introducing at least a dozen young vegetable-haters to the joys of nibbling on snow peas fresh from the vine.
One teenager from our friend-family did carefully extricate the small peas from the pods and refused the pods the first couple of times, but he pronounced them tasty!
And some 10 years later, he’s come around and now eats them with abandon like the rest of us.
Do you have any success stories with growing this cool-weather crop, or questions that we can help with? Be sure to share your input in the comments section below.
And if you found this guide useful, learn more about growing peas starting with these guides:


I have never succeeded in growing snow peas eventhough people tell me it is easy to grow them. As soon as they start growing they are affected by diseases.
Hello Lizzy Eapen. I am so sorry to hear that about your snow peas. I wonder if your plants are failing because there is a fungus or bacteria that live in your soil. It’s possible for a number of them to survive the winter and infect the next year’s plants, and some of the insects that spread disease can also overwinter in weeds or other debris in the garden. It might be worth trying to grow just a few in a container for one year, to see how they do. Also, it could help to rotate where you grow snow… Read more »
Nowhere can I find just how low a temp snow peas can tolerate. It’s getting down to the mid 20s and the plants are about 6 inches tall.
Snow peas can withstand light frosts, but they’re likely to be killed back by heavy freezes like you’ve described. Flowers are particularly vulnerable to the cold, but you may be able to save the plants at this early stage of development with row covers and other forms of protection to keep the soil warm.