
Brassica oleracea var. acephala
Delicious and nutritious with textured and colorful leaves, kale is an easily cultivated vegetable that thrives in the cooler temperatures of spring and fall.
It can grow well in summer too, but will need a little shade during the hottest part of the afternoon.
A powerhouse for healthy eating, kale is a member of the Brassicaceae or mustard family and has earned its “superfood” status from its high levels of antioxidants, fiber, minerals, and vitamins while being low in calories.

We link to vendors to help you find relevant products. If you buy from one of our links, we may earn a commission.
Highly versatile in the kitchen, baby leaves have a mildly sweet, lightly peppery flavor with earthy or grassy undertones that are popular in salads, sandwiches, smoothies, and wraps, and some of the colorful varieties make gorgeous garnishes!
Are you ready to add some healthy and easy-care greens to your garden this year? Then it’s time to get into the fun and easy steps of how to grow kale!
Here’s a look at what’s ahead:
What You’ll Learn
Kale is a biennial that produces stems and foliage in its first year then flowers and sets seed in its second growing season.
A close cousin to brussels sprouts, cabbage, collard greens, and mustard, the variety name acephala is Latin for “without a head,” in reference to the loose-leaf growth habit.

The leaves are borne in whorls on sturdy stalks up to 36 inches tall, depending on the variety.
One of the hardiest members of the Brassica genus, B. oleracea var. acephala is suitable for cultivation in USDA Zones 6 to 10, with variations depending on the type.
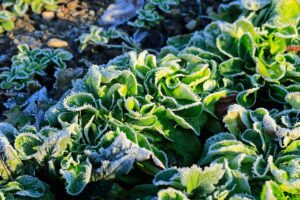
The flavors actually improve with a touch of frost – cold stress causes some of the starches to convert into sugars, giving the leaves a sweeter, more delicate flavor.
Its fast growth makes kale ideal for two or three plantings each year, providing a steady harvest that can last almost year round.
Quick Look
Common name(s): Borecole, cole, kail, Scotch kale
Plant type: BLeafy biennial vegetable
Hardiness (USDA Zone): 6-10
Native to: Eastern Mediterranean, Anatolia (Asia Minor)
Bloom time / season: Spring, fall, summer in cool climates, winter
Exposure: Full sun in cool seasons, afternoon shade in summer
Soil type: Loamy, organically rich, well draining
Soil pH: 6.0-7.0, slightly acidic to neutral
Time to maturity: 30 days (baby greens), 55 to 80 (mature leaves)
Spacing: 6-20 inches after thinning
Planting depth: 1/4 to 1/2 inch (seeds)
Mature size: 12 to 36 inches tall and wide, depending on variety
Water Needs: Moderate
Taxonomy
Order: Brassicales
Family: Brassicaceae
Genus: Brassica
Species: Oleracea
Variety: Acephala
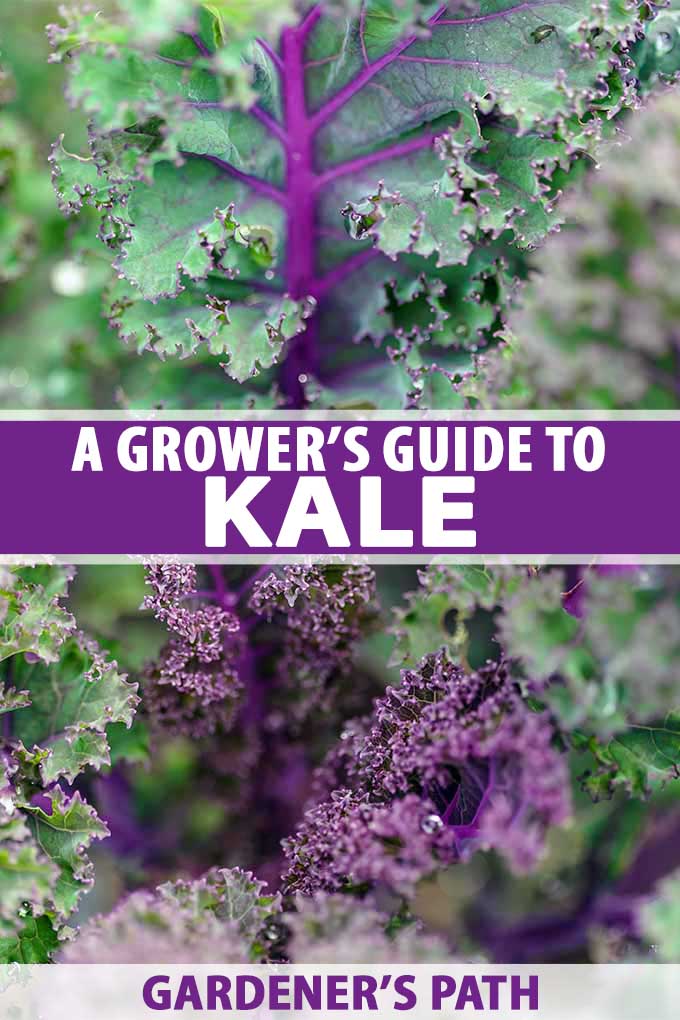
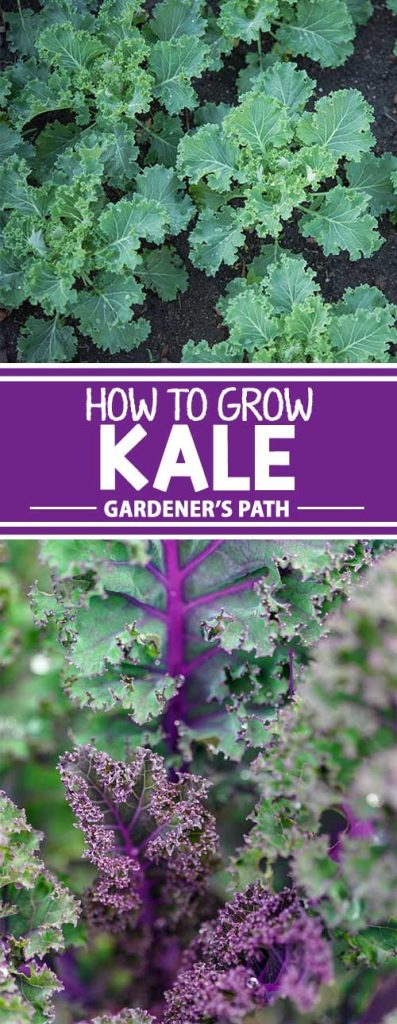
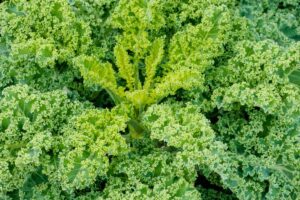
The loose, textured leaves that can be tightly curled, flat, or savoyed and are wonderfully colorful – especially in winter gardens – flaunting rich hues of glaucous, jade, and grass greens, almost black, bronze, burgundy, dusty plum, purple, and scarlet.

There are three main types of kale grown in home gardens:
Curly
The curly-leafed varieties, also known as borecole, cole, kail, and Scotch kale have tightly ruffled leaves that are blue green, bright green, or tinged with red.
Curly types feature an earthy/peppery taste that tends to become bitter as they age. These varieties have good cold hardiness.
Lacinato
Lacinato varieties, aka black, dinosaur, or Tuscan kale, have long, plume-like leaves with a unique pebbly or savoyed texture in rich shades of bronze, burgundy, dark green, and almost black.
These types have a rich, earthy taste with a hint of nutty sweetness and are less prone to bitterness than curly types. They are moderately cold hardy.
To learn more about dinosaur varieties, our guide to growing lacinato kale has all the details.
Russian
The Russian or flat-leafed group hails from Scandinavia and Siberia and includes the hardiest varieties for regions with cold winters.
The leaves are broad and flatish, often with heavily toothed margins that resemble arugula. They have a delicate flavor that’s mild and sweet with a hint of pepper.
How to Sow
Kale seeds can be sown directly in the garden from early spring to mid or late summer for harvesting from late spring through to winter.

In regions with warm winters and hot summers, sow from fall to early spring to avoid summer’s heat.
Kale transplants readily so you can also start seeds indoors four to six weeks before the last frost, then transplant out when the soil warms up.
Seeds typically germinate in seven to 10 days.
Direct Sowing
For spring and summer harvests, direct sow seeds in early spring four to six weeks before the last frost date. For continuous crops, succession plant every 14 days until the end of May.

Although seeds can germinate in soils with temperatures as low as 40°F, sprouting is typically slower and spotty in cooler conditions.
For the best germination rates, wait until soil temperatures are in the range of 50 to 75°F to sow directly in the garden.
For winter crops, choose varieties with early maturity and sow eight to 12 weeks before the first fall frost date.
In areas with very hot summers, delay planting until temperatures cool off and consistently stay below 75°F during the day.
- Work in an all-purpose, slow-release fertilizer into the top four to five inches of soil, using one and a half cups per 25 feet of row, or about one tablespoon per plant. A balanced fertilizer formula such as 5-5-5 works well.
- Rake the soil level then pat down firmly.
- Sow seeds in rows to a depth of a quarter to half an inch.
- Water gently to moisten the soil, keeping it lightly moist but not wet.
When plants are at least six inches tall, thin them so they are spaced six to 20 inches apart, depending on the variety.
If you have short summers or simply want an early crop, start seeds indoors for transplanting out.
Indoor Sowing
For a head start on early crops, start seeds indoors four to six weeks prior to your last frost date.
Here’s how:
- Fill a tray with good-quality starter soil and moisten lightly.
- Sow seeds in rows a quarter to half an inch deep.
- Place trays on a warm, bright windowsill or under grow lights.
- Two weeks after germination, thin the seedlings to three inches apart.
- When seedlings have two sets of true leaves, transplant into containers or garden beds after all danger of frost has passed.
And starting seeds indoors for winter crops is also a good idea if your summers are very hot – transplant outdoors when daytime temperatures cool to under 75°F.
How to Grow
Vigorous and fast-growing, kale is very easy to cultivate. It adapts well to growing in containers as well.
Let’s take a look at the details:
Climate
Kale likes a cool climate and prefers growing temperatures between 55 and 75°F, with a sweet spot of 60 to 70°F.
Plants can produce good crops in warm, but not super hot summer temperatures.
Cold weather also intensifies colors, with the winter-hardy, flat leaf types taking on beautiful hues of plum, purple, scarlet, and dark, inky green.

I always like to grow a couple of late season boxes using varieties like ‘Russian Red’ or ‘Winter Red’ for the intense colors they add to winter salads and smoothies.
In areas with sweltering summer heat, growth slows and plants are prone to bolting.
Light
Kale needs full sun in spring, fall, and winter but benefits from some afternoon shade from hot sunshine in summer.
To provide light shade, use floating row covers for vegetable beds and containers, or move containers to a spot with morning sun and light afternoon shade.
Learn more about sun recommendations for kale here.
Soil
Kale grows in most soil types but does best in rich, humusy, well-draining soil with a slightly acidic to neutral pH of 6.0 to 7.0.
For garden beds, start with good quality garden soil then dig in one part of compost, well-rotted manure, or worm castings to enrich the soil and improve tilth.
If the soil is heavy, you can add in one part gritty material to improve drainage using materials such as landscape sand, perlite, or stone chips.
Watering
Water regularly, providing one inch of water per week in the absence of rain. Strive to keep the soil moist but not wet for the most abundant growth.

Avoid splashing water onto the lower leaves, which can allow unfriendly fungal pathogens to proliferate and lead to powdery mildew. Drip or soaker hose irrigation systems are ideal.
Fertilizing
Overwintered plants benefit from an early topdressing of compost, manure, or worm castings.
Carefully work in one or two inches of organic matter over the root zone in early spring once new growth starts to pick up.
Spring plantings can be fed with a slow release fertilizer using a balanced formula or one slightly higher in nitrogen.

Down to Earth Bio-Fish, available at Arbico Organics, has an NPK ratio of 7-7-2 that’s ideal for leafy greens.
Alternatively you can feed with a liquid or water-soluble formula once a month.
Maintenance
To help keep the soil moist, roots cool, and weeds at bay, apply a two-inch layer of mulch of shredded bark, leafmold, or straw when plants are at least six inches tall.

Remember to keep mulch materials away from the base of the plant to avoid stem rot.
If you’ve found a variety that you love and grows well in your garden, you can easily save the seeds for future crops.
Follow the steps in our guide to harvesting and storing kale seeds – it has all the details you need!
Cultivars to Select
Here’s a small sampling of popular varieties from the three main kale groups.
For more ideas, check out the delicious recommendations in our roundup of 13 of the best kale varieties!
Black Magic
A spell-binding plant with long, dark, and wonderfully pebbled, strappy leaves, ‘Black Magic’ is a gourmet Tuscan variety with exceptional sweetness and rich flavors.
The savoy-style leaves start out gray green and as they mature into darkly dramatic fronds, the colors deepen into an inky forest green so dark it’s almost black.

‘Black Magic’ is frost tolerant and grows 24 to 36 inches tall with a spread of 18 to 24 inches. Begin harvesting in 65 days.
You can find packets of seeds available at Burpee and from Eden Brothers.
Dwarf Blue Curled
Vates ‘Dwarf Blue’ is a miniature curly variety with upright stems heavily laden in lush, blue green leaves with densely ruffled margins.
Vates types are both cold and heat tolerant and slow to bolt, maturing in 55 days on plants that grow 12 to 16 inches tall and spread up to 12 inches.

An excellent choice for containers and kitchen gardens – and the dense, compact plants are so pretty they make an attractive and edible border plant as well.
Seed packets are available at Burpee and the larger ‘Blue Scotch’ curly variety can be found at True Leaf Market.
Red Russian
A flat leaf variety, ‘Red Russian’ has oak-like, heavily toothed leaves of gray green on upright burgundy stems that easily withstand hard frosts.
The flavorful, tender leaves sweeten with cold weather and darken to burgundy, plum, and purple as the temperatures drop.

Plants grow 24 to 36 inches tall and wide and mature in 50 to 60 days.
You can find packets of seeds available at Burpee and from True Leaf Market.
And we have a guide to growing ‘Red Russian’ if you’d like to learn more.
Managing Pests and Disease
Although kale is easily cultivated, hearty, and fast growing, it is susceptible to a number of pests.
Diseases such as damping off, downy mildew, and black rot plus marauding insects like aphids, cabbage white moths, and flea beetles are common problems.
To control nasty pathogens, keep the soil lightly moist but not wet, space plants for adequate air circulation, and always use heat-treated seeds.

To keep most bugs at bay, natural pesticides like neem oil can be sprayed onto infested plants, but I find the easiest solution for keeping hungry insects away is to use floating row covers.
Our guide to common kale pests and diseases has more information.
Harvesting
For baby greens, tender leaves can be picked as early as 30 days from sowing. Full-sized leaves are generally ready in 50 to 65 days, depending on the variety.
To harvest young leaves, treat plants as a cut-and-come-again crop.
Pick them when they’re at least four inches in length, removing only the outer ones and leaving the terminal buds – new leaves develop from the terminal, or main stem.
Use a clean, sharp knife or kitchen shears to cut the leaves close to the base.
To collect large leaves for chips or cooking, wait until they’re the size of your hand before harvesting.
If you wish to harvest the entire plant, use a clean, sharp knife to cut through the stem close to the ground.
Trim leaves away from the stem with a clean, sharp knife.
Learn more about how to harvest kale here.
Preserving
Now let’s check out the various ways to preserve this green goodness.
You can store loose leaf or bunches of kale wrapped in paper towels placed in a plastic bag or storage container for up to five days in the refrigerator.
The longer kale is stored, the more bitter the flavor can become.
Freezing
To freeze your harvest, remove the ribs then rip or cut the leaves into smaller pieces.
Blanch in boiling water for one or two minutes then plunge the leaves into ice water.

Thoroughly dry them in a salad spinner or pat dry with clean dish towels, then spread them in a single layer on a baking sheet.
Freeze for a couple of hours then pack the leaves in a freezer bag or airtight storage container and keep in the freezer for up to eight months.
Canning
Kale can also be canned but be aware that these leafy greens shrink a lot in the canning. You need four pounds of leaves to produce a one-quart jar!
- Rinse leaves thoroughly under cool running water then blanch.
- Pack the blanched leaves into clean, sterile quart jars leaving one inch of headroom.
- Add one teaspoon of salt to each jar then fill with boiling water, leaving one inch of headroom.
- Seal jars and process in a pressure canner for one hour and 30 minutes for quart jars.
Canned leaves can be stored and used as needed. After opening, keep in the refrigerator.
Drying
Dried kale powder is nutritious with earthy, umami flavors perfect for adding to dishes like sauces, soups, or stews.
Rinse leaves thoroughly under cool running water then dry well in a salad spinner.
Lay them in a single layer and dry in the oven or dehydrator on the lowest setting for several hours.
Ensure the leaves are completely dry – moisture can introduce mold – then pulse in a blender or food processor to reduce them to a coarse, flaky powder.
Store in airtight containers in a cool, dark cupboard for up to six months.
Cooking Ideas
Kale is delicious raw or cooked, but in some cases leaves that grow too big can take on bitter tones.
But not to worry, woody leaves can have the bitterness massaged out of them!

To restore mature leaves to tender, delicious greens a little olive oil and salt does the trick. Here’s how:
- Remove the ribs and woody pieces from the ends of each leaf. Tear off bite-sized chunks and place in a large bowl.
- Add a drizzle of olive oil, enough to lightly cover the leaves, and a few pinches of coarse salt.
- Toss the leaves with your fingers as you gently work in the oil.
- After four or five minutes, the leaves should appear darker in color with a more supple texture. Serve immediately, or dress for a salad.
You can also substitute the olive oil for your choice of oil or vinaigrette.
For some tasty recipes, our sister site Foodal has several great ideas to try out.
A Dream Veggie
With colorful leaves, superb nutrition, and fast growth, kale is a dream veggie to cultivate in garden beds, containers, or kitchen potagers.

But don’t stop at just one crop! This leafy biennial loves cool temperatures and thrives in spring, fall, and winter with successive plantings.
Are you growing kale? Let us know in the comments section below!
And for more information about growing kale in your veggie garden, check out these guides next:
This is not a ‘how to grow kale’ article. You barely touched on soil, amendments, sun and water and instead focused on types of kale and some ideas on how to prepare it. Disappointing.
Some of our shorter guides are in definite need of improvement, but our aim is to make them the best they can be. We’re working on an update to the contents of this article!
Linsey,
My kale has grown a seed pod at the top. No articles I can find say if I should leave it or cut it, or as my neighbor implied, it means the plant is done for the season? It’s early spring. It just started growing. Help?
Kale is a cool weather crop, and warm temperatures will encourage it to bolt as you’ve described. The leaves will become more bitter and tough when the plants begin putting their energy into flower and seed production. If you remove seed pods as you would from other plants (like lettuces and herbs) you may be able to encourage some more tasty leaf growth. Otherwise, you can allow them to flower for the pollinators, remove the spent plants once the flowers are finished, and start a new crop in time for a cooler season harvest. If you like, you can even… Read more »
I am an amateur gardener, and my purple kale was one experiment i didnt have much luck with last summer as they got devoured by bugs. Then i left them through winter. We had snow and frost that finally stopped in February and two of my plants survived! They have produced a gorgeous abundance of tasty leaves that i have been using several times a week for cooking, salads and yummy coleslaw. The last week the weather has been increasingly warmer and both plants are well over 3 ft high now and going to flower. How do i use them… Read more »
Great question, Diana. Kale grows as a biennial in many regions, and it sounds like you’re already on the second half of the cycle. To save seeds, when your plants bolt later in the season, stop harvesting the leaves (they will become more tough and bitter when the plant begins putting its energy into blooming) and allow it to flower and go to seed. When it starts to dry, if you like you can cut the stalks and hang them upside down in a cool, dry location to dry fully. It’s also okay to let them dry on the plant,… Read more »
I am wondering if I can plant kale cuttings? I have these little babies coming off the main stalk and need to know if they will root. It’s curly kale.
Hello Stephanie! You can start a new kale plant from a cutting. It does need to be a variety that grows a fairly substantial stem, like the curly variety you mentioned. If you were growing a variety like lacinato, where the oversize, bladelike leaves grow from very short stems, you’d be out of luck. Here’s how to proceed: Select a shoot that’s strong and healthy and has at least three or four leaves This side shoot should also be strong and healthy, and at least three inches long. Cut the shoot from the main stem where they meet, using a… Read more »