Daucus carota sativus ‘Danvers’
Even though I amend diligently and till mightily, my garden soil is still heavy.
It’s amazing I can grow carrots in this dirt, but I can, and I have long-ago growers from Danvers, Massachusetts to thank for that.
They introduced the variety originally known as ‘Danvers Half Long’ more than a century ago.

We link to vendors to help you find relevant products. If you buy from one of our links, we may earn a commission.
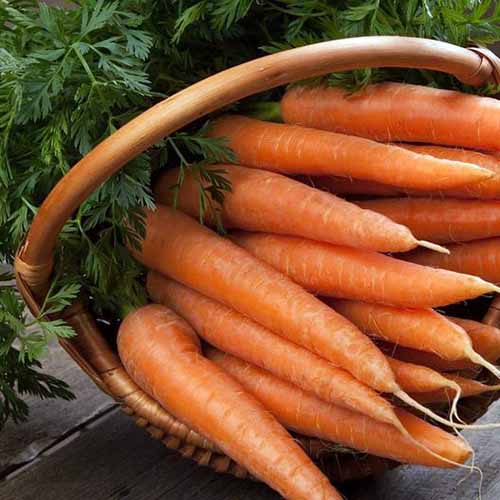
‘Danvers’ is able to grow in dirt that’s rocky or heavy, and still produces medium size carrots in a deep, rich orange.
Without this type, I’d miss the chance to devour homegrown Daucus carota sativus grown on my own land. And that would be a shame.
I’d like to introduce you to this swell option for the vegetable garden.
I’ll also let you in on the growing techniques that maximize quality and productivity. Here’s what I’ll cover:
What You’ll Learn
Along with being grateful that there’s a heavy soil carrot option, I’m thankful that ‘Danvers’ is a standout cultivar.
It benefitted from an upgrade in 1947, when the improved ‘Danvers 126’ was released, with a sweeter flavor, increased crack resistance, and better yields.
Quick Look
Common name(s): Danvers carrots
Plant type: Biennial root vegetable
Hardiness (USDA Zone): 3-10
Native to: Eurasia
Bloom time / season: Spring and fall
Exposure: Full sun
Soil type: Sandy, loamy, well draining
Soil pH: 6.0-6.8, slightly acidic
Time to maturity: 65-75 days (spring); 75-90 days (fall)
Spacing: 6 seeds per inch when planting, 2 inches after thinning
Planting depth: 1/4-1 inch (seeds)
Mature size: 1-2 inches wide x 7-8 inches high
Water Needs: Medium
Taxonomy
Order: Apiales
Family: Apiaceae
Genus: Daucus
Species: Carota sativus
Cultivars: ‘Danvers’
Seventy-some years later, ‘Danvers’ doesn’t just grow where others won’t, it also tastes great, has an enhanced fiber content, and stores for a good, long time.
All carrots are biennials, with a life cycle that spans two years. The plants spend much of their first season making sugar and storing it in a central taproot.
Of course, the process is intended to provide plenty of energy for the plant to flower in its second season.
In our gardens, though, we pull these tasty taproots to eat long before they enter a second season.
A few characteristics do set ‘Danvers’ apart from other garden varieties. For one, it has been bred to power through heavy soils, growing to seven or eight inches at maturity.

‘Danvers’ carrots are conical, and one and a half to two inches in diameter at their full size.
This variety also has distinctively strong stalks that make it easier to pull them up at harvest time.
In brief, ‘Danvers’ is a dandy!
You can learn about other options in our guide to the best carrot cultivars. But if you’ve settled ‘Danvers,’ you’ve picked a winner. Now, on to get it growing in your garden!
How to Sow
Carrots are far more productive if you carefully consider where to plant them.
They need full sun, for example. They also require soil you can cultivate a couple of inches below the total length of the mature roots, so about 10 inches.

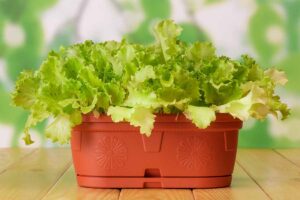
You could grow ‘Danvers’ carrots in a container if you like, but I would opt for a shorter variety if you’re considering that option.
One better choice is ‘Little Fingers,’ which is also orange, crunchy, and sweet – and has been bred especially for growing in pots and planters.
A raised bed is another possibility, but it needs to be 10 inches deep or so to make contact with soil at the bottom. Planters or beds that aren’t deep enough and are lined with plastic or a weed mat will prohibit the root from growing long enough.
For the typical vegetable garden bed, choose a spot where you’ll be able to break up the soil to a depth of about 10 inches.
‘Danvers’ will grow best in loam or sandy soil, but they’ll also do fine in heavier soils if you cultivate and amend with plenty of composted organic matter.
Over the years, I’ve come to appreciate the benefits of giving carrots the slightly acid pH they prefer.
They thrive in soils with a pH of 6.0 to 6.8, which is a bit below the 7.0 average, on the acidic side. It’s worth testing the soil and amending it if the pH is above or below this ideal range.
Another site selection consideration is how slowly the seeds germinate. They could take as few as 14 days, or as many as 24, and you’ll need to keep the soil moist that whole time.
After a couple of experiences where the soil dried out and my seeds never sprouted, I now make sure I sow where they’re in plain view and near a water source.
Aim to sow seeds 14 to 28 days before your average last frost date, but avoid sowing them during a killing frost or icy weather.
You can sow more in late summer for a fall harvest, but make sure to allow for the slower growth caused by chilly temperatures as winter approaches. You’ll need almost 10 more days, on average, to harvest this crop when you grow it in cooler temps.
The ideal soil temperature for germination is 60 to 85°F. That’s not usually feasible before the last frost, though. So if the soil temperature is at least 45°F, you can proceed with sowing!
Sow the seeds a quarter of an inch deep, an inch apart in rows spaced six inches apart, and cover loosely with soil.
If you’re sowing a little later in the spring and the soil is drier and warmer, you should sow the seeds one-half to three-quarters of an inch deep.
That way, they’ll still be able to break through the soil, but the sprouts won’t be so close to the surface that they wash away in the first good rain.
After sowing, for at least two weeks, your top job will be checking to make sure the soil is moist. Then there are a few more chores before these tasty root vegetables are ready for salads, pickling, roasting, or stew.
Keep reading for growing tips that will carry you through to harvest, along with some cooking techniques and recipes.
How to Grow
Like all culinary carrots, ‘Danvers’ requires a steady supply of water for a sweet harvest, especially as the weather gets warmer.
When your garden hasn’t received any rain, provide the plants with about an inch of water per week.

It’s also important to thin them as they grow. These root veggies need enough space to grow bigger, and thinning also improves air circulation so the plants don’t succumb to diseases caused by overly-humid conditions.
Wait until the tops are a few inches tall, and thin them to stand about two inches apart.
Instead of pulling them up and possibly disturbing the roots that will remain, use scissors to snip the young seedlings off at the soil line.
Also make sure to keep the carrot patch weeded. The roots grow more quickly if the plants aren’t competing for nutrients or moisture.

Any variety that takes too long to mature is at risk of getting woody or stringy, and losing most of its sweetness.
Turn to our complete guide for more growing techniques that improve the yield and flavor of carrots grown in the garden.
Where to Buy
If ‘Danvers’ sounds like a great proposition, you’ll be looking for some seeds!
Keep in mind that transplants are not an option, as the substantial roots don’t appreciate being disturbed.
Find sizes from a modest packet to five-pound bags of these seeds from Eden Brothers, and one- and three-gram packets from Botanical Interests.
Pests and Disease
Let’s discuss pests first, of which there are a few that can cause problems for your ‘Danvers’ carrots.
Pests
The most bothersome ‘Danvers’ pests are the ones who attack underground.

The worst offender is the carrot rust fly. These unsavory bugs lay their eggs where the greens sprout forth from the soil.
Then their larvae chew right into the roots, and the results aren’t pretty.
Plus, the damage from rust fly larvae alters the taste, so no one wants to eat any roots they’ve attacked.
Other underground larval pests that burrow into the roots include carrot weevils and wireworms.

The best option for prevention is floating row covers installed just as they’re sprouting. These will let water in, but keep the adult insects from landing at the base of the plants to lay eggs.
Above-ground nuisances that might damage your crop include aster leafhoppers, flea beetles, and grasshoppers.
Find more tips for identifying and combating carrot pests here.
Disease
There are a litany of diseases that afflict carrots of any variety, too. The harshest is bacterial, in the form of Alternaria leaf blight.
Forked roots can result from attack by root knot nematodes (Meloidogyne species), and cavity spot, caused by the oomycetes Pythium violae and P. sulcatum, can create some unappealing blotches on the roots.
A few more to be aware of include aster yellows, bacterial soft rot, cercospora leaf blight, downy mildew, and powdery mildew.
But don’t get too discouraged! If you rotate carrots each season, interplant wisely, and choose the varieties that will grow best in your soil, you can usually stay ahead of any issues.
Learn more about identifying and controlling carrot disease.
Harvesting
Keep track of the days that have passed since sowing, to give you a general idea of when to harvest.
In general, ‘Danvers’ will reach full size in 65 to 75 days when you sow seeds in spring. It takes 75 to 90 days to mature if you sow in late summer for a fall or early winter harvest.

You can leave them in the ground to pull as needed throughout the fall, even through a couple of light frosts. Just make sure you’ve harvested any you plan to eat or store before the ground freezes.
Immature carrots are tasty, and pulling some will give those left behind more space to grow.
But the sweet flavor is at its peak when the carrots reach their mature, bright orange hue, so it’s a good idea to wait to harvest most of the crop at full size.
When the predicted harvest window arrives, start checking the crowns that peek out of the soil. When they’re about an inch and a half in diameter, it’s go time.
If you can’t see the orange portions at all, you may have to rely on extracting a couple of samples to see if they’re the size you want. Since you can eat them, this is all good!
Moisten the soil the day before you want to harvest to make pulling nice and easy.
The day after irrigating, pull them up using those strong stalks ‘Danvers’ are known for!
If the soil is unyielding, carefully scratch around it with a gardening fork, claw, or trowel until it’s loose enough to release the roots.
Learn more about how to harvest ‘Danvers’ and other carrots here.
Storage
Once you have the harvest in hand, move straight to preparing the roots for storage. Or if you literally are cooking “farm to table,” get them prepared and into the salad bowl or pot.

For either approach, knock any loose dirt back into the garden.
Then remove the leaves, pronto. Otherwise they’ll keep drawing up water and the carrots will shrivel before your very eyes.
Twist the tops off with your hands. Or use kitchen shears or a garden knife to take off all but an inch. This is necessary even if you’re going to cook with them.
If you’ve uprooted more than a few, store them in a plastic bag with a couple of holes pricked into it with the tines of a fork.
The idea is to keep them cold and moist, which is best achieved at 32 to 40°F and 95 percent relative humidity.
They’ll last at least a month under these conditions, which should give you plenty of time to use them in all sorts of recipes, including the ones that are coming up!
Preserving
It’s a good idea to plant a couple of feet of carrot seeds in a row at a time, every three weeks during their growing season.
That way, you’ll have a nice mini-harvest of a couple of pounds per planting, and won’t need to worry much about preserving your harvest.
If you do want to grow this variety for “putting up,” though, you’ve got lots of great options, like fermenting or pickling.

Here’s a recipe for Habanero-Carrot Butter, too, if you’d like to make homegrown carrot freezer preserves.
Use it as a condiment for tacos, burgers, or sausages, or slather some on warm corn muffins. Many people also like it warmed and served atop grilled chicken or pork.
This version is adapted from the “All New Ball Book of Canning and Preserving,” available on Amazon.
All New Ball Book of Canning and Preserving
The original recipe was intended for hot water bath canning, but I just pop jars or freezer-safe containers into the icebox, where they’ll keep for at least six months.
If you do use canning jars for freezing, make sure to leave about an inch of headspace at the top, and only use jars smaller than 16 ounces. The larger quart jars have shoulders that make them crack easily in the freezer.
Also, if habanero adds too much heat for your taste, you can substitute jalapenos or hot or mild banana peppers.
To make habanero-carrot butter, you will need:
- Two pounds of peeled and sliced carrots
- One cup of water (preferably filtered)
- One cup white wine vinegar (five percent acidity)
- Three quarters of a cup chopped onion
- Half a cup freshly squeezed lime juice
- One teaspoon salt
- Four chopped garlic cloves
- Three seeded and chopped habanero peppers
- A third of a cup chopped fresh cilantro.
Bring all ingredients except the cilantro to a boil in a four- to six-quart stainless steel pan or enameled Dutch oven.
Reduce the heat to medium, cover the pot, and simmer for about 30 minutes until the carrot is soft, checking every 10 minutes or so. If it gets too dry, add more water a tablespoon at a time.
Remove the pan from the heat, add the cilantro, and use a potato masher to create a smooth paste.
Put the pan back on the burner and bring the mixture to a boil once again.
Reduce the heat to medium and simmer, uncovered, until the mixture thickens to an apple butter-like consistency and holds its shape on a wooden spoon.
Fill jars or storage containers to within an inch of the top. Let cool to room temperature. Fasten or snap the lids on, and freeze. Use within six months, defrosting first in the fridge overnight.
Danvers Is Dandy for Tough-to-Till Soil
Homegrown carrots take a bit of patience and TLC, but the taste is so sensational, that seems like a fair price to pay.
For me, ‘Danvers’ is the prime choice for my garden beds.
Even though I amend the soil with plenty of compost, it’s still heavy. Only root crops like this powerhouse will grow in that kind of soil.
But there are many other varieties I treasure, and grow either in raised beds or containers when I get the chance. ‘Purple Haze’ is a colorful favorite, and then there are the Parisian market types, like little, round ‘Atlas.’
I could go on and on, but I’d rather hear from you. If you have a favorite variety or questions about this one, hop onto the comments below, please!
And to learn more about growing carrots in your vegetable garden, check out these guides next: