Peperomia spp.
Peperomias are marvelously diverse, ranging from petite bright green plants that trail out of hanging baskets to two-foot-tall upright specimens with striking wrinkled foliage and purple stems.
Some look like succulents, while others are bushy and lush.
What they have in common is that they’re all tolerant of drought, don’t demand much light, and they add gorgeous greenery to your home without much maintenance at all.

We link to vendors to help you find relevant products. If you buy from one of our links, we may earn a commission.
They’re truly ideal houseplants for beginners and experienced growers alike.
This guide will teach you how to propagate, plant, and help your peperomias to thrive.
Here’s what we’ll explore:
What You’ll Learn
Peperomia is a genus of over 1,000 species, though only a fraction of these are commonly grown as houseplants.
They’re part of the pepper family (Piperaceae), and the houseplants in this genus are sometimes referred to as radiator plants.

Peperomias are native to tropical areas in South America, southern parts of North America, and parts of Asia and Africa. Most, however, come from the Americas.
They are semi-succulent, with thick leaves or stems that can store water and tend to absorb more moisture from the air than the soil.
As such, many are epiphytic, which means they grow on the surface of other plants.
Quick Look
Common name(s): Radiator plant, peperomia
Plant type: Herbaceous perennial
Hardiness (USDA Zone): 10-11 (outdoors)
Native to: South America, southern North America, Africa, Asia
Bloom time / season: Intermittent; primarily spring to summer
Exposure: Bright, indirect light
Soil type: Loose, loamy, well-draining
Soil pH: 6.0-7.0, slightly acidic to neutral
Time to maturity: 2-3 years
Mature size: Up to 4 feet wide by up to 3 feet tall (depending on species)
Best uses: Houseplant, office plant, small spaces
Taxonomy
Order: Piperales
Family: Piperaceae
Genus: Peperomia
Species: Alata, angulata, argyreia, blanda, caperata, clusiifolia, graveolens, griseoargentea, nivalis, obtusifolia, orba, pellucida, polybotrya, prostrata, puteolata, rotundifolia, scandens, tetraphylla, wheeleri
The epiphytic types typically come from rainforests, where they thrive in the dappled sunlight of the understory.
Others grow in the soil (terrestrial types) or on rocks (lithophytic varieties).
Some terrestrial types are geophytic, which means they have large underground tuberous roots that can store water and nutrients.
You’ll usually find geophytic types in drier regions such as parts of Mexico. These are less common to see growing as houseplants.
In general, peperomias aren’t terribly picky about water, sunlight, or food, which makes them suitable low-maintenance options in the home.
In their native habitat, peperomias usually thrive in partially shaded areas that are damp and moist. You can even plant them outdoors in USDA Hardiness Zones 10 and 11.
Most stay pretty small, and you can find species that never grow more than a few inches tall, while others climb closer to two feet tall at maturity.

Plants in this genus might flower when they’re happy with the environmental conditions, even when they are growing indoors.
The bad news is that the flowers aren’t showy or heavily scented. They look like little spikes, and lack any petals or sepals.
Many species are edible, though you should check on your specific species to be sure. They aren’t toxic to pets such as dogs or cats.
How to Grow
Peperomias are incredibly easy to grow, but there are a few things to do to keep them looking and growing their best.
Light
Direct light is no good. Peperomias need indirect light, though plenty of it won’t hurt them, so long as direct sunlight isn’t hitting them.

Full shade isn’t ideal either. Though plants will survive in full shade, they will likely be spindly and less attractive than they could be.
Soil
Peperomias do best in water-retentive soil, which is a medium that contains some coconut coir, peat moss, vermiculite, rice husks, or some combination of these.

Tank’s-Pro Potting Mix is a good option with a mix of coco coir and compost. You can find bags available at Arbico Organics.
Water
Keep in mind that while peperomias sometimes grow in wet, tropical areas, these semi-succulents can retain water for up to several weeks.

These beauties are particularly sensitive to water-logged soil and will suffocate if you give them too much moisture.
Let the top inch of soil dry out between watering. Just stick your finger into the soil and see if it feels moist. When the top inch dries out, add more water.
When a radiator plant is stressed, it may drop its leaves. This likely means it’s receiving too little or too much sunlight, or too little or too much water.
Fertilizing
If you only repot every few years, then you’ll want to add some fertilizer in the second year after repotting.
An all-purpose houseplant fertilizer will do the job nicely. You can purchase slow-release pellets, spikes, or liquid fertilizer.
I like to set it and forget it, so I prefer something like Osmocote’s PotShots, which slowly release food for six months.

Amazon carries this handy product in 25-count packages of nuggets, or try Osmocote Plus in one-pound, two-pound, and eight-pound containers and bags of granules.
Species and Cultivars
The most common species are beetle (P. angulata), watermelon (P. argyreia), and emerald ripple peperomia (P. caperata).

These have proven over the years to be healthy, reliable growers in the average home. The baby rubber plant (P. obtusifolia) is also quite popular.
P. maculosa looks like the pepper-family plant it is, with glossy, oval-shaped leaves that end in a sharp point, and pronounced veins. They’re less common than other species, but just as lovely.

If you want to learn more about these and other species for the home, we have an entire guide dedicated to the many varieties of peperomia.
Maintenance
It’s a good idea to size up your container once every year or two, depending on how quickly the plant is growing.
The pot should extend a few inches wider than the diameter of the base of the stem. In other words, when the peperomia stems start to reach the edges of the pot, it’s time to go up a size.

The exception to this is those species that have a trailing growth habit. Let these reach the edge of the pot to contain their spread.
You can repot every few years if you desire, or just change out some of the soil to help refresh it.
After a few years, the plant will reach its mature size and will stop expanding.
At this point, divide it and it will fill up the container once again. Be sure to use fresh potting soil when repotting the divisions.
There is no need to prune peperomias, but you can trim them down to size or remove sad-looking, dead, or diseased stems at any time.
Propagation
There are several ways you can propagate peperomia, but rooting stem cuttings is the easiest.
From Seed
It’s best to purchase seeds rather than trying to extract them from a mature plant yourself.
Seeds saved from hybrid peperomias won’t grow true to type. In general, seeds have low germination rate.
If you do want to start from seed, here’s how:
- Fill a container with a soilless seed-starting mixture.
- Sow seeds about a quarter of an inch deep, and water well so the medium is moist but not saturated.
- Place the pot in a spot where it will receive bright, indirect light for several hours a day.
- Tent a plastic bag over the container to help retain moisture.
- Open the plastic once every day, and touch the soil. If it feels dry, add some water.
Within a few weeks, you should see some green sprouting out of the soil.
From Cuttings
Start by prepping a small container and filling it with a soilless seed-starting mixture.
Next, take a cutting from the plant. How much and where to clip depends on the species.

Some radiator plants grow out of a cluster of central stems. If yours is like this, snip a cutting that includes a node and is several inches long. Aim for a stem with two to three leaves.
If your species has single stems growing out of the soil, snip one of the stems as close to the soil surface as possible.
Gently press the cutting into the medium so the stem is about an inch deep, and water well.

You can also put your cutting in a cup of water instead of soil. Replace the water once a week if you go this route.
Place the pot next to a window where it will receive several hours of bright, indirect light each day, and keep the soil moist but not wet.
Within a few weeks, new leaves or stems should start forming. If your cutting is in water, you should be able to see the new roots.
At this point, transplant the rooted cutting into a permanent container as described below.
From Divisions
Most species of peperomia grow in clusters with multiple stems extending out of a single root ball.
You can cut away one or more of these stems to divide your peperomia into multiple plants.
Remove the plant from its container and knock or rinse away as much of the soil as you can.
Take a clean, sharp pair of scissors and cut through a section of roots that includes the stem you want to separate from the rest of the plant.
Plant the part that you cut away as you would a transplant. Repot the remaining portion of your plant in its previous container with some fresh soil.
Transplanting
Make sure to select a pot that has at least one drainage hole and that is a few inches larger in diameter than the base of the stems.

Prep the container by filling the base with enough potting soil so the plant will be sitting at the level you prefer.
Gently remove the peperomia, soil and all, from its existing container.
Knock away as much of the loose soil as you can from the roots.
The stems should be placed at the same height they were in their previous container – don’t heap more soil around them as you plant – and about an inch below the lip of the pot.
Fill in around the roots with more potting soil.
Give the peperomia some water to help settle the soil.
Pests and Disease
Peperomias are generally very resilient against pests and diseases. They are not immune, however. Here’s what to watch for:
Pests
The usual pest suspects that impact most houseplants will also take a nibble out of peperomias.
Beyond harming plants, they can also increase the chances of disease, so don’t let an infestation become a bigger problem.
Aphids
Aphids are incredibly prolific. There is hardly anything growing in your home or garden that they won’t feed on.
In houseplants, the green peach aphid (Myzus persicae) is the one to watch for, though you might occasionally see a different species.
An aphid infestation can cause yellowing leaves, or even stunted growth.
The simplest way to deal with an aphid infestation is to put your plant in the shower or tub, and spray it to knock the pests loose.
Do this repeatedly for several weeks. If that doesn’t work, neem oil or insecticidal soap are effective treatment options.
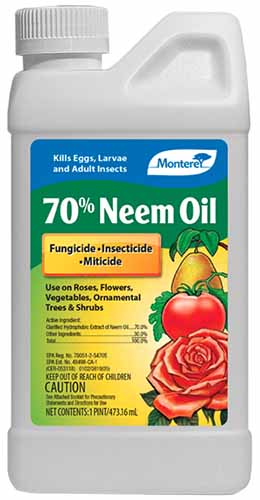
Arbico Organics carries Monterey brand neem oil in 32-ounce ready-to-use or 16-ounce ready-to-spray bottles, as well as eight-ounce, pint, and gallon concentrates.
Spray your plants once a week or so until the aphids are gone, taking care to cover the stems as well as the leaves.
Fungus Gnats
Have you noticed tiny black flies scurrying across the soil of your houseplants? These are likely to be fungus gnats, which are tiny gnats from the order Diptera.
The gnats themselves aren’t a big deal, but the larvae feed on the roots and lower stems of plants.
Fungus gnats thrive in wet soil and feed on decaying plant matter, so take care not to overwater and you will greatly reduce the chances that this will become a problem in your indoor garden.
If you’re careful not to overwater and these little pests are still a problem, buy yourself some yellow sticky traps.
Combined with reducing watering, this is enough to eliminate an infestation.
Find more tips on combating a fungus gnat infestation here.
Spider Mites
Spider mites are arachnids in the family Tetranychidae. The most common to infest indoor plants is the red spider mite, Tetranychus urticae.
It’s likely that you won’t see the mites themselves unless you look reeeaallyy close, but you probably will see fine webbing on your plant. They can cause yellow stippling and a general lack of vigor.
One of the easiest ways to keep spider mites away – or even get rid of them – is to up the humidity.
You can also treat your plant as described above under the section on aphids.
Learn more about dealing with spider mites here.
Disease
On the whole, peperomias are pretty darn tough and you most likely won’t need to deal with diseases at all.
Cercospora Leaf Spot
Caused by fungi in the Cercospora genus, this disease causes black or tan raised spots on the underside of the foliage. P. obtusifolia cultivars are particularly at risk.
If these spots show up, your best method of control is to use a copper fungicide. Spray the undersides of the leaves to ensure that you are coating the fungal spores.
Bonide Liquid Copper Fungicide
Bonide Liquid Fungicide – which Arbico Organics carries in a variety of ready to use and concentrated versions – is a reliable option.
Ring Spot
Caused by the peperomia ring spot virus, this disease causes spots and leaf distortion. P. otusifolia may also be stunted.
Because this is a viral disease, there isn’t much you can do to cure the problem. If you don’t have any other plants in the same genus in your home, you can just cut off any symptomatic leaves and hope for the best.
Otherwise, toss out the plant to prevent further spread.
Root and Stem Rot
One of the most common diseases of peperomias is root and stem rot, which is caused by fungi and oomycetes in the Pythium and Phytophthora genera.
Reduce watering and use a fungicide that contains the beneficial bacteria Bacillus amyloliquefaciens strain d747.
This bacteria works its way into the soil and prevents these pathogens from becoming established. It also kills them when they are present on the stems and leaves.
Monterey Complete Disease Control
Monterey Complete Disease Control is available at Arbico Organics.
Pamper Those Pretty Peperomias
This is a houseplant that has a lot to offer without asking for much in return. It’s hardy, unfussy about water and light (so long as it isn’t too bright), and the foliage is pretty darn showy.

It’s hard not to notice the heavily wrinkled or remarkably colored leaves when they’re on display in your kitchen or living room.
It’s also nice to find a plant that isn’t a risk to curious pets, right? Which species have you fallen in love with? Let us know in the comments section below!
Looking for a bit more houseplant fun? Several other guides might interest you, starting with these: