
Cichorium intybus var. foliosum
When other types of greens are out of season, delicate Belgian endive is in its prime – and thank goodness for that!
This slightly bitter, nutty, and refreshingly crisp vegetable is a welcome antidote to the usual winter fare.
But before you go and purchase a packet of seeds to sow in your garden, beware: growing Belgian endive isn’t easy.

We link to vendors to help you find relevant products. If you buy from one of our links, we may earn a commission.
Allowing the heads to grow to maturity requires a lot of time (we’re talking up to half a year) and multiple steps. And this most definitely isn’t a plant-it-and-forget-it type of veggie.
I’m not trying to scare you off, but I want to make sure you’re prepared for the process ahead. More than anything, you’ll need to arm yourself with plenty of patience.
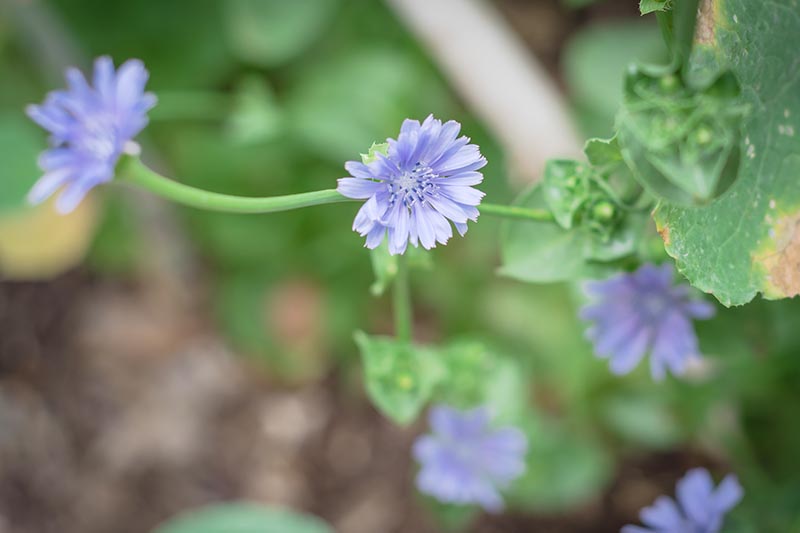
On the bright side, Belgian endive is part of the same family (Asteraceae) as many tenacious plants, such as common chicory and dandelion, so you’ve got that weed-like hardiness working in your favor!
In other words, Belgian endive isn’t terribly demanding in terms of maintenance, or prone to succumbing to pests and diseases.
So why make the effort to grow Belgian endive? Well, first of all, having fresh veggies on hand in the dead of winter is priceless.
You could buy them, but Belgian endive isn’t cheap. In my neck of the woods, a pound of conventionally-grown heads costs over eight dollars. For comparison, at the same store, a pound of conventional spinach costs just two dollars.
You probably aren’t considering growing Belgian endive just to save a few bucks at the grocery store, but it’s an added bonus, right? Even better than the savings, though, is being able to tackle a new garden challenge.
Part of what I love about gardening is that things are constantly changing and you always have to adapt to new threats and unexpected obstacles.
Nonetheless, gardening can sometimes start to feel a little… routine.
So I love it when I find something new to try, and forcing those luscious, leafy, creamy little torpedoes is definitely a unique challenge.
Feel like you’re up for it? Trust me, you can succeed, and this guide will help you through the whole process.
Here’s what we’ll cover:
What You’ll Learn
Part of what makes Belgian endive special is the two-step process involved in growing it.
Initially, the plant focuses energy in its long, parsnip-like root and then you cut off the foliage and dig up the root.
Next, you put the roots in a dark, cool place and wait for them to grow a second head of tender, crispy, creamy white colored leaves.
You can do it! Let’s go!
What Is Belgian Endive?
Before we get busy growing Belgian endive, we need to clarify a few things.
First, Belgian endive (Cichorium intybus var. foliosum) is not the same thing as endive (C. endivia).
The two are frequently confused, but endive, though a close relative, is a different species in the Cichorium genus.
Available in two types, the first is known as curly leaf, often called frisee (C. endivia var. crispum).
The second is broad leaf, often called escarole (C. endivia var. latifolia).
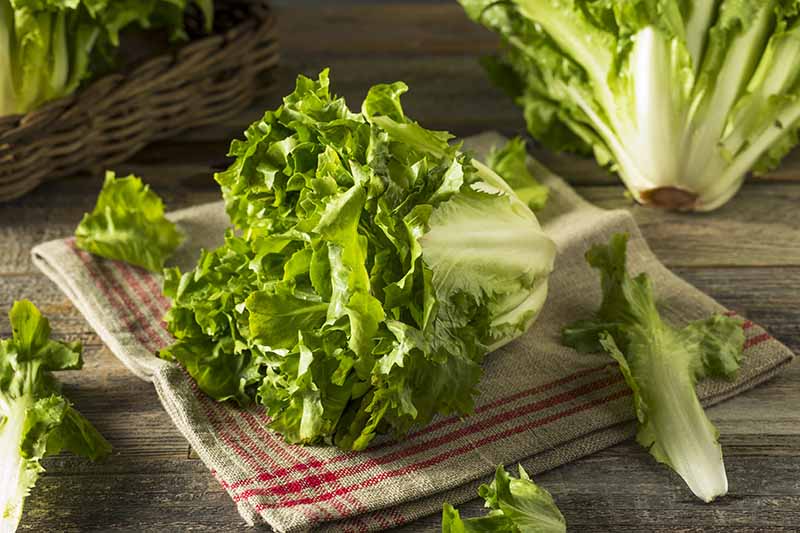
They look similar to lettuce but have a more bitter flavor.
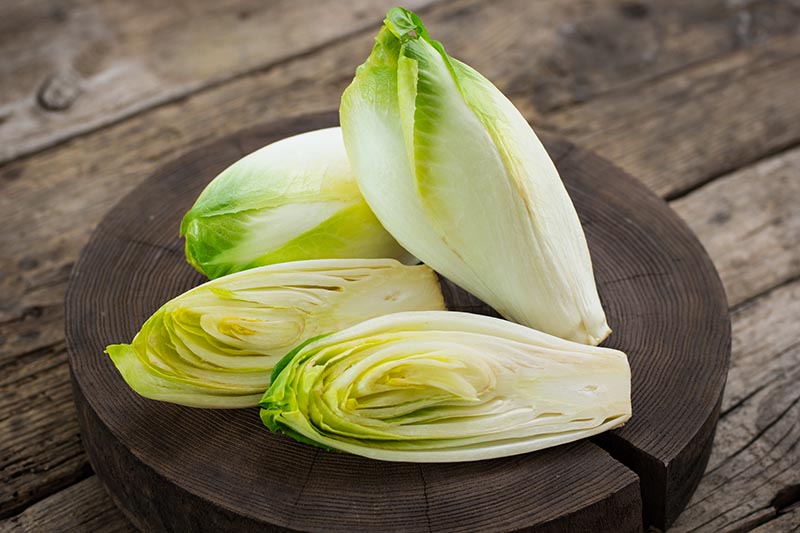
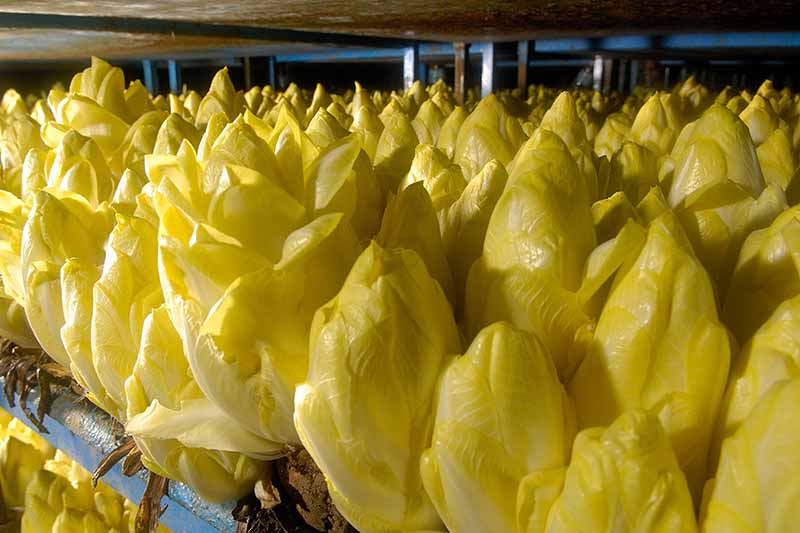
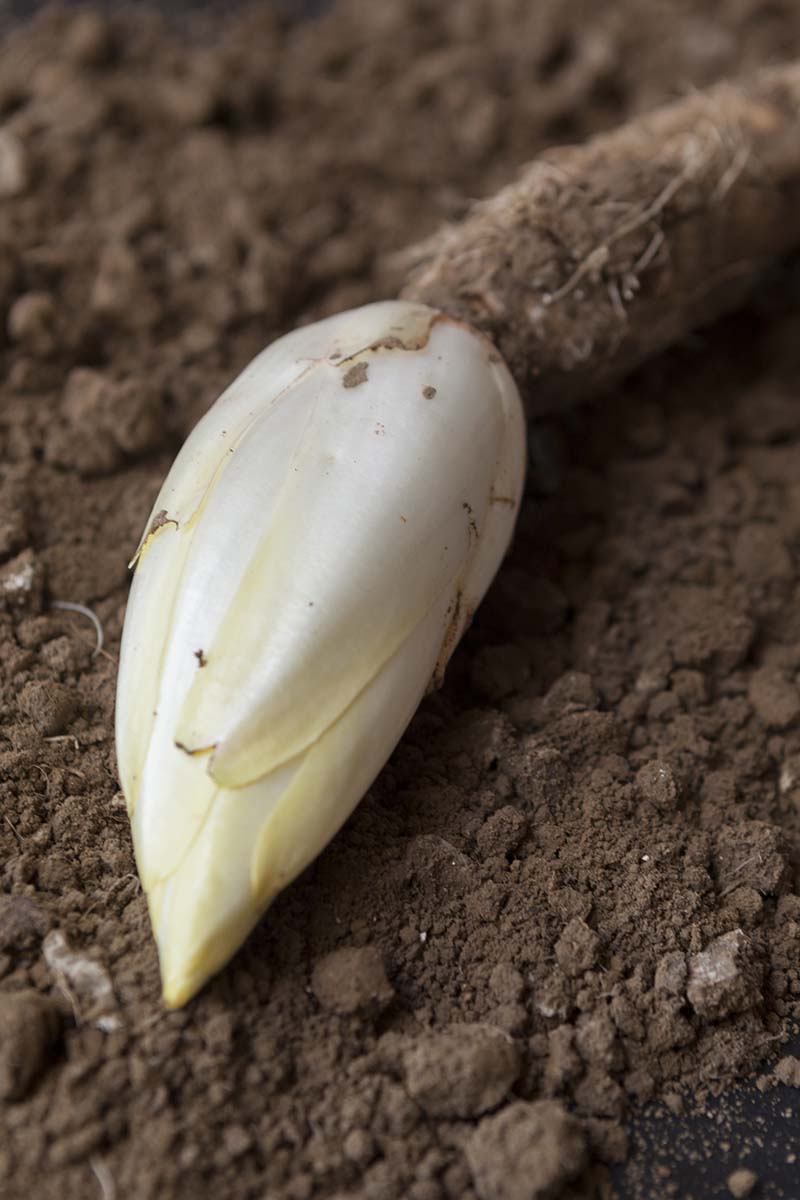
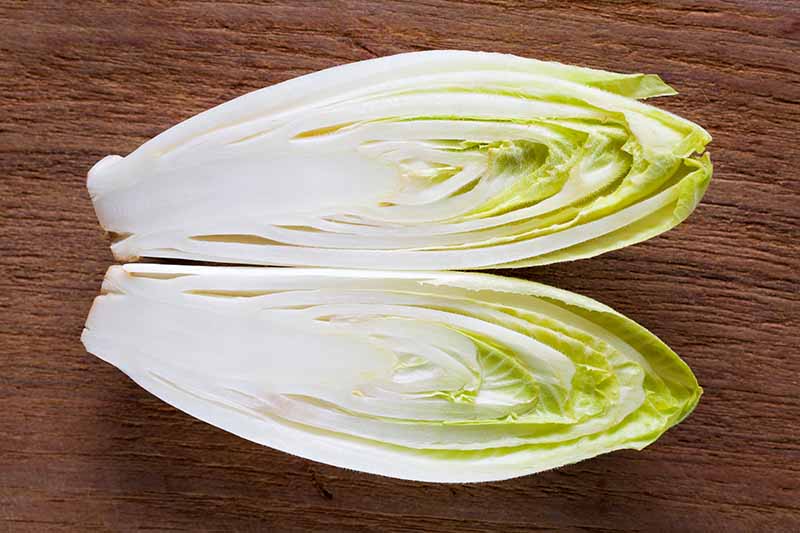
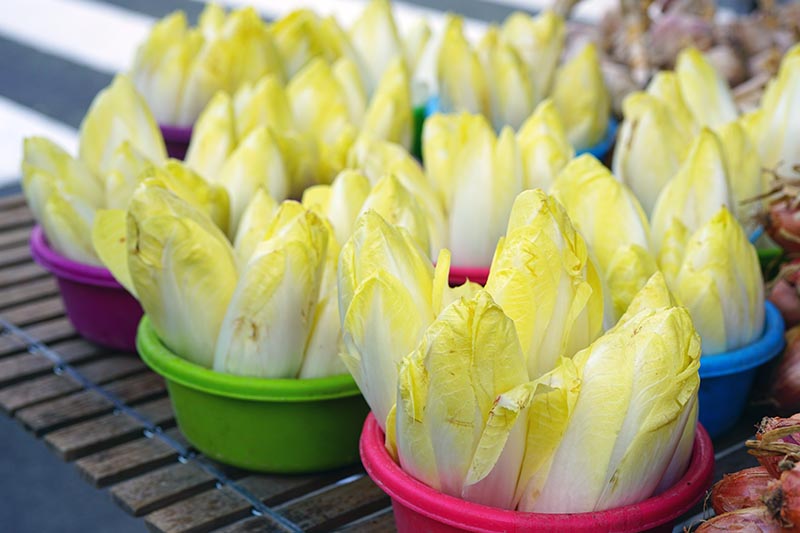
Belgian endive, on the other hand, is that compact, pale yellow head of greens with a cylindrical shape that you’ve no doubt seen at the grocery store, or at fancy restaurants.
It’s sometimes called French endive, witloof, chicory, succory, or chicons. In Australia it’s known as witlof and the French call it chicon.
After Belgian endive is first planted in USDA Hardiness Zones 4-9, it will grow a crown of green, oblong leaves that look somewhat like extra-large dandelion leaves. Underground, a tannish-white root forms.
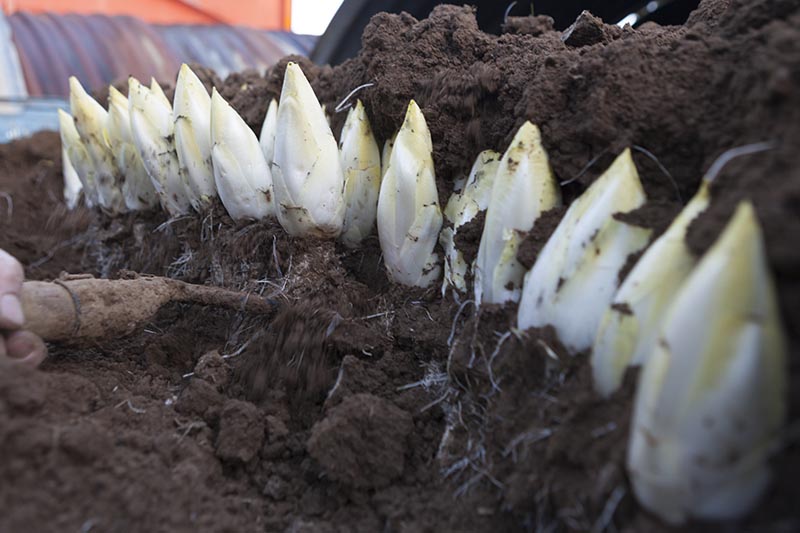
The familiar heads you have probably seen at the store are produced by digging up the root, cutting off the first head of leaves, and leaving the root in a dark, cool spot for about a month to develop the second head. I’ll cover more about this process below.
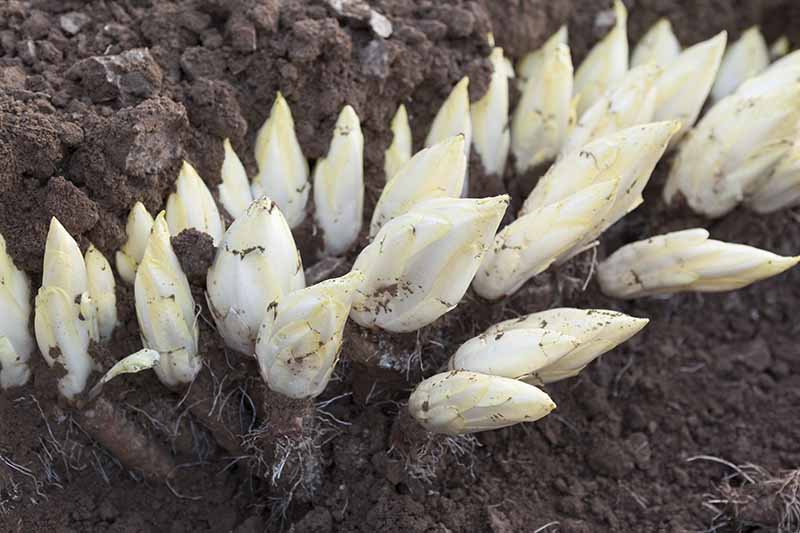
Some growers force the head – encourage the plant to produce outside of its normal growing season – and blanch it by burying the root under soil or a layer of straw.
Like its leafy, lettuce-like relative, the flavor is slightly bitter, with the addition of a subtle nuttiness that curly endive or escarole lacks.
Other species in the Cichorium genus are wild chicory and radicchio.
Belgian endive is a good source of vitamins B, C, and K. It contains calcium, iron, zinc, potassium, and folate, as well.
Now that we’re all on the same page, let’s dig in!
Cultivation and History
As with other plants in the Cichorium genus, Belgian endive likely originated in the Mediterranean region and Asia.
Originally, it was cultivated for its long taproot, which was used as a coffee substitute.
According to common lore, Jan Lammers, a farmer from Belgium, had to leave his farm in 1830 to fight for Belgian independence. When he left, he had chicory roots drying in his cellar.
While he intended to use the root once it was dry to make a coffee substitute, what caught his attention when he returned to his home a few months later was the pale, delicate head that had emerged from the roots.

He sampled the leaves and thought they tasted good, with a pleasingly crisp texture. Voila! Witloof, which means white leaf, was born.
A Belgian botanist called Brezier started cultivating and refining the plant and what we now know as Belgian endive hit the market in 1846.
Propagation
Belgian endive seeds are pretty undemanding, so long as you prep your planting spot in advance.
One of the most important things is to prepare the soil properly first. You need loose, loamy soil that retains water but is well-draining.
Turn your soil and remove any rocks before amending to improve the texture.
Rocks can cause roots to grow crooked or to form multiple forked roots rather than one thick, long, straight one, so toss them out of there.
You should conduct a soil test before planting so you know exactly what your soil condition is like. That way, you aren’t adding nutrients you don’t need or leaving out those you do.
Don’t add any manure to the soil when planting because it contains high levels of nitrogen which will encourage an abundance of leafy greens at the expense of root development. If you need to amend your soil, use well-rotted compost instead.
In early spring, after all risk of frost has passed, put your seeds in the ground a quarter of an inch deep.
But be careful, as temperature fluctuations – periods of warm, dry weather, followed by cold, wet spells – can cause your Belgian endive to bolt.
Some people opt to wait several weeks after the last frost for extra protection from any early spring wonkiness. Whenever you plant, just make sure that you have enough time for the heads to mature before a deep freeze arrives.
You can also plant in early fall in warmer regions. Put seeds in the ground about 100 days before the average first frost date in your area.
Pick a spot that receives full sun, or plan to provide some afternoon shade if you live somewhere that temperatures regularly soar above 80°F in the heat of summer.
Belgian endive should be spaced four to six inches apart in rows 18 to 24 inches apart.
I sow more seeds than I’ll need and thin them after a few weeks to keep only the largest, most robust seedlings.
Keep the soil moist while the seeds are germinating and as the seedlings begin to grow.
Seeds can germinate when air temperatures are between 45 and 85°F, with 70-75°F being ideal. It takes them about a week to emerge when temperatures are close to ideal.
How to Grow
Once you’ve got them in the ground, your most important job will be keeping your new plants watered well.
Make sure the soil stays evenly moist, and remember that growth below ground is the most important element during this phase. As with other root crops, if the soil dries out it may cause the roots to split.
It’s a good idea to head outside every day or so and test the moisture level of the soil by sticking your finger an inch or so down. If the soil feels like a well-wrung out sponge, you’re good. If it feels drier, add water.
Water deeply but infrequently rather than frequently and shallowly. You want to encourage the roots to grow deep and they’re going to go where the water is. If moisture is only available in the top few inches, that’s where the roots will want to stay.
From there, just make sure you’re pulling up any weeds as you see them, and keep an eye out for signs of pests or disease (more on that below).
Other than that, you can let them do their thing for now. There’s no need to add fertilizer as long as the soil was amended properly when you planted.
To help the soil retain moisture and to smother weeds, you can place an inch or two of straw mulch around your plants.
And again, remember that at this point, you’re growing a root crop. The tops are merely there to feed the roots. These aren’t going to be particularly beautiful plants during this phase, so don’t worry if it looks like you’re growing a field of weeds.
Forcing Heads
As I mentioned, growing Belgian endive is a two-step process.
The first part involves letting the plant develop that long, carrot-like taproot. Once the root has matured, it’s time to start the second step, which is to pull up the root and cut the leaves off.
Then, you’ll need to put the roots in a dark, cool location for about two months until a new, smaller head forms.

Encouraging the tender heads to grow during the second phase of growth isn’t complicated. After all, a farmer apparently discovered the process by hardly doing anything at all, right? But it is time-consuming and it takes a bit of planning.
To get this done, you are going to need to pull the roots out of the ground once they’re mature, usually after 80-140 days, depending on the cultivar.
You’ll know it’s time because the leaves will start to turn red at the base and the roots will be large, about one and a half inches in diameter or more. Just brush the dirt and mulch away from the top of a root to see how large it is.
Keep an eye on the weather forecast, and make sure to harvest before a hard freeze sets in.
Don’t wait too long to pull the plants up. If you do, they may bolt and then you won’t grow that second lovely head that you’ve worked so hard for.
If the plant does bolt, you can still use the root to make a coffee substitute, so all is not lost. But you won’t be able to enjoy any Belgian endive.
To harvest, use a fork to loosen the soil and lift up the plant, roots and all. Be careful not to damage the roots because they’ll be more prone to rot if they are damaged or broken.
Discard any small roots that are under an inch in diameter. Trim any roots that have multiple forks down to have one central root.
You need a large base to grow good-sized heads, so small or spindly roots won’t do.
Next, cut off the leaves to about an inch above the top of the root, and trim the roots so that all of them are about the same length, around six to eight inches.
Then place them upright in a deep planting container or bucket filled with a mixture of half damp peat moss and half sand. The roots should be arranged shoulder to shoulder.
I recommend you use a five-gallon plastic bucket filled about halfway. That way, you can easily put a cover over the top.
Place in a dark area where air temperatures are consistently around 32-36°F. This process is known as vernalization. A garage, greenhouse, or root cellar is usually ideal.
Humidity around 95 percent is also ideal, but don’t sweat the humidity too much. If you live in a dry area, cover the container with plastic to retain humidity.
Keep the growing medium moist but not soaking wet.
After a month, move the container to a warmer area with temperatures around 50-66°F that is completely dark. Even a little light will make the heads turn green and bitter. I use a closet, but a dark basement room or windowless bathroom could work, too.
Cover the plants with an opaque black garbage bag or tarp, to keep out light and retain humidity and moisture.
You should also keep an eye out for marauding mice. They’ll try to eat the roots and the developing heads. Again, using a deep bucket is recommended since mice usually can’t crawl in there.
The heads should form in about three to four weeks. They might not be quite as compact and pretty as commercially-grown heads, but they’ll be just as tasty and beautiful in their own right.
Growing Tips
- Keep the soil moist like a well wrung out sponge.
- Grow in full sun, or provide some shade in the afternoon in hotter regions.
- After about 80 days, dig up roots and start the forcing and blanching process.
Cultivars to Select
Many nurseries and garden supply stores sell true species Belgian endive under the generic name of “Belgian endive” or “witloof,” rather than listing the specific cultivar.

You can find seeds in a variety of packet sizes available from True Leaf Market.
There are several named cultivars available that are worth seeking out, in addition to the true species plant.
Flash
This cultivar doesn’t require soil for forcing.
Instead, you can place the roots shoulder to shoulder upright in a container and allow them to grow without adding a potting medium. It makes the whole process just a bit easier.
You’ll still need to keep them moist by spraying them with water every few days, though.
‘Flash’ is also quick to mature, ready to force after 80 days.
Macun
‘Macun’ was bred by growers in Europe and has extremely dense heads with golden, slightly bitter leaves. It’s ready for initial harvest after 125 days.
Roelof
This is another cultivar that doesn’t need soil for forcing. Roots are ready to harvest in 100 days.
Totem
‘Totem’ is a Dutch variety with large heads and uniform roots. Ready to dig up and force after 115 days.
Witloof Bruxelles
‘Witloof Bruxelles’ is of Belgian origin. It’s ready to force in 110 days, and produces uniform heads with an excellent, mild flavor.
Managing Pests and Disease
As mentioned, Belgian endive is a close relative of wild chicory and dandelion. So long as you prep the soil in advance, this plant is pretty tough. It doesn’t succumb to pests or diseases too often.
Herbivores
Animals like deer and rabbits love to chomp down on all of the plants in the Cichorium genus. Even worse, some herbivores go after the precious root. Here’s what to keep an eye out for.
Deer
Deer will not only munch on the leaves, but they’ll eat the roots too, if they can reach them.
Fencing is your best option for keeping these animals out of your garden, but we have an entire guide with other helpful advice.
Mice
Mice may be a problem when you are storing the roots to force the new heads. They’ll eat the developing heads and nibble on the roots. Mouse droppings can also spread disease.
Use your favorite mouse control option, whether that’s your reliable barn cat, eliminating entry points, or humane mouse traps by CaptSure, available at Amazon, to protect your precious Belgian endives.
Rabbits
Rabbits love to chomp on the leaves. If they are just taking a nibble here and there, I ignore them. They won’t hurt the plants enough to compromise the root, which is what we’re concentrating on during the first phase of growing.
But if they start decimating your plants, check out our guide for tips on keeping rabbits out of your garden.
Voles
While the other animals described here all tend to go for the foliage, voles (not to be confused with moles) attack the precious root.
These small brown rodents are about the size of a golf ball and may or may not have a long tail. You may not see the animals themselves, but rather, the two inch wide tunnels that they create throughout the garden.
Voles love root crops in general, and they also seem to prefer chicories. They’ll often start with the roots before working their way up to the leaves. That means you won’t realize that your plants are damaged until it’s too late.
You’ll likely need a multi-pronged approach to handle this animal. First, place traps around where they travel. Then, collapse any tunnels you see using a shovel or tiller.
Then, break out the repellents. I use two, one for repelling them from the garden space, and one for repelling them from the plants themselves.

Bobbex-R, which you can purchase through Arbico Organics, can be sprayed near the tunnels and areas where voles like to hide, such as in areas with 12-inch or taller plants, or at the base of trees.
Bonide Repels-All can be sprayed directly on your endives to keep voles away.

You can find this product available at Arbico Organics.
Insects
While it isn’t too big a deal if you have a little leaf damage from insects (we’re after the root initially, after all), pests also tend to spread disease.
Plus, a large enough infestation can cause roots to be stunted, which means the second-round growth will be smaller. Keep an eye out for the following common pests:
Aphids
Unless you have a massive infestation, aphids aren’t that big of a deal on your Belgian endive plants.
The problem is that these tiny insects (seriously, they’re itty bitty – about two millimeters long) may spread disease, and they secrete a sticky substance that attracts sooty mold.
There are thousands of species of aphids, but the ones you’ll most often encounter on endives are green peach aphids (Myzus persicae), lettuce aphids (Nasonovia ribisnigri), and plum aphids (Brachycaudus helichrysi).
Regardless of the specific variety that’s chowing down on your plant, the recommended treatment options are the same.
Your best bet is to blast your Belgian endives with a strong spray of water from the hose every day for a week.
This will knock the insects away and most won’t return. If you need a bit more firepower, mix a three percent dish soap and water mixture, and spray plants every seven days until they are gone.
Slugs and Snails
Like aphids, a few slugs and snails are no biggie. They typically won’t damage your plants enough to hurt the developing roots.
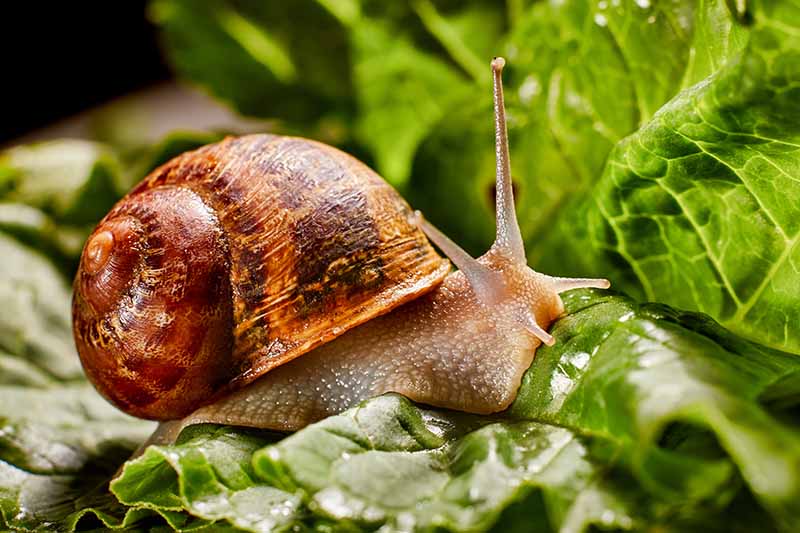
But there are two situations where snails can be a problem:
The first is if the snails attack your plants when they are young. A hungry snail can devour a seedling in no time flat, and just like that, your plant is gone.
The other potential problem is when you have a massive attack, with snails eating all of the foliage on the plant. This deprives the root of nutrients.
In either case, you need to take action before you lose your Belgian endives entirely.
You can learn how to control slugs and snails in our guide.
Thrips
Once again, the biggest problem with this pest is that it may spread diseases, like tomato spotted wilt virus.
Thrips are small (one millimeter long) brown, tan, or yellow insects that suck sap from the leaves and stems of plants.
There are two common types that may affect your crop, Western flower thrips (Frankliniella occidentalis) and onion thrips (Thrips tabaci).
They cause discolored leaves and silvery stippling. Leaves may curl or have small whitish bumps.
If you aren’t sure whether they are present or not, go outside with a piece of white paper and shake the leaves of your plants.
You’ll see little thrips fall onto the paper if you have an infestation. You may also see black specks, which are the frass or feces that they leave behind.
Reflective mulch is an effective method of control, as are floating row covers. Apply the mulch after the leaves have emerged and are about three inches tall.
You can also spray Belgian endive with a spinosad-based insecticide like Monterey’s Garden Insect Spray.

Monterey’s Garden Insect Spray
Arbico Organics carries this product, which you can use to coat the leaves once every few weeks until the pests are gone.
In addition, you can help avoid thrips in the first place by not planting your Belgian endive anywhere near plants in the onion family (think chives, leeks, garlic, flowering alliums, and so on).
Also avoid planting near cereal grains because thrips breed on these crops during the spring.
Read more about controlling thrips here.
Disease
Belgian endive suffers from many of the same diseases that impact other leafy greens and chicories.
Here are the most common ones to watch for.
Anthracnose
Sometimes called leaf spot fungus, ring spot, or shot hole, anthracnose is a fungal disease caused by Microdochium panttonianum.
Watch out for small water-soaked spots forming on the leaves of your plant. It usually starts out on the outer leaves and on the underside rather than the top.
As it progresses, the spots turn yellow, may merge, and can rot, causing holes.
Now, I know what you’re thinking… who cares if plants exhibit signs of this disease on leaves that you aren’t planning on using anyway?
The problem is that if it progresses, this disease causes the leaves to die entirely and can deprive the root of nutrients so that it becomes stunted.
The fungus thrives in cool and wet weather.
It can also survive in the soil, so don’t plant lettuce or chicories in the same spot more than once every three years.
You should also take care to irrigate at the soil level rather than on the leaves, since it can spread via splashing water.

To treat anthracnose, spray the foliage with a liquid copper fungicide like this one from Bonide, available at Arbico Organics.
You’ll need to spray the top and bottom of the leaves once a week for a few weeks, until the situation is under control.
Bacterial Soft Rot
Caused by bacteria from the Erwinia genus, this disease attacks the roots of the plant.
Underneath the soil, the root will develop water-soaked lesions and cracks that may ooze a slimy brown liquid. The lesions will eventually turn soft and rot.
Aboveground, the leaves may start to wilt or the plant will look stunted.
Unfortunately, there is no cure, so prevention is vital. Rotate crops so that you aren’t growing anything in the Asteraceae family in the same place more than once every three years.
Also, make sure you’re planting in well-draining soil. Mind proper spacing recommendations and keep the garden weed-free.
Insects can also spread this disease, so keep infestations under control.
Damping Off
Most gardeners will encounter damping off at some point, and chicory plants are included among the many that can be impacted by this disease.
It is spread by species of oomycetes in the Pythium genus and by Rhizoctonia solani.
Seeds will fail to emerge or seedlings will be weak, spindly, and will have stems that appear to be water-soaked at the base, as well as rotting roots. Eventually, the seedlings will die off or fail to thrive.
Treatment won’t help once an infection sets in, so it’s important to prevent it from taking hold in the first place. The pathogens that cause damping off favor waterlogged soil, so make sure your plants have good drainage.
Clean all of your tools with a 10 percent bleach and water solution before working with them. Treat seeds with a product containing the beneficial bacteria Streptomyces, which kills off the oomycetes that cause the disease.
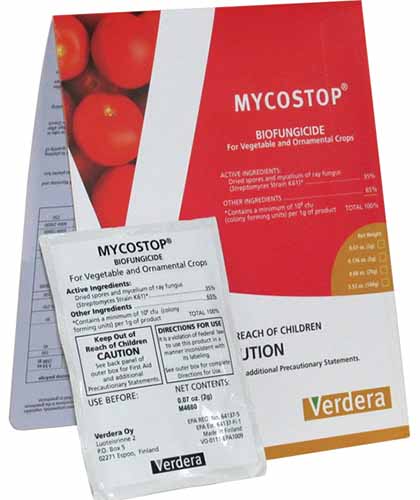
Arbico Organics carries a product called Mycostop that contains this bacteria.
You mix it with water and soak the seeds for a half hour or so before planting.
Read more about damping off here.
Downy Mildew
In plants in the Cichorium genus, downy mildew is caused by the water mold (oomycete) Bremia lactucae.
This disease causes a fuzzy white mold to form on the underside of leaves. Young leaves may dry up and fall off, while older ones will thin out and turn papery.
It can be spread via weeds and plant debris, which is why it’s important to keep your beds clean.
Neem oil is effective for treating a mild outbreak, but you’ll need something a bit more potent for a more severe problem.
Once again, copper fungicide is an effective treatment.
Neem oil can be combined with water and sprayed on the foliage of your Belgian endive plants.

You can purchase a quart or gallon of pre-mixed neem oil, or a pint of concentrate, from Arbico Organics.
Fusarium Wilt
Fusarium wilt, as you may have guessed, causes leaves to wilt and droop. They may also turn yellow or you might see water-soaked lesions.
This fungal infection, caused by Fusarium oxysporum, spreads through water. Watering on the leaves rather than the soil and planting in soil that drains poorly creates the ideal conditions for it to run through your garden.
You should also rotate your crops to prevent the spread of this disease. Don’t grow any type of chicory in the same place more than once every three years.
Make sure to clean up your garden beds and remove and dispose of any infected plants right away. Don’t put them in your compost or you risk spreading this disease into the rest of your garden.
Harvesting
After about three weeks in the dark, you should have heads between five to eight inches tall. It’s time to slice them off at the base, using a sharp knife or a pair of clippers.
Don’t toss the roots, though. If you leave them in place, they will send up yet another set of leaves. They won’t be as large or compact as the first harvest, but they’re still delicious.
Preserving
You can store unwashed heads in the refrigerator in a plastic bag for up to a week.
Like most greens, this plant doesn’t preserve too well, and it’s best to enjoy it while it’s fresh. Still, if you have a large harvest that you don’t want to waste, you can freeze or pickle the leaves.
Freeze as you would spinach, by washing and blanching the leaves in hot water for three minutes. Dry them on paper towels and then put the leaves in resealable plastic bags in the freezer.
To pickle, cut the leaves so that they’ll fit into your chosen jar. Bring one cup white vinegar and a heaping tablespoon of sugar to a boil on the stove. Let the mixture cool.
Pack the jar with leaves and fill with the vinegar and sugar solution.
Add your preferred spices: If you like sweet flavors, you might put in some sugar, cinnamon, salt, cloves, and cardamom. For savory, use peppercorns, mustard seeds, cumin seeds, and bay leaves. Play around to figure out what combo you like best.
You can quickly roast the spices in a pan to release their fragrance or just toss them into the jar.
Store in your refrigerator, shaking the container every day, for a few weeks.
Recipes and Cooking Ideas
Bitterness as a flavor has really come into its own in recent years. You’d be hard-pressed to find a bar that doesn’t whip up a killer negroni these days, and the bitter double IPA has surged in popularity.
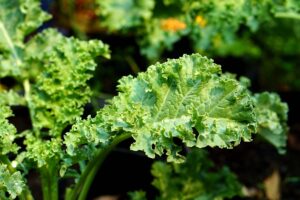
Bitter dandelion, escarole, and kale are all regular features at many restaurants. Belgian endive gives you yet another bitter flavor to experiment with in the kitchen.
The leaves can be used anywhere you might use lettuce or cabbage, whether that’s in a slaw or a salad. But I think Belgian endive is particularly tasty as a replacement for kale or spinach.

The leaves also make a nice little cup to stuff with anything you can imagine. Try goat or blue cheese, walnuts, and bacon.
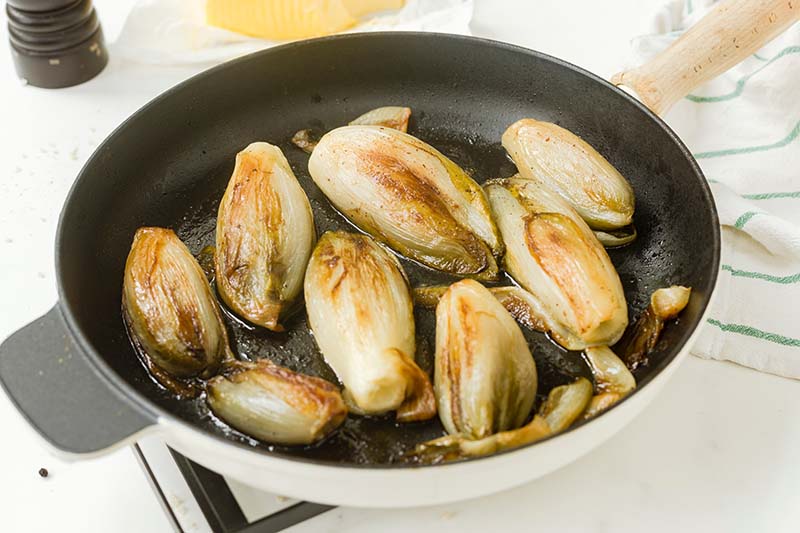
In Europe, Belgian endive is usually cooked. You absolutely must try it drizzled with olive oil and roasted over an open flame. You can also braise the heads in a pan.
Here’s a fun gift idea. If you plan ahead, time it so that you’ll have the forced heads just about ready to harvest around the end of December.
Put the roots in bunches of six or so in decorative containers and fill with the sand and peat mixture. Essentially, you’re making smaller containers of roots to force and blanch as we described above.
Then, during the holidays, you can give loved ones a container full of Belgian endives still attached to the root.
It’s a seriously impressive gift that any foodie is going to rave about. I did this one year about a decade ago and people still talk about it.
Quick Reference Growing Guide
| Plant Type: | Leafy biennial vegetable | Maintenance: | Low |
| Native to: | Mediterranean | Tolerance: | Frost |
| Hardiness (USDA Zone): | 4-9 | Soil Type: | Organically rich loam |
| Season: | Spring, fall | Soil pH: | 5.8-8.5 |
| Exposure: | Full sun to part shade | Soil Drainage: | Well-draining |
| Time to Maturity: | 120+ to harvest the blanched head | Companion Planting: | Carrots, dill, fennel, tomatoes |
| Spacing: | 4-6 inches, rows 18-24 inches | Avoid Planting With: | Alliums, cereals |
| Planting Depth: | 1/4 inch | Family: | Asteraceae |
| Height: | 12 inches | Genus: | Cichorium |
| Spread: | 6 inches | Species: | intybus |
| Water Needs: | Moderate | Variety: | var. foliosum |
| Common Pests: | Deer, rabbits, voles; Aphids, slugs, snails, thrips | Common Diseases: | Anthracnose, bacterial soft rot, damping off, downy mildew, fusarium wilt |
Dive into Growing Your Own Belgian Endive
Whew! We made it! I know growing Belgian endive isn’t exactly the quickest process, but it’s so worth it when you’re finally digging your fork into a tender head of braised witloof that you grew yourself.
Armed with a lot of patience, the right information, and a sense of adventure, you’ll be harvesting your own crop in no time.
Okay, well, not in no time, but in a few months, anyway.
I’m excited to hear how you like growing these incredible plants. They aren’t very common in the home garden, so we Belgian endive growers are a bit of a rare breed. Share your adventures with us in the comments section below!
Have you fallen in love with the wild world of chicory? I don’t blame you, they’re delightful. If you want to get to know and grow Belgian endive’s siblings, take a look at these guides next:
© Ask the Experts, LLC. ALL RIGHTS RESERVED. See our TOS for more details. Product photos via Arbico Organics, Bonide, and True Leaf Market. Uncredited photos: Shutterstock.

Thank you for this thorough guide!
Great detailed article of Endive. Love to learn more and make it a small business. Where should I start? I’m in Thailand.
Hi Tom, thanks for the kind words. I’m not sure I can help with starting a business, but as far as beginning with endive, your first task would be to try out starting a few plants and determine how difficult it will be to grow them in your environment. If you’re located somewhere cooler, like the highlands, your growing conditions might be ideal for endive. In warmer regions, your challenge will be the heat. Endive is a cool-season veggie and does best in cooler weather. Anything above 85°F (about 30°C) could result in the plant bolting (going to seed). Start… Read more »