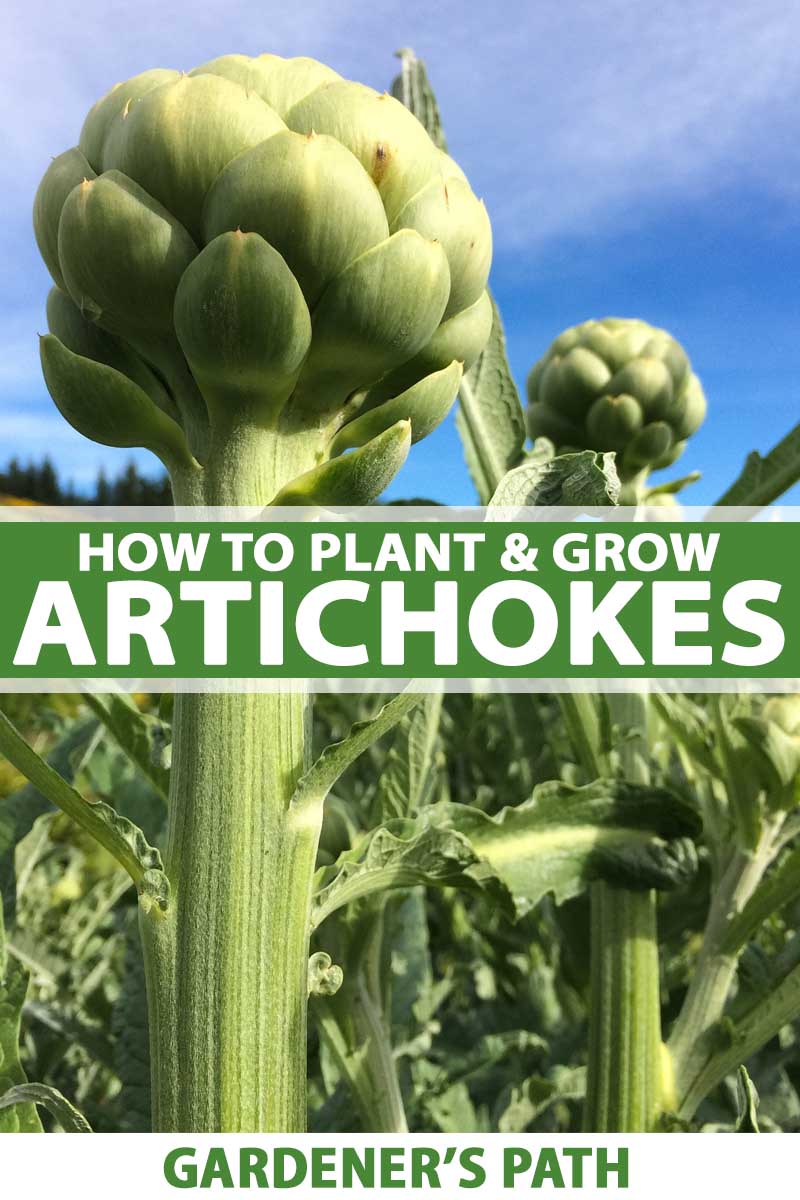
Cynara cardunculus var. scolymus
If you love to eat artichokes, why not grow your own fresh supply? You can grow this highly ornamental plant in your garden or yard, where its silvery foliage can do double duty as a striking landscape feature.
Even those of us with shorter growing seasons can grow these Mediterranean vegetables in our gardens with the right planning and cultivars.
We link to vendors to help you find relevant products. If you buy from one of our links, we may earn a commission.
In this article, I’ll include options for growing these vegetables in different conditions so you can find the best way to bring your plants to a tasty harvest.
Here’s what I’ll cover:
What You’ll Learn
Just to make sure we’re on the same page before we get started, this article is about Cynara cardunculus var. scolymus, also known as “globe artichokes,” and not the tubers called “sunchokes” or “Jerusalem artichokes,” which are botanically classified as Helianthus tuberosus.
If the tubers are what you’re after, consult our complete guide to growing and caring for Jerusalem artichokes.
Cultivation and History
While they may not be the most common garden vegetable, artichokes can nonetheless be grown at home in your garden, or even in your flower beds.
And they are adaptable to more climates and growing conditions than you might think.
They are perennial in USDA Hardiness Zones 7 to 10, and depending on the variety, this range can be extended to Zones 5 and 6 with overwintering protection.
Gardeners in colder zones will want to treat this veggie as an annual.
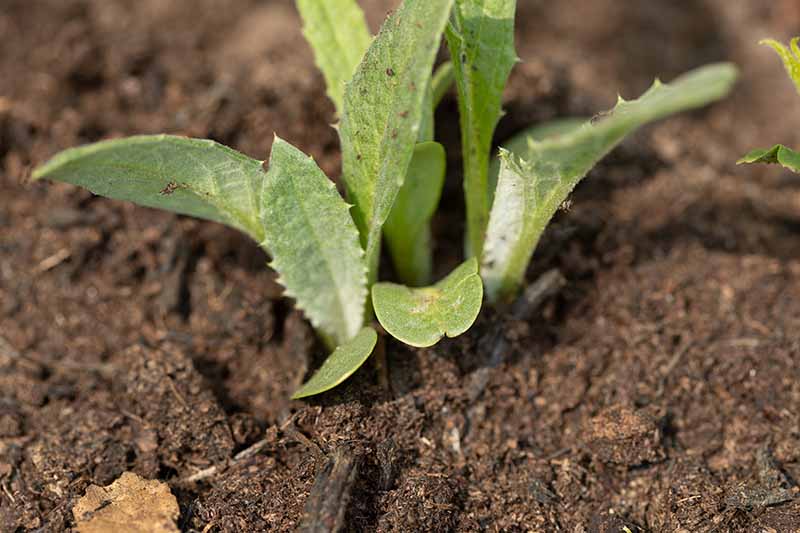
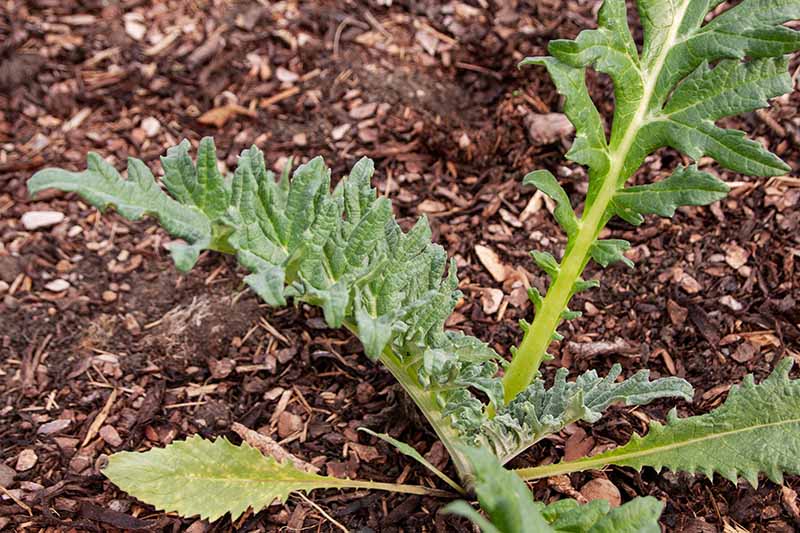
Once you are familiar with the appearance of an artichoke plant, you may notice its strong resemblance to a thistle.
This similarity is no coincidence – artichokes don’t just look like thistles, they are thistles.
Among this vegetable’s more obvious relatives are some other thistles you may have heard of, such as the ornamental flower, small globe thistle, as well as the medicinal herb, milk thistle.
But artichokes are also related to some members of our garden landscapes that may come as more of a surprise, such as cosmos, dandelion, sunflower, and marigold.
A member of the Asteraceae family, artichoke is descended from the wild cardoon, and a domesticated variety of this species is cultivated for its fleshy edible stems.
In fact, all three of these plants – artichoke, cultivated cardoon, and wild cardoon – are considered to be varieties of the same species, C. cardunculus.
Although research supports the classification of the artichoke as C. cardunculus var. scolymus, some sources still classify it as a distinct species by the name of C. scolymus. It is also sometimes classified as C. cardunculus ssp. cardunculus.
Despite these discrepancies in taxonomy, the artichoke’s genus name remains the same: Cynara, a word derived from the Greek term for dog, referring to the toothlike margins of its leaves.
As for the species name, Cardunculus, this word is related to the Latin term for “thistle.”
When it comes to the roots of its common English name, the history is a bit more circuitous. The word “artichoke” was likely adopted into the English language and anglicized from the Northern Italian “articiocco,” which was itself a transformation of the original Arabic word, “al-karsufa.”
When you trace the history of its common name, you start to reveal the journey this thistle has taken throughout its history as a food plant.
Artichokes may have been used as a food by people in ancient Greece, and were most certainly cultivated as a food during the time of the Roman Empire.
Northern African populations most likely introduced or reintroduced the vegetable to Italians, thus resulting in its common word origin. And by the Renaissance, it was being sold in markets and is featured in several paintings from that period.

But before it was considered a prized vegetable, it was just a thistle growing in its weedier form, the wild cardoon.
The species is native to Northern Africa, the Mediterranean, the Balkans, and the Macaronesian archipelagos – the islands off the northwest coast of Africa.
A Note of Caution:
Speaking of weeds, before you decide to grow this thistle, be aware that it can become weedy in certain conditions.
Artichoke has naturalized in both California and Arizona, meaning it now grows there without any direct help from human hands. And in some parts of California, it’s considered a noxious weed.
If you live in a climate similar to the one where this plant originated, instead of growing it in the ground, consider growing it in a large container, and make sure to harvest buds before they flower to prevent seed dispersal.
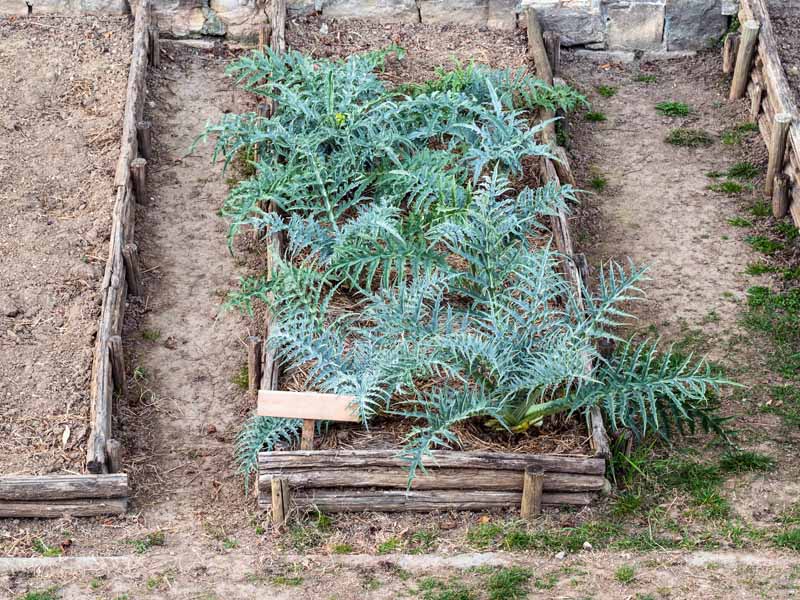
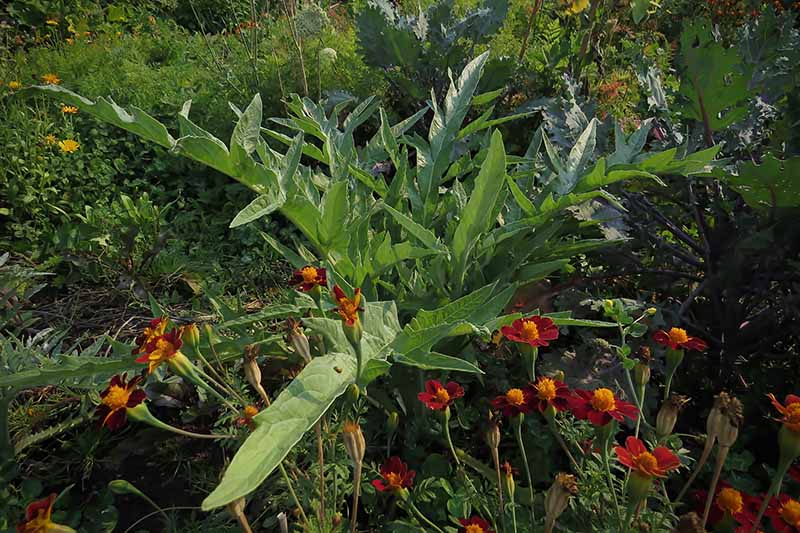
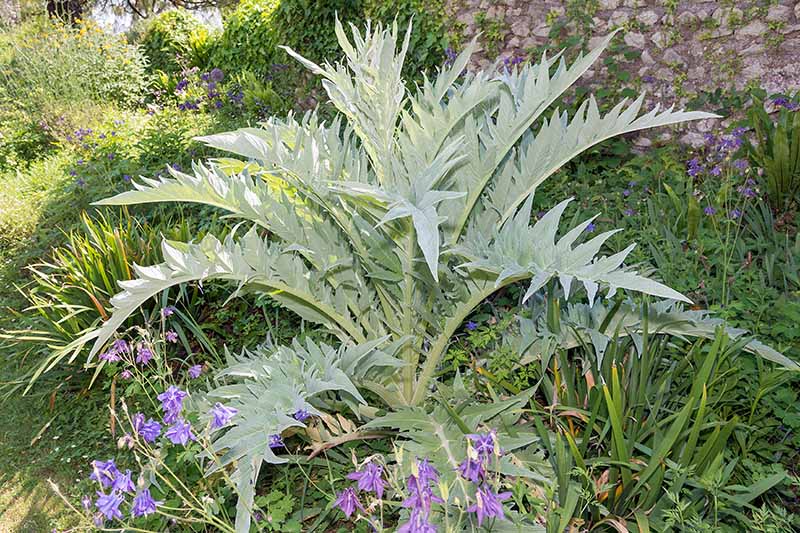
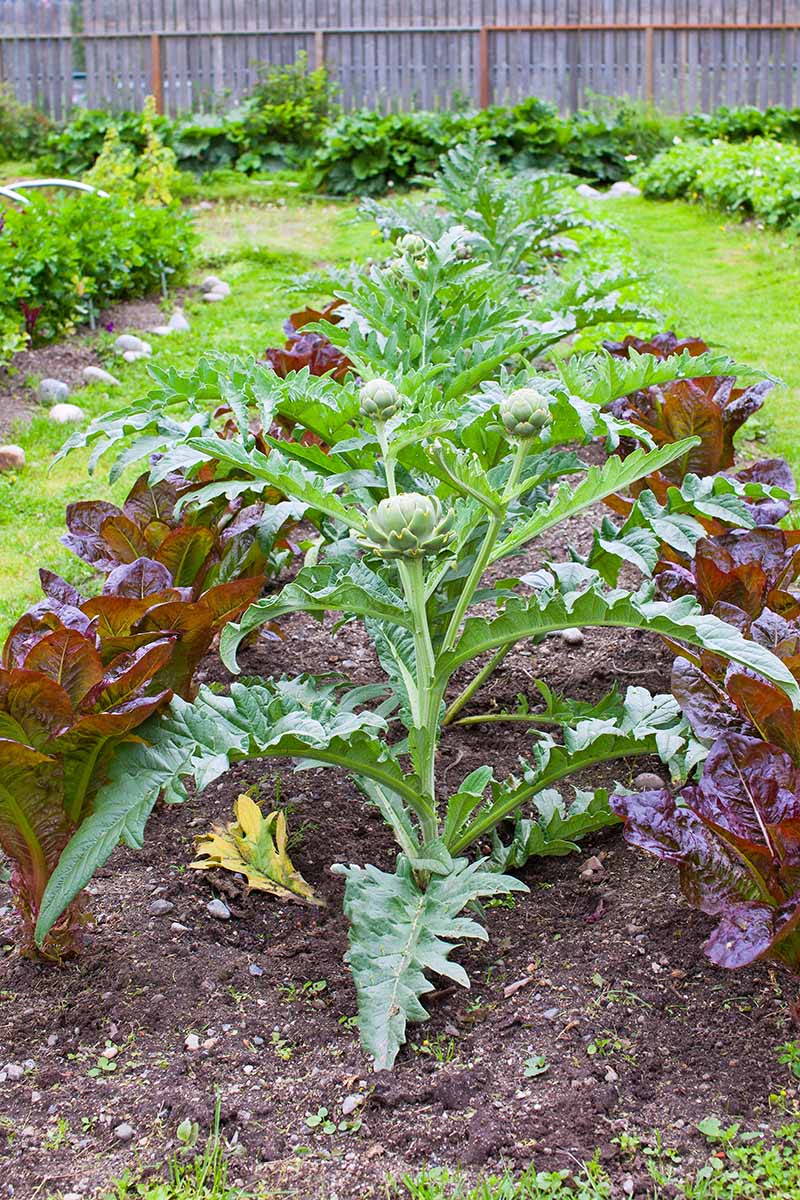
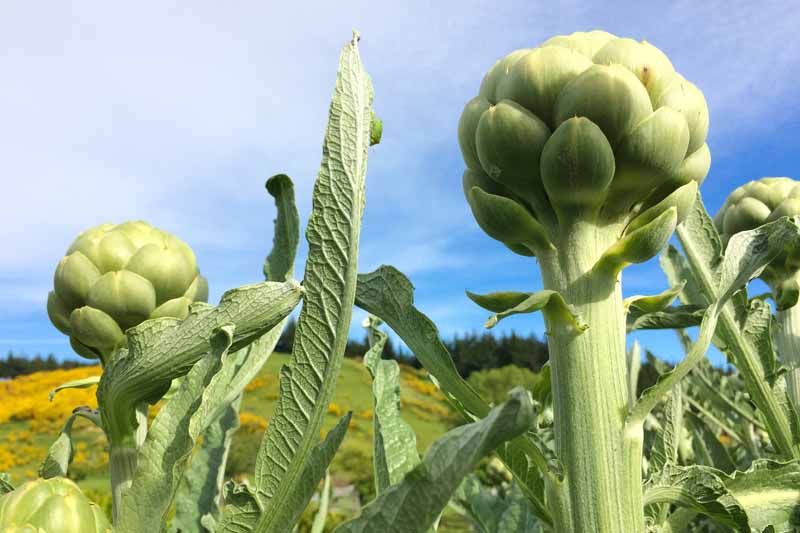
When grown intentionally in a landscape, artichokes can make striking specimens.
These thistles have large, deeply toothed leaves that are light green to silvery gray in color, and grow to approximately 32 inches in length. Together, the leaves form large rosettes that can measure six to eight feet across.
In most cultivars, both the leaves and the stems are spiny.
The plants tend to be slightly shorter than they are wide, growing to be about four feet tall, with some varieties growing even taller, to six feet.
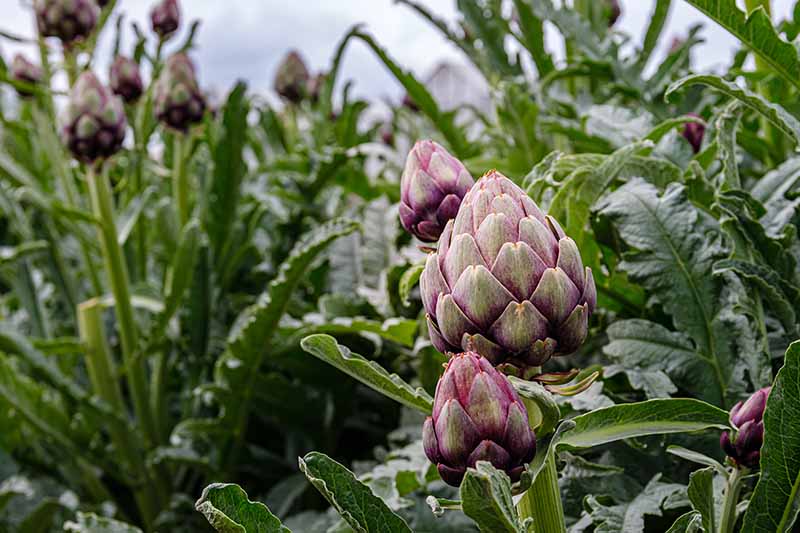
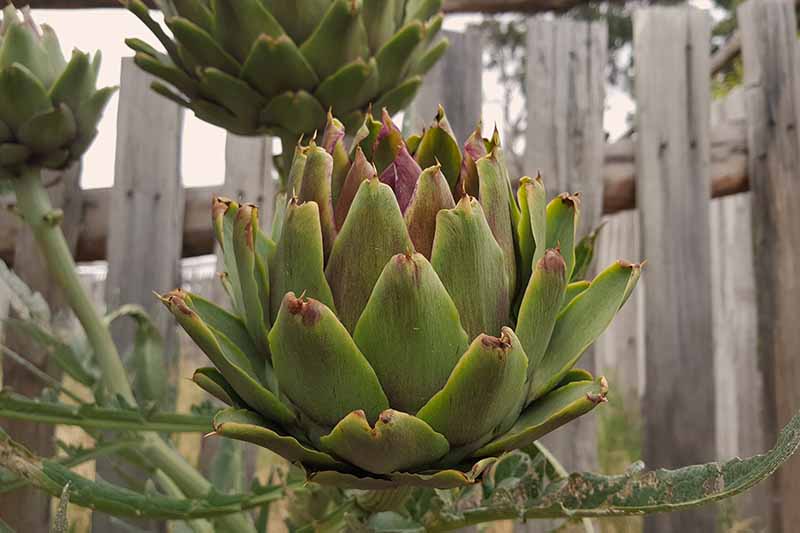
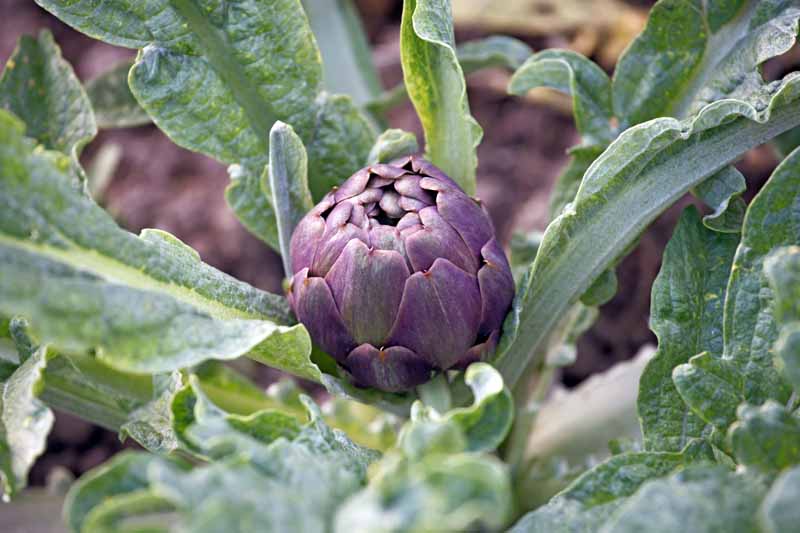
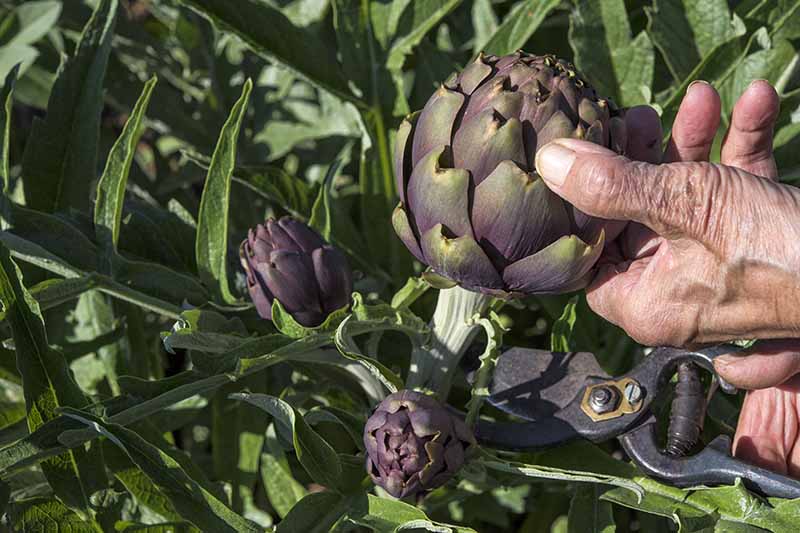
From the center of the plant, flower stalks emerge with a green or purple bud on the end of each stalk – this flower bud is the edible part, which we commonly call a “head.”
Side branches will also emerge from the main stalk and produce smaller heads, which are sometimes called “baby artichokes.”
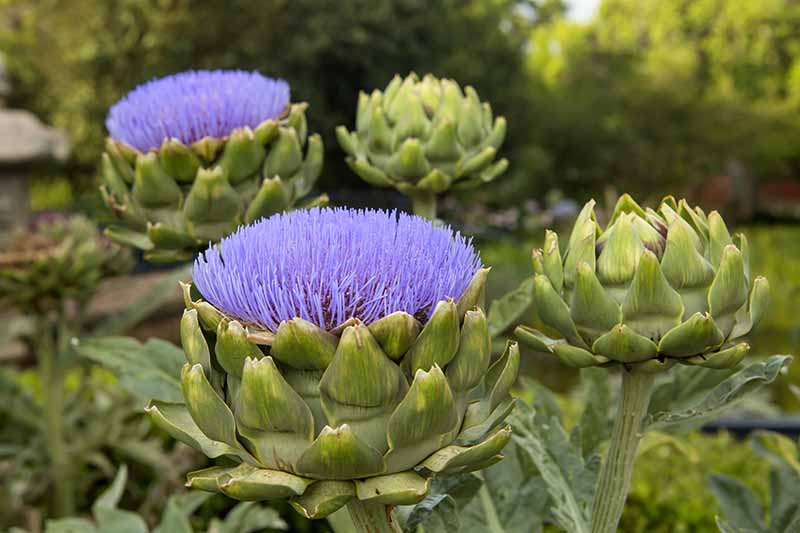
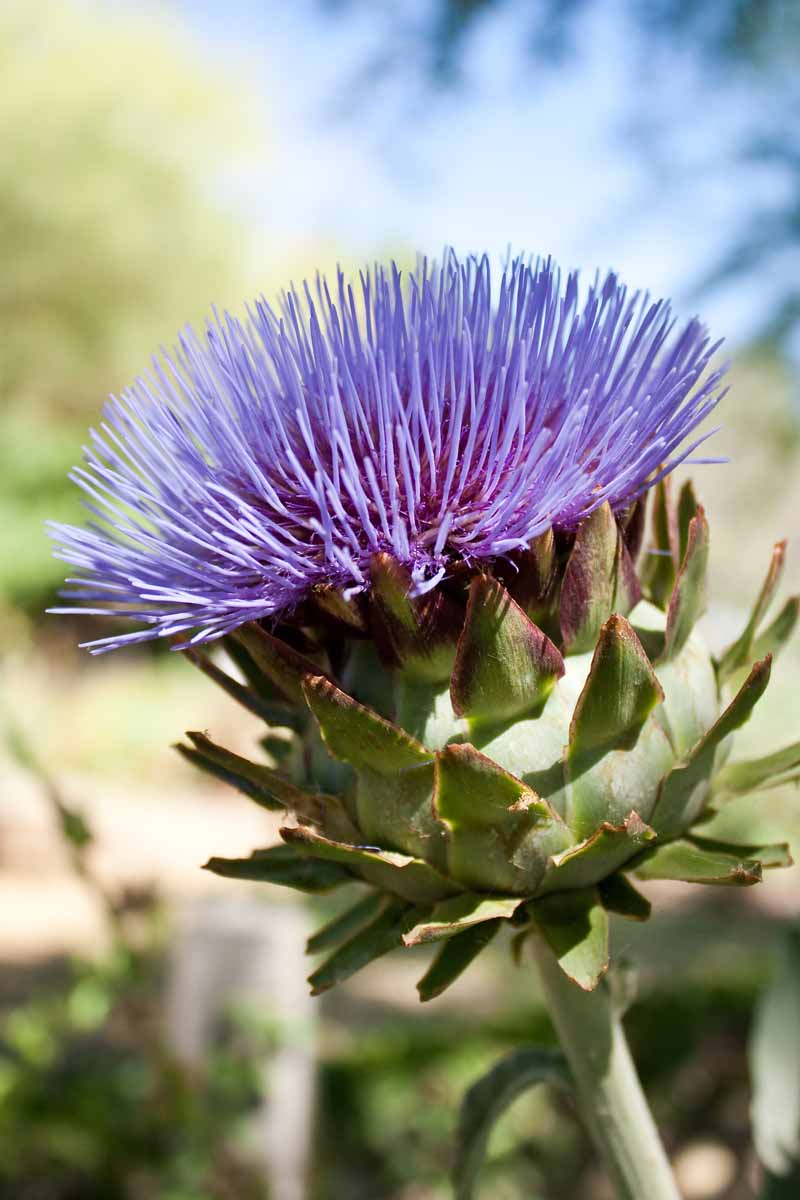
If the heads aren’t harvested, but are instead allowed to bloom, they become tough and unpleasant to eat. However, they are a sight to behold, with bright purple ornamental flowers.
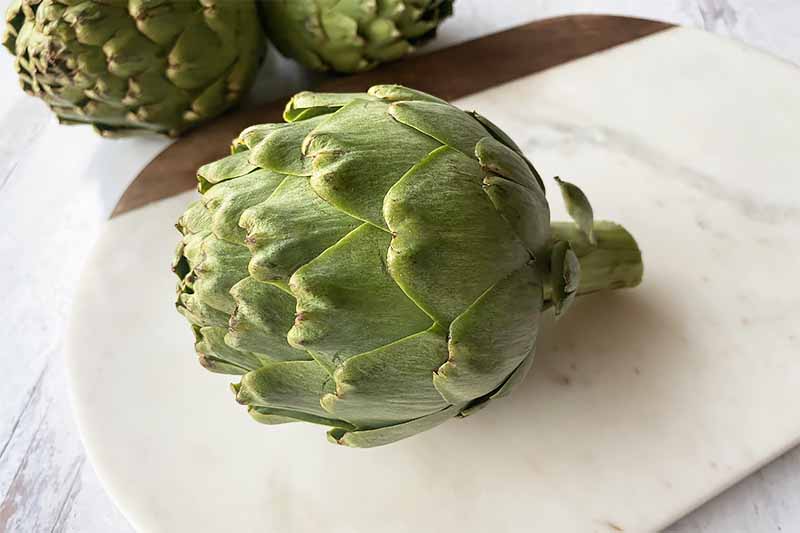
An artichoke picked in time to eat will keep its outer bracts tightly closed.
Within these outer bracts are softer inner bracts, immature florets called the “choke,” and below this is the tender heart. The bases of the outer bracts, large portions of the soft inner bracts, and the heart are all edible. The top portion of the stem, just below the heart, is also edible.
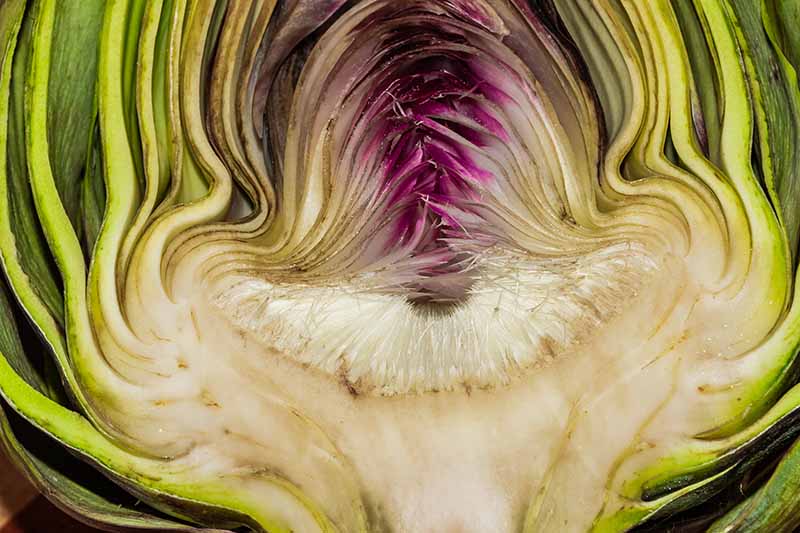
To enjoy these edible portions, the artichoke is trimmed to remove all of the sharp parts of the bud – I’ll describe that process later in the article, so keep reading!
In addition to being enjoyed as a delectable food, centuries ago, these plants were commonly treated as aphrodisiacs, and sometimes still are today.
Currently, globe artichokes are still used medicinally, but for less romantic purposes. Artichokes contain cynarin, a compound which demonstrates antioxidant properties, and may have the potential to protect the liver and the cardiovascular system, among other benefits.
Another health benefit of this veggie lies in its fiber content – thanks to its inulin content, artichokes are an excellent source of prebiotics, the indigestible fibers that feed our gut microbiota.
In addition to its medicinal and culinary uses, many gardeners are coming to appreciate the artichoke for its merit as a landscaping plant that provides architectural interest in the garden, with its distinct lines and upright stature.
Propagation
Artichokes can be propagated by seed as well as through division. Whichever method you choose, first you’ll want to prepare your garden beds.
Preparing Your Beds
Before you get started, make sure to choose a location in full sun, with plenty of room to accommodate the large stature of these Mediterranean thistles – some cultivars can grow to be eight feet wide.
Next, you’ll want to create a welcoming environment for your new artichoke plants, since these thistles are moderate to heavy feeders that prefer growing in rich soil.
To accommodate your plants and ensure the best possible harvest, mix compost or well-composted manure into the top twelve inches of the soil.
Assistant Professor and Extension Horticulturalist Joseph Masabni, and Extension Assistant Patrick Lillard, at the Texas A&M University System Extension, recommend mixing in 100 to 140 pounds of composted manure into the soil for every 100 square feet of garden area prior to planting.
One final note on selecting the location of your artichoke beds: these plants can live for fifteen years or more in certain zones, so think about your long-term landscaping plans when growing these as perennials.
From Seed
Artichokes can be grown from seed either by sowing them directly into your garden soil, or by starting them indoors to be set out later as transplants.
Since these vegetables can take up to 180 days to reach maturity, use the length of your growing season to guide you in this choice. If your growing season – that’s to say the average number of frost-free days in your location – is long enough, I recommend direct sowing.
For short season gardeners like me, however, starting these vegetables indoors may be the only way you can be sure to harvest your crop before the cold weather returns.
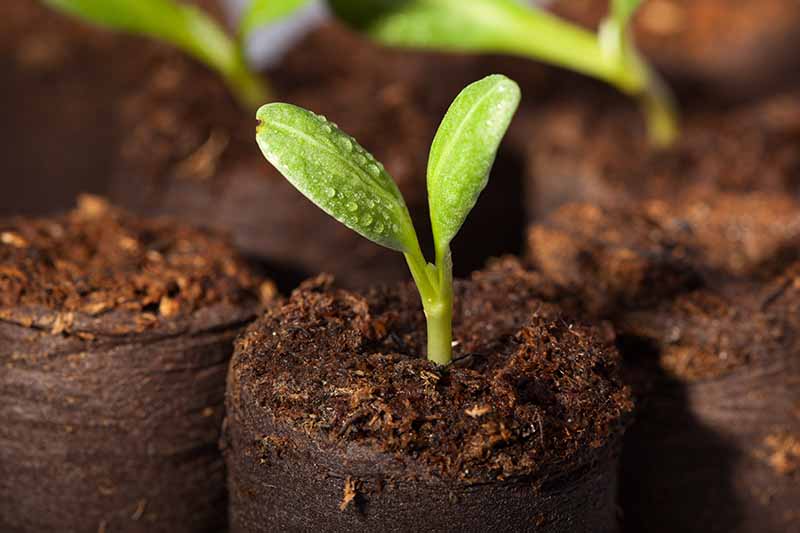
Whether growing your seedlings indoors or out, for better germination, you can cold stratify your seeds for two weeks prior to sowing them.
Wrap them in a damp paper towel, place this in a plastic bag or airtight container, and store it in the refrigerator for two weeks prior to starting your seeds.
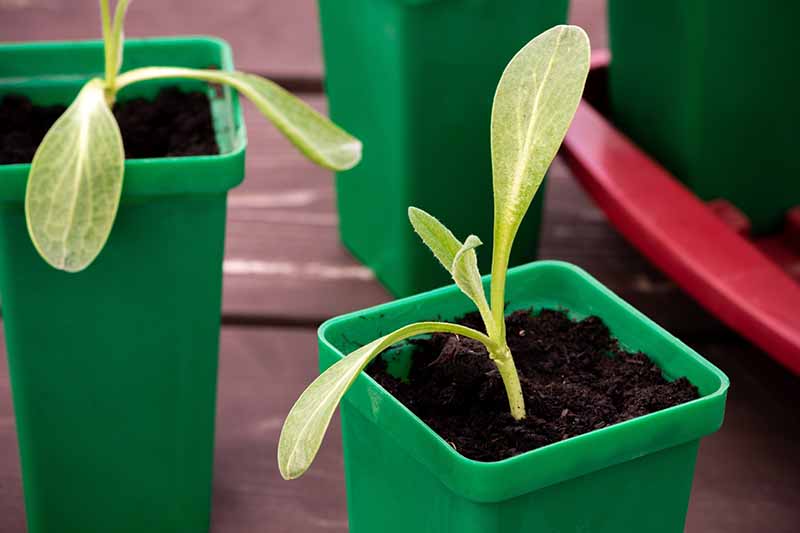
Starting Indoors
When starting artichokes indoors, you’ll need to plan ahead – these seeds should be started ten to twelve weeks before your last spring frost date.
This means that you’ll need to put this project on your winter “to do” list – consider scheduling it in your garden journal to make sure you don’t miss your ideal seed starting window.
Once it’s time to start your seedlings, gather your supplies. In addition to seeds, you’ll need a sterile starting mix and nursery pots.
I recommend starting these seedlings in biodegradable four-inch pots to reduce the risk of disturbing the seedlings’ sensitive tap roots when transplanting.
You can find biodegradable CowPots, made from composted cow manure, for purchase at Arbico Organics.
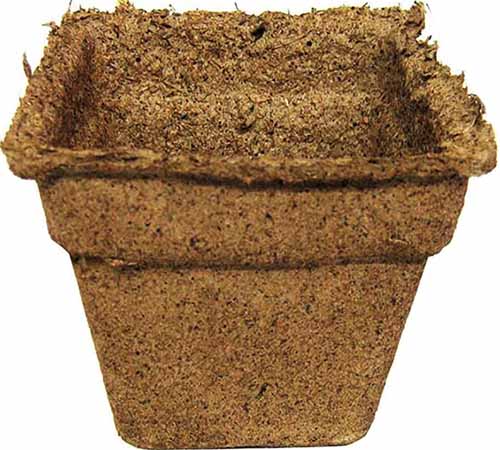
Four-Inch Biodegradable CowPots
Fill your pots with seed starting mix. It’s wise to plan on starting more seeds than you need to make up for poor germination rates, so sow two seeds to a depth of half an inch in each pot.
Use a spray bottle to water in your germinating seeds. This method of watering will ensure the seeds remain moist but not waterlogged.
And for best results, use a heat mat to keep pots at 70 to 80°F during germination.
If you need to purchase a heat mat, Vivosun has a waterproof heat mat available via Amazon.
While waiting for your seeds to germinate, keep them warm, and mist the soil daily to keep it moist.
Be patient during this process – these seedlings can take up to 21 days to emerge.
Once your seedlings have germinated, place them in a sunny windowsill or under a grow light. Read our article on the best grow lights to learn more about using these indoor gardening tools.
In addition to providing an ample supply of light, continue watering those young seedlings daily if needed as they grow.
As they mature, you’ll need to thin your seedlings. If you have more than one seedling growing per nursery pot, keep the strongest one and snip the other off at the base with a pair of clean scissors. Leave only one seedling in place per nursery pot.
When the seedlings have at least four true leaves, you can begin their transition to the outdoors. You’ll learn more about this process in the section below on transplanting.
For further guidance on growing seedlings indoors, refer to our complete guide to starting annuals from seed.
Direct Sowing
In climates that don’t dip below 15°F, artichoke seeds can be sown outdoors in spring. In locations with very mild winters, these seeds can be sown outdoors in the fall.
Just remember that your soil will need to be 70 to 80°F for seeds to germinate – use a soil thermometer to check the temperature of your soil to make sure it’s warm enough.
The day before sowing, lightly water in your bed so that the soil is moist but not soggy when you plant your seeds.
When you’re ready to sow, smooth the surface of the soil so that it’s even. Sow seeds in groups of two at a depth of half an inch.
Allow three to five feet of space between groups of seeds, depending on the mature size of your selected cultivar. Be sure to read catalog descriptions or check seed packets for this information.
Your germinating seedlings will need frequent waterings. How frequent? That will depend on your climate, soil, and weather.
In my hot, arid location, and sandy soil conditions, I generally water my germinating seeds and young seedlings once a day unless we receive an unexpected rain shower.
When watering, provide a gentle shower from a watering wand. Seedlings should emerge from the soil within 21 days.
Once seedlings emerge, choose the strongest looking one in each pair to continue growing, and snip the other one off at the base with a pair of scissors.
Pulling them out might be tempting, but it’s best to refrain from this to avoid disturbing the roots.
Continue a gentle watering routine while your seedlings are young. Watering established plants will be discussed below.
From Transplants
Transplanting artichokes can be a bit trickier than it is for many other types of vegetables, at least if you’re hoping for a harvest in the first year.
That’s because artichokes don’t produce flowers until their second growing season when left to their own devices.
Like many varieties of fruit trees, they require exposure to cold temperatures for a certain number of hours, a condition otherwise known as “vernalization,” in order to produce buds.
Young transplants can be tricked into believing they are in their second growing season (and thus coaxed into producing buds) if they are subjected to a period of cold – but not freezing – temperatures.
To induce budding, your young plants will need to be exposed to temperatures between 35 and 50°F for at least 10 days.
One way to provide artichokes with this cold period is to transplant your seedlings out four to six weeks before the last frost date, assuming temperatures are in the right range.
Another way to safely expose young transplants to these cold temperatures is to harden them off in a cold frame or greenhouse if you have that option.
On the other hand, if you’re growing artichokes as perennials and are the patient type, you can skip the vernalization period the first year, and wait for year two for your first harvest.
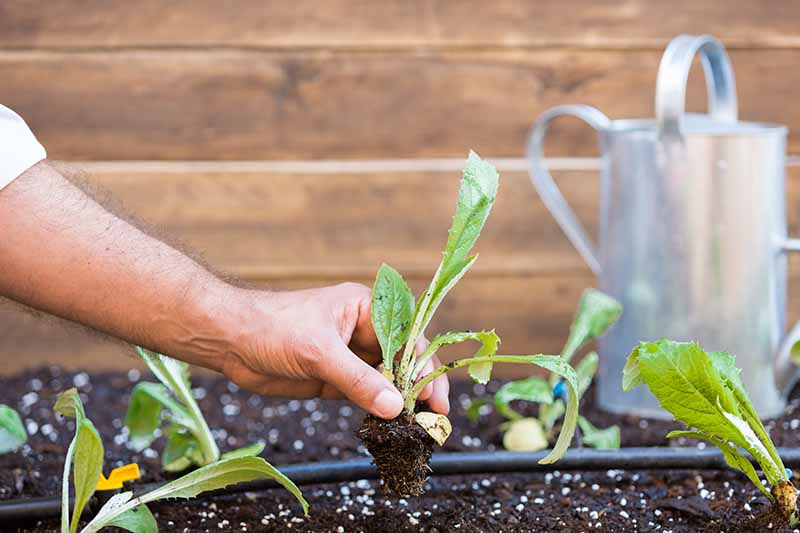
When you’re ready to plant, space your thistles three to five feet apart in your well-prepared beds.
Dig a hole in the soil that is deeper and wider than each pot, and loosen the soil up.
Place a seedling in each hole, making sure its crown is level with the soil line in its new home.
Backfill with soil, and smooth the soil surface around each transplant.
Water your transplants in, and continue providing water daily or as needed as they become established.
Young seedlings are vulnerable to frost damage, so keep an eye on the weather forecast, and keep your row covers at the ready if the mercury takes a sudden dip.
In locations with mild winters, artichoke transplants can be set out in the fall.
From Division
Established artichokes produce side shoots which come up under the soil. These shoots are also called “pups.” Removing these pups from the mother plant is an easy way to propagate more artichoke plants.
Spring is a good time to divide pups from their mother plant – when new growth is visible, but after your last frost.
Before dividing your plants, prepare your garden beds as described above.
It’s a good idea to perform this operation on a cloudy day, or late in the afternoon, to avoid subjecting freshly divided pups to hot sun – they will recover better if given this extra care.
Use your hori hori or hand trowel to separate the pups’ roots from the mother plant, then pull the pups up out of the soil.
Replant each pup into a new location, and water it in. Be sure to water daily if there’s no rainfall while the young pups get established in their new locations.
Dividing artichokes in this way will actually keep the mother producing longer.
Agriculture and Natural Resources Agent at University of Arizona Cooperative Extension Jeff Schalau recommends dividing established perennials every three to five years.
How to Grow
Providing these Mediterranean plants with the best growing conditions will bring you a more reliable, bountiful harvest. Here’s all you need to know:
Climate
Officially, artichokes are considered cool-season plants. They are at their happiest when daytime temperatures are around 70°F and nighttime temperatures are about 15 degrees cooler.
This means they grow exceedingly well in locations with cool summers. They can nonetheless be grown in areas with hot summers, but in those locations they should be grown for spring or fall production.
When grown in conditions that are hot and dry, bracts can open prematurely, and the edible portions can lose their tenderness.
In addition to these cooler growing conditions, as mentioned above, artichokes require a vernalization period in order for buds to form.
Vernalization requirements vary according to the cultivar, ranging from 250 to 1,300 hours per season, so make sure to choose the best variety for your climate.
To determine the number of average chill hours in your area, contact your local extension agency.
As for cold hardiness, unprotected mature plants can be damaged at temperatures of 25°F and lower, and mulched plants may be damaged below 15°F.
Sun
Artichokes grow best in full sun, which is to say, they need six to eight hours of direct sunlight per day.

However, in areas with hot and dry summers, artichokes can be planted in partial shade.
Growing artichokes in partial shade will be particularly helpful in these conditions if shade is provided during the hottest part of the day, the late afternoon.
Water
Consistent watering is important for this crop and will mean the difference between a tender and generous harvest, and one that is meager and tough.
The amount of water these plants require will vary depending on your growing conditions and soil.
Dan Drost, vegetable specialist at Utah State University Extension, recommends providing artichokes one to two inches of water per week.

Whatever your conditions, watering deeply and occasionally rather than lightly and more often will be beneficial to this deep-rooted plant.
Artichoke plants can survive in lower water conditions, but they won’t be nearly as productive and their buds will be tougher, making them less palatable.
Water stress can also cause a condition called “black tip,” which doesn’t affect the edibility of the buds but does spoil their appearance.
Soil
While they may be picky about water, artichokes are much less discerning when it comes to soil type. They can grow in clay, loam, or sandy soils, as long as the soil drains well.
However, if your soil is very sandy, it may drain a bit too well. In this case, make sure to prepare your soil with plenty of organic matter, such as aged manure or compost, to help slow water drainage and conserve moisture.

Since these vegetables are moderate to heavy feeders, rich soil with plenty of organic matter is optimal.
They are also fairly flexible about soil pH, growing well in soil with a pH ranging from 6.0 to 8.0.
If you’re not sure what your soil pH is, or what type of soil you have, you might want to consider having your soil tested, which is the best way to know what you’re working with and which amendments you do or do not need.
And while artichokes are somewhat salt tolerant, soil that is too salty will produce a less abundant crop.
Amending with compost will help remedy salty soil. For very salty soils, discuss the results of your soil test and possible options with your local extension agent.
Growing Tips
- Plant in full sun or partial shade.
- Grow in rich, well-draining soil.
- Provide regular water and water deeply.
Maintenance
Artichokes will require some maintenance, particularly when growing these plants as perennials.
These maintenance tasks include overwintering care, weeding, mulching, and possibly staking. Let’s look at mulching first.
Mulching
Once your seedlings have a few true leaves on them, apply a layer of mulch two to three inches thick, being sure to leave a few inches bare around the crown of the plant.
Mulching will help your artichoke crop in multiple ways:
Covering the ground will help conserve moisture, preventing your plants from drying out in between waterings.
Mulch will also help to keep the ground cooler, a definite plus when it comes to growing these cool-season plants.
Finally, mulch can also help you in your battle to keep weeds at bay, depriving many weeds of the sunlight they need to continue growing.
Not sure what type of mulch to use? There are so many options! Read our article on mulching and low maintenance gardening for ideas on the various materials you might use for this purpose.
Weeding
When artichoke plants are small, they will struggle to compete with weeds for water, sunlight, and space, so make sure to keep your beds weed free as plants get established.

And even once plants are mature, keep your beds weeded so your crop doesn’t have to compete with unwanted companions for water and nutrients.
If the idea of spending your time pulling unwanted plants from the soil leaves you feeling less than excited, perhaps it’s time to up your weeding game? Read our tips on how to spend less time weeding.
Fertilizer
Before you decide on a fertilizer regimen, make sure to refer to the results of your soil test so that you don’t fertilize unnecessarily.
Soil fertility can vary widely from location to location, and there’s no point in applying a product that you don’t need.
However, in addition to garden beds prepared with aged manure, most sites will also require a side dressing of composted manure or fertilizer each month during the growing season.
Down to Earth Vegetable Garden Organic Fertilizer (NPK 4-4-4) is an all-purpose balanced fertilizer that is approved for organic gardening, and it is available for purchase at Arbico Organics.
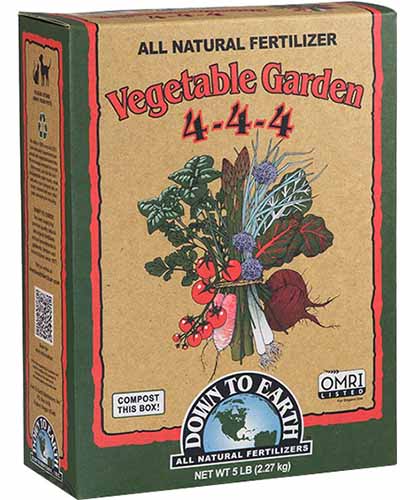
Down to Earth Vegetable Garden 4-4-4 All Purpose Fertilizer
If your growing season is long enough for a second harvest, or you wish to perennialize your artichokes, continue fertilizing until the end of the growing season.
Staking
If you live in a windy climate, you may need to stake your artichokes as part of your maintenance routine.
Drive a stake into the soil a few inches from the center of the plant, then tie the stalk loosely to the stake with twine or string.
This will provide the plant with extra support to stand up to turbulent weather.
Pruning
For gardeners who harvest their first crop in spring, you can encourage a second crop in late summer or fall by pruning artichokes down to the ground after this first harvest.
For those with shorter growing seasons who harvest a first crop in summer, it’s unlikely you’ll have time for a second harvest, so wait until fall to prune back these plants.
Unless you live in a very mild climate where artichokes will grow year-round, established plants should be pruned back to the ground in autumn.
You’ll only need to prune if you are trying to perennialize these thistles.
Overwintering Care
If your winter temperatures fall to 25°F or lower, mulch these plants heavily to help them make it through the cold months.
After cutting foliage down to the soil, cover with four to six inches of soil, and then top with an additional six inches of mulch. The colder your climate, the more insulation you should provide.
You may want to mark the positions of your artichokes with a stake to remind you where they are, so that you can easily locate and uncover them in the spring.
As an alternative, you can dig up your artichoke roots and overwinter them in a cool basement or cellar.
For a complete guide to overwintering your artichoke plants, make sure to read our detailed guide.
Cultivars to Select
When growing this Mediterranean vegetable, you’ll discover an assortment of cultivars to choose from, starting with the classic and most-well known variety.
‘Green Globe’ is the artichoke type you are most likely to be familiar with, as it is the one most commonly found in supermarkets.
This heirloom open-pollinated cultivar dates back to 1825.
When ready for harvest, the buds are three to four inches in diameter, globe-shaped, and green tinged with purple. ‘Green Globe’ plants can reach six feet in height and are spiny.
This cultivar requires 1,300 chill hours for best production, and needs 120 days or more to reach maturity. Expect three to five main buds per plant.
You’ll find ‘Green Globe’ seeds from Mountain Valley Seed Company available at True Leaf Market.
When choosing your artichoke cultivar, be sure to select the best one for your climate.
Want More Options?
You can discover the best variety for your growing conditions and climate in our roundup of more of our favorite artichoke varieties.
Managing Pests and Disease
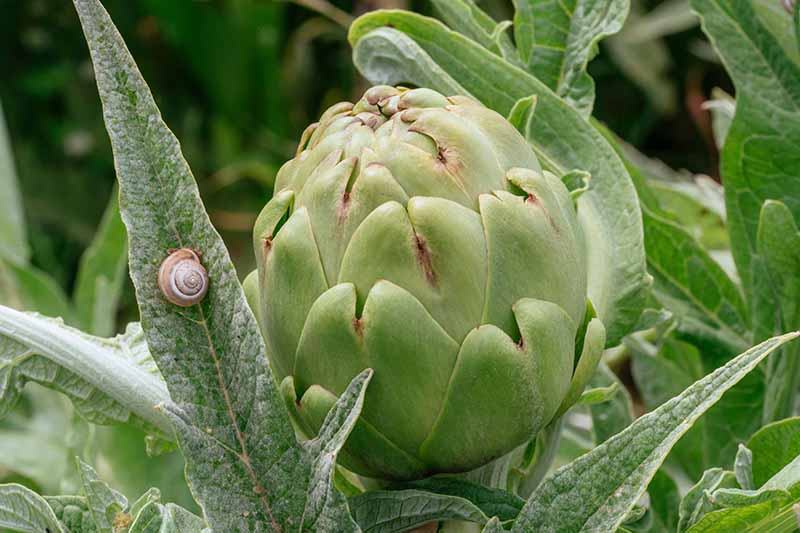
Slugs and snails may enjoy nibbling on your artichoke plants, but luckily, these thistles are deer resistant.
However, you’ll want to be on the lookout for signs of disease and insect infestation, since catching these issues early can save your harvest.
Insects
Bugs may decide to treat these thistles as an all-you-can-eat buffet. Here are some of the top insects to watch out for:
Aphids
Most experienced gardeners need no introduction to the dreaded aphid, a tiny garden pest that will colonize the underside of plant leaves, sucking away valuable nutrients.
Like many other garden vegetables, artichokes can be the target of these bothersome pests, which can also spread disease in addition to stealing nutrients.
Young plants are more susceptible to aphid damage than mature ones.
If you discover aphids on your plants, try brute force first – that is to say, a strong jet from your garden hose – to remove them. Oftentimes, that’s all that is necessary to eliminate aphids from these large thistles.
You can learn more about eradicating aphid infestations in our article.
Artichoke Plume Moths
Platyptilia carduidactyla, commonly known as the artichoke plume moth, uses artichokes and other thistles as host plants.
These brown- and buff-colored moths are distinctive looking – at rest, their wings and bodies make a cross shape.
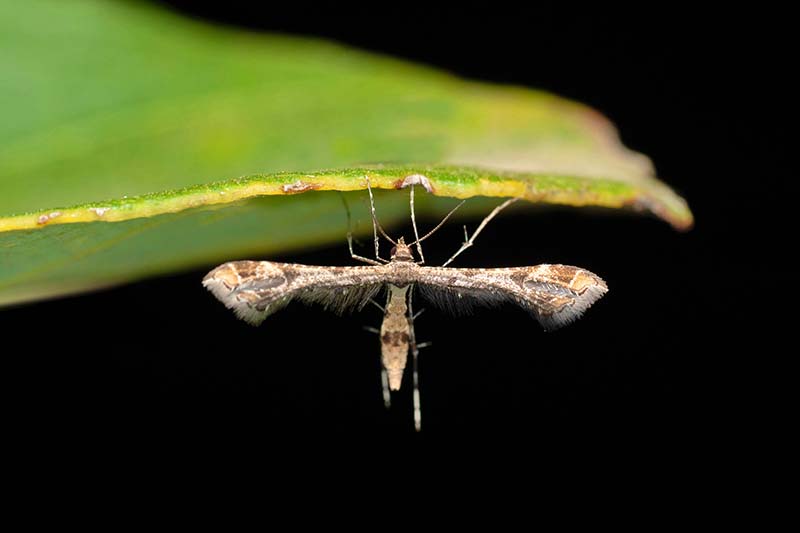
However, it’s not the adult moths that are directly responsible for damaging these vegetables. Instead, it’s their small, wormlike larvae.
Plume moth larvae may feed on leaf exteriors, or may burrow into leaf veins, feeding inside. When this is the case, damage to plants tends to be negligible.
However, some larvae may feed on the flower buds, gradually working their way to the center. Damage to this edible portion of the plant is sometimes limited to the outer bracts, which can be removed.
However, a deeper infestation can ruin a harvest.
These caterpillars can also infest the crown of the plant, beneath the soil. Care should be taken not to use infested crowns for propagation.
To limit the damage caused by plume moths, inspect your plants regularly.
Examine the undersides of leaves for eggs – plume moth eggs are oval-shaped and a green-yellow color, later turning orange-yellow.
If you find plume moth eggs on the leaves of your crop, you can squish them as a control method, just make sure you have correctly identified them to avoid reducing populations of beneficial insects.
Another way to prevent problems caused by these caterpillars is to grow companion plants such as cilantro, cosmos, and dill nearby, to attract predatory wasps.
Predatory wasps can help to keep populations of these and other types of caterpillars under control.
If you discover a heavy infestation of plume moths, you can control them with a variety of Bacillus thuringiensis (Bt) known as Btk.
Thuricide is a commercial brand of B. thuringiensis kurstaki, and it serves as a nontoxic, microbial insecticide that specifically targets plume moths as well as other types of caterpillars.
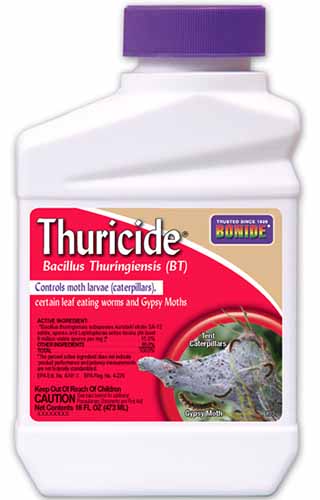
Thuricide (B. thuringiensis kurstaki)
You can find Thuricide for purchase at Arbico Organics.
Before you apply this product, make sure to read our article on using Bt to control insect pests.
When plume moth larvae have infested the soil under your artichoke plants, turn to beneficial nematodes as an organic control method. Learn more about beneficial nematodes in our article.
Flea Beetles
Flea beetles pose more of a threat to your young artichoke seedlings than to established plants.
Damage from these tiny beetles is easy to recognize – they chew tiny holes or pits in plant leaves. The damage from flea beetles is often minimal. However, seedlings can be stunted or killed by larger infestations.
For an in-depth discussion of dealing with these insects, read our article on controlling flea beetles.
Disease
Prevention will go a long way towards saving your crop from disease. Read on to learn more about some of the diseases you’ll want to be aware of:
Artichoke Curly Dwarf Virus
Artichoke curly dwarf virus is a viral disease that results in stunted plants with distorted leaves, and dark spots or patches.
The disease can lower the yield of an infected plant and may also kill it.
In the case of infection, remove diseased plants and dispose of them in the trash (not the compost pile), being sure to wash both your hands and your tools after handling infected material.
To guard against this virus, make sure to obtain root crowns and plant divisions only from reputable sources.
Damping Off
Damping off afflicts young seedlings which suddenly wilt and die, often rotting at the soil line.
This disease is caused by a plant pathogen that flourishes in wet and cool conditions.
Since seedlings rarely recover from damping off, your best means of recourse is prevention. Learn more about how to prevent damping off in our article.
Powdery Mildew
Powdery mildew is the name for a disease that may be caused by hundreds of different species of fungi.
When these fungi take up residence on your artichoke plants, you may see powdery white or gray spores on the tops or bottoms of the leaves, as well as on the flower buds.
Infected plant parts may later turn yellow and then brown.
To learn how to prevent and treat this fungal disease, be sure to read our article on treating powdery mildew with homemade and organic remedies.
Harvesting
Depending on the variety and your climate, you may be able to harvest a crop in spring and another again in the fall.
Since cultivars and growing conditions can result in varying harvest times, rely on your personal observations of your plants to choose the best time to pick.
Keep an eye on the developing buds. Wait until bracts begin to open and can be pulled away from the bud just a little. Overall, they should still be tight before harvesting.
When the time is right, use a sharp knife or garden snips to cut the bud off of the stem, with about two inches of stem attached. The upper portion of the stem is edible – and delicious.
Crop size will vary depending on your climate and variety, but on average you can expect six to nine buds from each plant.
For baby artichokes, you have two options:
The smaller buds that grow from side branches are typically considered baby artichokes and can often be harvested at the same time as the larger, main bud.
However, the buds that grow on the main stem can also be picked at a smaller size and used for recipes that call for baby-sized veggies as well.
Either way, make sure to pick these vegetables when the outer bracts are still closed, which will ensure a tender, succulent crop.
If you miss harvesting a bud and the bracts open, don’t bother collecting it for food, as it will become tough and unpleasant to eat.
Instead, you can allow the bud to flower and let your local pollinators enjoy it, or cut it and use it in a flower arrangement.
For best results in perennializing your plants, leave the buds on their stalks, let them flower, and wait until the second growing season to pick your first harvest.
Storing and Preserving
While fresh artichokes are best eaten quickly after harvesting, they can also be stored in the fridge for one to two weeks.
To prepare artichokes for refrigerator storage, submerge heads in ice water to cool them, then pat them dry. Place them in sealed containers and store them in your vegetable drawer.
And if you aren’t going to be able to use up your crop in that timeframe, freezing is also an option – you can freeze nearly whole artichokes, or just the bottoms or hearts.
For best results with freezing, first blanch the artichokes, then shock them in an ice bath to stop the cooking process. Let them drain, then pack them tightly into freezer containers and place them in your freezer.
Dried artichoke anyone? These veggies can also be dehydrated and stored for later enjoyment. Get tips on dehydrating these and other foods at our sister site, Foodal.
Preserving artichoke hearts in oil is another method of keeping this food on hand for a longer duration. You may have eaten this Mediterranean treat before as part of an antipasto plate, or tossed into pasta salad.
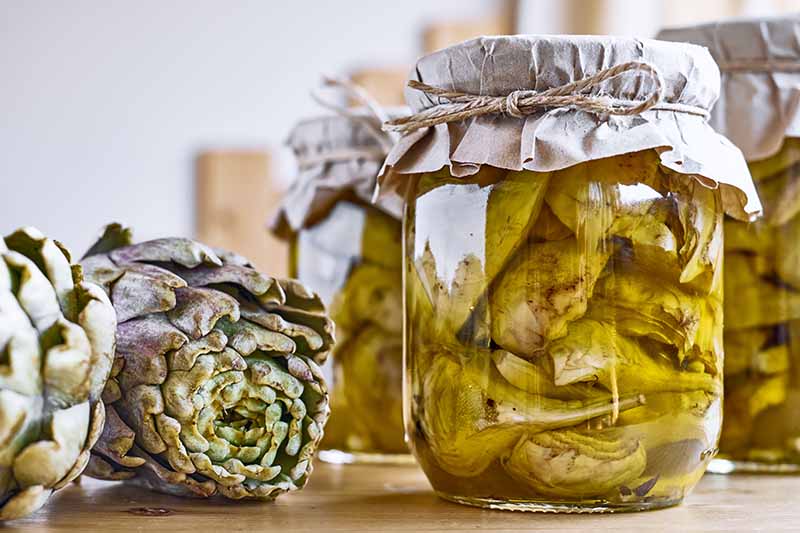
You can preserve your harvested hearts in oil at home too – just make sure you follow the proper food safety procedures.
When preserved in oil, artichokes are first acidified with vinegar or lemon juice, an important step that’s needed to eliminate the risk of botulism.
And always be sure to follow a reliable recipe when preserving vegetables in oil in order to create a safe food product.
Recipes and Cooking Ideas
If you are considering growing artichokes in your garden, you are probably not at a loss for ideas on how to prepare these delectable vegetables.
In Mediterranean countries where this food has deeper roots, it is roasted, stuffed, added to stews, or used as a pizza topping.

My personal favorite way to enjoy this vegetable is perhaps the simplest – steamed and served with a tangy homemade vinaigrette.
It’s not just a delicious flavor experience, but also a very tactile one, as you pull the leaves off the head, dip the ends of the leaves into vinaigrette, and use your teeth to scrape the tasty meat off the end of the leaf.
After you work your way through the leaves, you finally arrive at the pièce de résistance, the tender artichoke heart.
If you’ve never cooked or eaten one of these vegetables in this way, no worries, we have complete instructions on how to prep an artichoke at our sister site, Foodal.
In brief, you will typically trim the leaves and stem, remove the tip, and possibly remove the choke before cooking and enjoying your homegrown veggies.
But it doesn’t have to be difficult if you follow the instructions over on Foodal (and there are step-by-step photos too!).
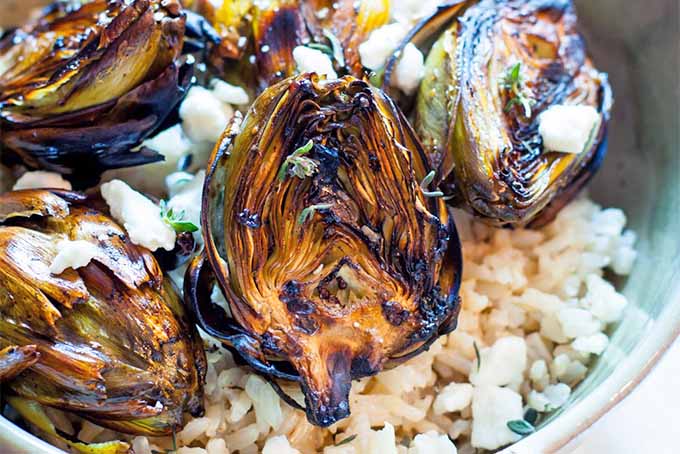
Another option for preparing these veggies is to grill them. You’ll find a recipe for balsamic grilled baby artichokes at Foodal. Just remember to pick your crop when the heads are still small for the baby size.
Although I find that artichokes don’t require much preparation to be sublime, including them in a quiche is a blissful way to enjoy them.

If you need more bliss on your dinner plate (and who doesn’t?), make sure to check out this recipe for artichoke, leek, and red pepper quiche, also at Foodal.
Quick Reference Growing Guide
| Plant Type: | Herbaceous perennial vegetable | Tolerance: | Frost, salt, slightly alkaline soils |
| Native to: | Mediterranean | Maintenance | Moderate |
| Hardiness (USDA Zone): | 7-10 | Soil Type: | Sand, loam, clay |
| Season: | Spring, fall | Soil pH: | 6.0-8.0 |
| Exposure: | Full sun | Soil Drainage: | Well-draining |
| Time to Maturity: | 75-180 days | Companion Planting: | Cilantro, cosmos, dill |
| Planting Depth: | 1 inch (seeds) 6-8 inches (transplants) | Order: | Asterales |
| Spacing: | 3-5 feet | Family: | Asteraceae |
| Height: | 3-4 feet | Genus: | Cynara |
| Spread: | 3-4 feet | Species: | Cardunculus |
| Water Needs: | Moderate | Variety: | Scolymus |
| Common Pests: | Alfalfa loopers, armyworms, aphids, artichoke plume moths, chrysanthemum leafminers, cribrate weevils, flea beetles, cabbage loopers, lygus bugs, spider mites | Common Diseases: | Artichoke curly dwarf virus, bacterial crown rot, botrytis rot, damping off, powdery mildew, ramularia leaf spot, verticillium wilt |
An Architectural and Ornamental Edible
While they may require some planning and extra care, artichokes will pay you back with a harvest of flavorful heads, and provide you with gorgeous garden foliage as a bonus.
Are you growing these vegetables in your garden or flower beds? Do you have any of your own well-earned tips to share with our readers? If so, let us know in the comments section below.
If you appreciate the artichoke’s perennial quality and are interested in filling your landscape with other edibles that will come back year after year, here are some additional articles that are sure to be of interest:


Hello love your article on growing artichokes
Is it possible to get a paper copy of this also on asparagus
I’m happy to pay
I would have saved the article to my tablet but don’t seem to be able to
Des
Hi Des,
I’m glad you’ve enjoyed our articles. I’m sorry, we don’t send out paper copies of our articles. And unfortunately I’m not a tablet user so can’t offer you assistance there. However, if you pull up the articles on a computer, you could print them out. Public libraries usually have computers and printers for use if you don’t know anyone who has a printer.
I hope this helps!
This is GREAT information! Thank you so much!!!
Hi Sammy,
I’m so glad you found this article helpful – thanks for letting us know!
Happy gardening!
Thanks for your knowledge I hope you to be fine and I work with globe artichoke for many years I love it so much
Hi Shadia,
Thanks very much for your kind message. Globe artichoke is a delicious and delightful vegetable, isn’t it?
Happy gardening!
I search the web to answer two questions on why my artichokes I just planted bore Fruit from only one OF the eight plants and whether my beautiful seven other plants were perennials. Your article quickly answered both of these questions. thank you.
Hi Gus,
Thanks for letting us know you found this article helpful! Best of luck with your artichoke growing!
Great article, thank you for sharing your wisdom
Hi Diana,
Thanks for the kind comment, and for letting us know you enjoyed the article!
Happy gardening!
How come my artichoke plants die after first harvest, but grow baby plants
Hi Linda,
Thanks for reading the article and posting your questions here. Would you be able to post some photos of your plants so we can see exactly what’s going on? Thanks!
Do you let the smaller artichokes growing under the bigger ones grow, or do you harvest them also?
You can either harvest those small or let them keep growing – it’s up to you!
I planted several Artichokes in pots last summer and opted to bring them inside for their first winter (which still hasn’t arrived yet – 75 degrees on 12/30 in Texas – but cold is coming.). It seems like the plants are all dying but I’m wondering if that is just the natural dying back of the above ground leaves. Any tips to ensure I have a viable plant for the garden this spring?
Hi Rus,
Unless you are in the northernmost part of Texas, artichokes will likely survive the winter in your area as they are hardy in USDA Hardiness Zones 7-10.
It’s normal for the foliage to die back in fall.
Unless you are in a colder zone than 7, I would put them back outdoors in a protected area and let them wake up in the spring.
Keeping perennials indoors all winter long is tricky – you’ll likely be more successful by keeping them outside.
Hope this helps!