Allium tuberosum
If I was choosing my Dream Team for a kitchen garden, wild garlic chives would win the “easy to care for herb” spot, hands down.
They’re perennials, hardy in USDA Zones 3 to 9, and spread readily. They’d also rank tops on a roster of edibles you could feature on the menu daily.
We link to vendors to help you find relevant products. If you buy from one of our links, we may earn a commission.
The leaves lend just a hint of garlic flavor to spring mix salads, scrambled eggs, tomato sauce, herb butter, pasta – and this list of their uses is far from exhaustive.
Even when they’re not in season, frozen or dried chives can figure as an ingredient in soups or stews.
Would you like to put garlic chives on your shortlist for a kitchen, container, or indoor garden, too?
I’m happy to help you succeed with these hardy alliums whether you’re a newcomer to the world of growing your own food, or a veteran grower looking for a handy herb to make your other veggies even tastier.
Here’s everything I’ll cover up ahead:
What You’ll Learn
What Are Wild Garlic Chives?
People don’t typically eat the roots of this plant, which are slim, tough, and pungent, but wild garlic chives are still considered a bulbous perennial herb.
Sometimes called Chinese chives, with the botanical name Allium tuberosum, this herb shares similar growth habits and the name “chive” with A. shoenoprasum.
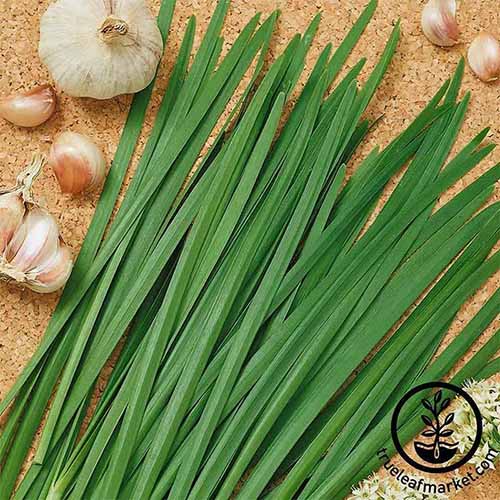
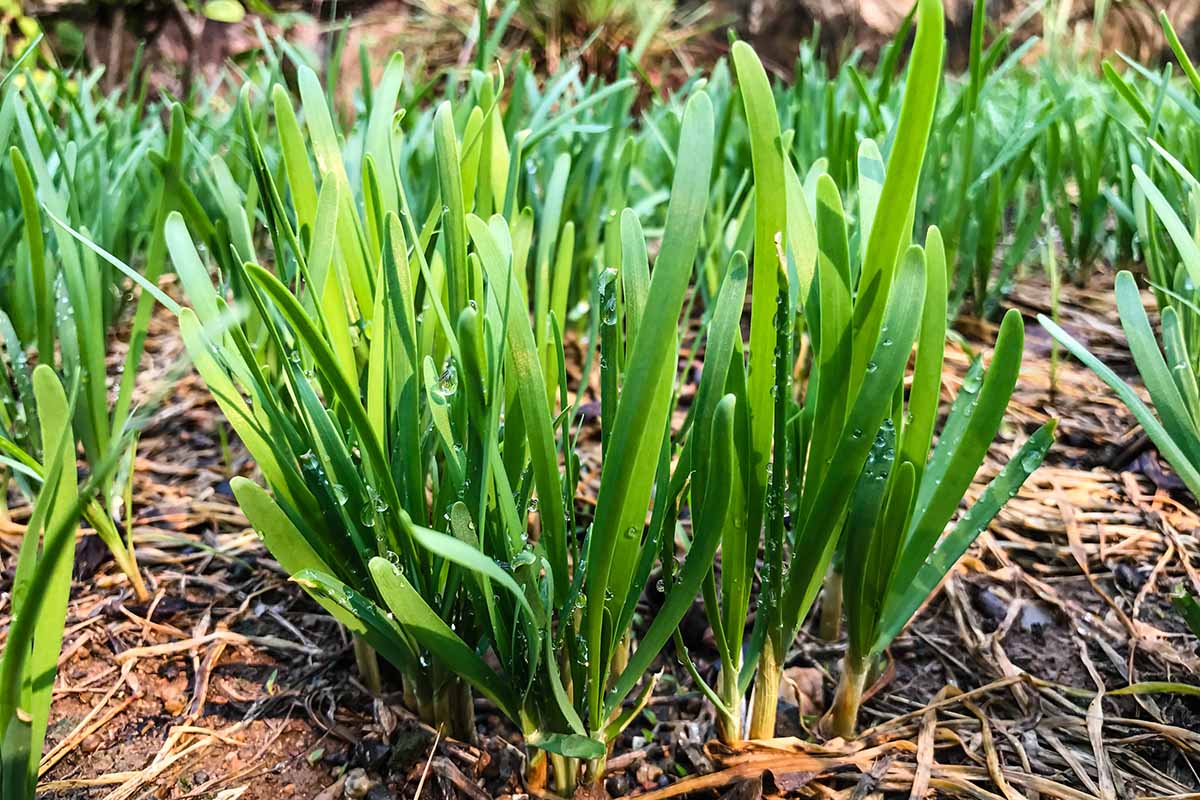
But while the common chive has hollow stems and a mild onion flavor, A. tuberosum is known for its bladelike, broad leaves and hint of garlic flavor amidst the onion undertones.
They grow in clumps, spreading via rhizomes. They’re productive in the cool spring and early autumn but tend to go dormant in hot midsummer temperatures, and again when temperatures plummet in winter.
Garlic chives are easy to grow from divisions or seeds, though it takes many months longer for direct-sown garlic chives to get established.
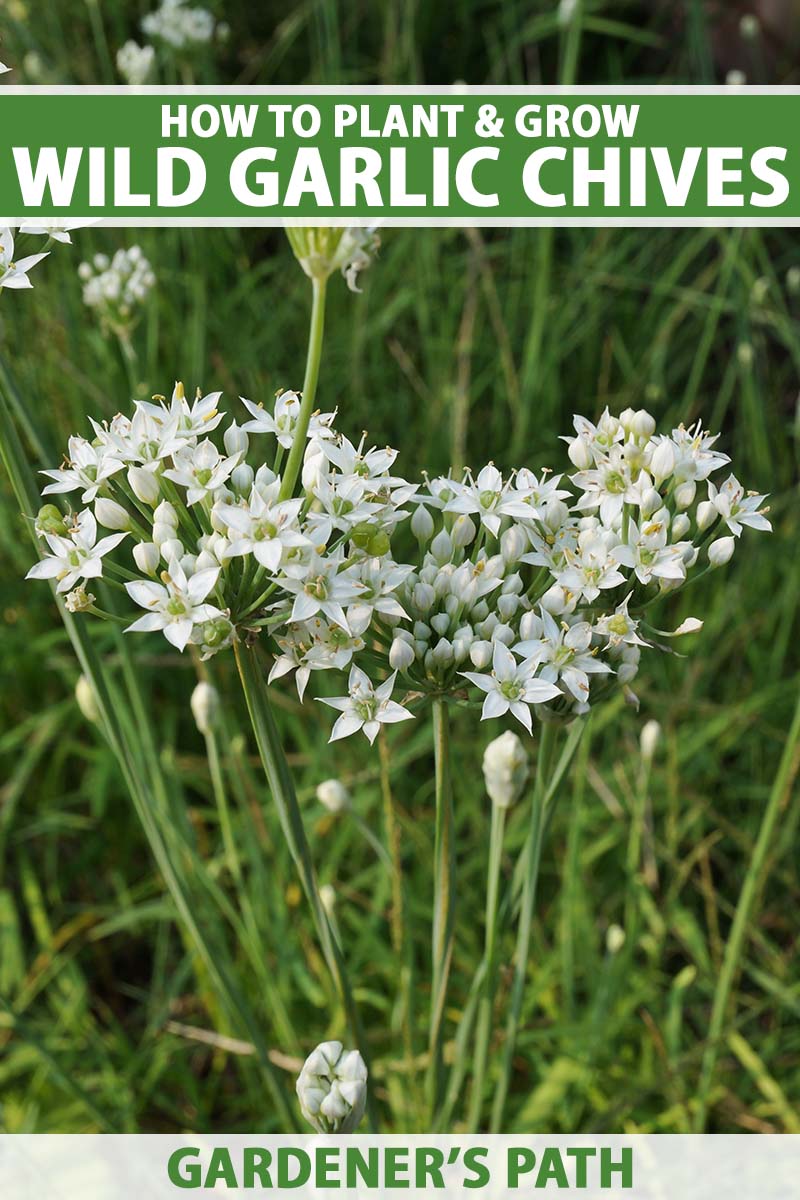
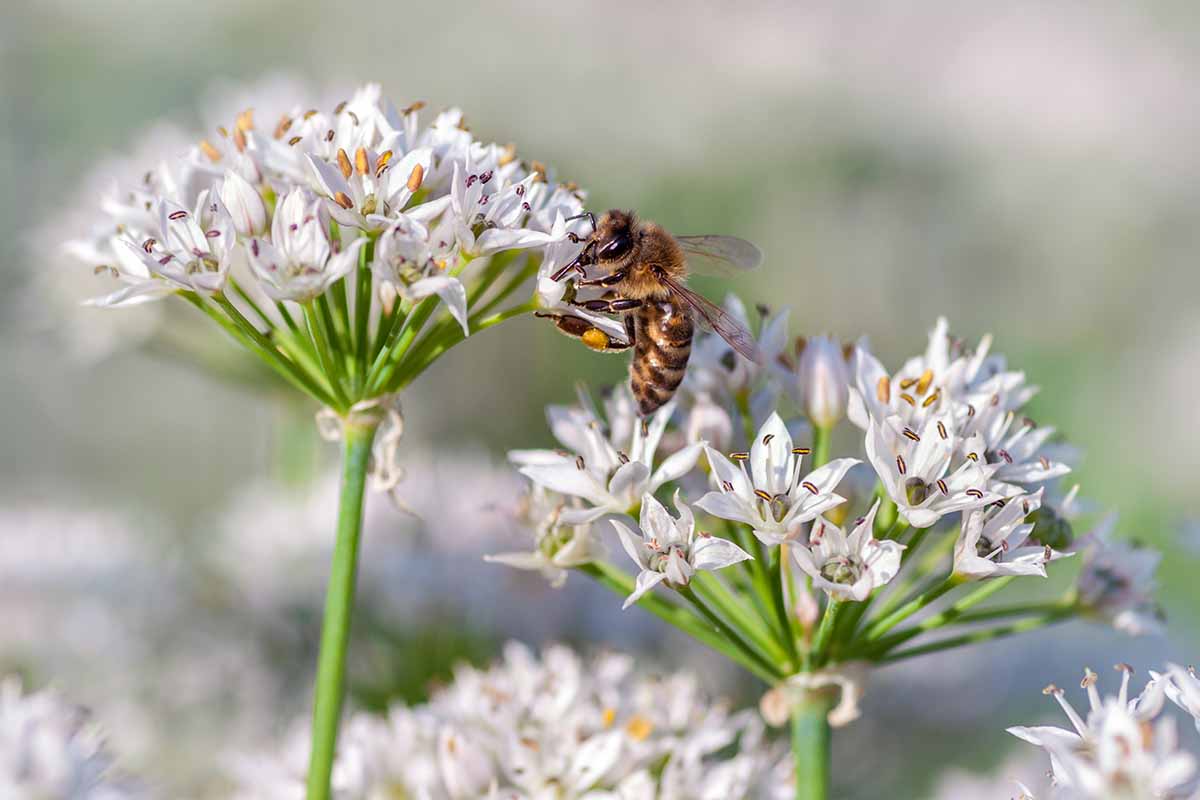
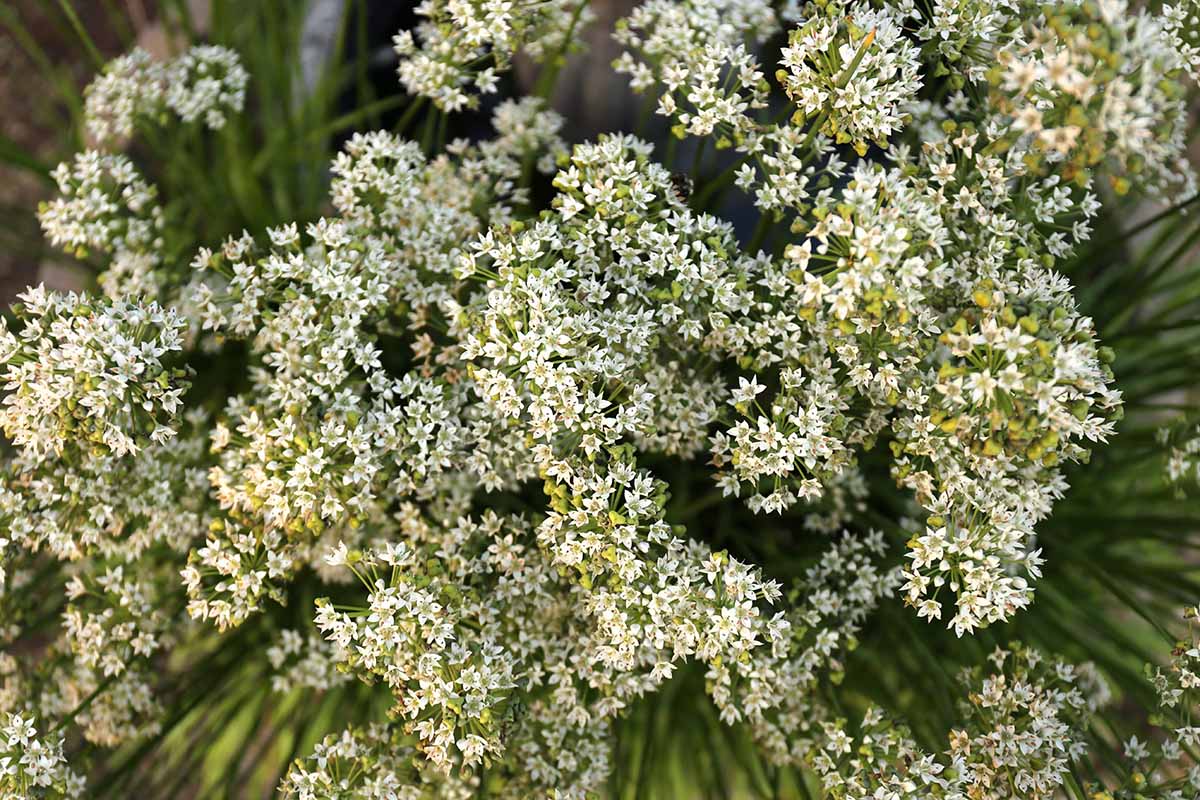
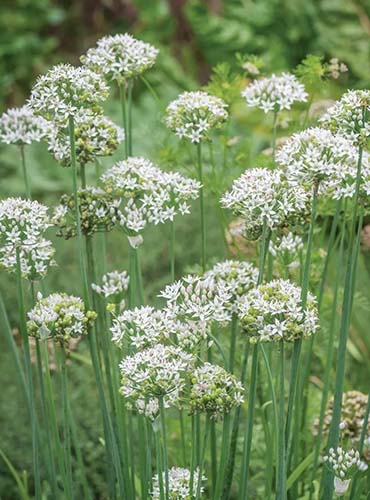
Along with the herbaceous leaves, garlic chives produce edible white flowers that also draw butterflies, bees, and other beneficial insects.
The plants reach 18 to 24 inches at maturity. You do have to take extra care to protect them from the cold in Zone 3, but they’ll grow as perennials in temperature climates throughout USDA Hardiness Zones 3 to 10.
They’re also favorites for container gardening. Some folks even prefer to grow them in pots to keep them from self-seeding or spreading so vigorously they take over a garden plot.
They don’t call them “wild” garlic chives for nothing.
Another cool option is growing these herbs entirely indoors.
All you need is the plants or seeds, growing medium, a suitable container, and a source of sunlight or supplemental light, and these hardy alliums will thrive.
Honestly, they are so undemanding that even a newbie gardener or avowed plant murderer can usually succeed with this type of allium.
Sound good? Let me take you through the not-at-all hard steps to planting and caring for your own wild garlic chives.
Cultivation and History
A member of the onion family, this particular allium has its origins in the Himalayan region stretching east to China, which likely explains its common use in Asian cuisine.
A. tuberosum was first described in 1825 but it was grown in Asia as a culinary and medicinal plant for centuries prior to that.
The species grows wild in Italy and Greece, and the accepted theory is that garlic chives made their way to the Americas with European explorers.
These days, broadleaf garlic chives grow wild in a few parts of the US, but more commonly are cultivated in herb gardens and vegetable plots.
Their growth habit is a bit unusual. They aggressively self-seed, and they also spread vigorously via rhizomes below the soil – not at all common for your typical garden veg or culinary herb, though it is common for flowering alliums.
They’re one of the rare perennial edibles, plants that can stay green year-round outdoors in the mild climates of USDA Hardiness Zones 8 to 10.
They can also die back to the ground and then return the following season in Zones 3 to 7, and will grow happily in containers indoors if you need to bring them inside for winter protection and want to keep your crop going.
This allium is also considered ornamental, thanks to its rounded white blossoms. Its faint garlic scent attracts pollinators like butterflies and beneficial wasps, but its taste and odor are not particularly appealing to deer.
Does it sound appealing to you? Let’s dive right into the info you’ll need to start growing your own pot or plot of A. tuberosum.
Propagation
When you’re impatient, don’t have a lot of time to devote to gardening, or really don’t like to fuss over plants, you’ll appreciate how simple it is to grow these particular alliums.
But you know what? Even gardeners who don’t mind extra toiling or who have great reserves of patience will enjoy caring for an herb that requires so little tending once it’s established.
Growing this carefree allium leaves you more time to fuss with trickier vegetable or herb garden annuals and perennials, right?
Of course, starting chives from seed takes longer than other propagation methods. They’ll need 85 to 90 days from sowing before you can harvest even a few leaves, and maybe up to a year before the plants are fully established.
But it’s still not at all hard to sow garlic chives, and simplicity itself to propagate them from divisions. Here’s the lowdown on the different propagation methods:
Sowing Seeds Outdoors
Whether you plant indoors or out, the seeds are small, and they should not be sown more than about a quarter of an inch deep.
If your growing season is long enough and you’re not worried about having a harvest in the first couple of months, direct seeding is a viable and inexpensive option.
First, make sure the soil you’re planting in is fertile and well-draining. Garlic chives can handle poor soil, but ample nutrition will help them produce more leaves and flowers, and healthier ones at that.
Their preferred pH is 6.0 to 6.8, or slightly acidic, though they’ll grow in any fairly neutral or even slightly alkaline soil with a pH ranging as high as 8.0.
You can sow as soon as the soil can be worked in spring, but the best soil temperatures for germination are between 60 and 70ºF. Even under ideal conditions that are suitably warm, the seeds can take seven to 14 days to sprout.
Keep an eye on them, and keep the soil moist.
Starting Seeds Indoors
If you’d like to transplant homegrown seedlings outdoors that will produce a harvest this season, be sure to get a jump start by sowing them indoors at least eight weeks ahead of the last frost date in your area.
You can start them in trays or individual peat pots or cells, with an eye towards transplanting them into a raised bed or garden plot once they’re about four inches tall.
Or you can use the strategy of starting them indoors in a container and then moving the whole pot outside in early spring.
Either seed-grown starts or the containers you sow indoors must be gradually acclimated to outdoor temperature and light conditions before you move them outside or transplant them.
Learn more about growing common or garlic chives from seed in our guide.
From Division
This is both the quickest and the easiest way to obtain a quick harvest of garlic chives.
You may be able to purchase starts in pots from a local nursery, and I’ll share a couple of places that offer them online here in a minute, too – so keep reading!
But if you’re lucky enough to know someone who already has established plants, see if they will allow you to take a piece home the next time they divide the plant.
If you’re the gardener doing the dividing, spring is the best time. Give the plants a drink ahead of digging to soften the soil.
Dig up a clump that has spread to at least four inches wide and that contains at least 16 bulblets.
Trim the leaves to stand four inches tall, using scissors.
Gently break off a section that includes about six of the tiny bulblets at the bottom. Make sure you leave at least that many of the tiny bulbs behind in the clumps that will continue to grow in their original space, too.
Replace the original plant, making certain to backfill the space you’ve created by removing the other portion. Transplant as described below.
Transplanting
Wait until the threat of frost has passed to transplant garlic chive seedlings.
Cultivate the soil to a depth of at least six inches, and then center the clump of starts or your divisions, roots down, with the crown about half an inch below soil level.
Space the clumps about eight inches apart.
Backfill with additional well-draining soil. Gently firm the growing medium with the palm of your hand, and then water the transplants thoroughly.
Apply a two-inch layer of mulch around the transplanted divisions or seedlings, being careful not to let the mulch reach within an inch or two of the crown.
Use grass clippings, pine straw, or dry leaves to mulch, but be careful not to introduce any mulch that’s been treated with pesticide or herbicide into a garden plot or container where you’re growing edible plants.
Give the transplants a chance to get established before trying to pick any leaves from them. A good rule of thumb is to wait until they’ve had at least four weeks to adjust before you clip any leaves or blossoms.
Sow as Microgreens
You can also plant garlic chives with the intention of picking them as microgreens when they’re two or three inches tall.
Micro-chives are delicious in salads and stir fry, or as part of a savory green smoothie or soup.
Sow them thinly but with good coverage on top of a pre-moistened layer of seed starter mix, in a tray with holes for drainage. Press them into the soil with your fingers so they’re covered with no more than an eighth of an inch of growing medium.
Rest that tray in a second tray to catch any runoff from watering. Moisten the soil mix with a spray bottle, and then keep the sown seeds in the dark until they sprout by placing a dark cover on top.
Some people upend a third tray to serve as this cover, while others use aluminum foil or an opaque tablecloth to keep the seeds in the dark in their first days of sprouting.
Keep the dark cover on for a few days, until the seedlings are about half an inch tall. At that time, remove the covering and place the tray of microgreens somewhere with good light, like a windowsill that receives at least six hours of sunlight per day.
Ordinarily, you’ll have microgreens that are ready to harvest within about 21 days.
That’s the basic process. Learn more about growing microgreens in our guide.
How to Grow
I’m not reversing my earlier statement that garlic chives are super easy to grow and will thrive on neglect.
They can absolutely withstand average soil, part sun, or dry weather.
But they’ll be far more vigorous and produce more of those tender, garlicky leaves if you take a few extra steps.

First, try to plant them in well-draining, fertile soil that’s been amended with plenty of organic material.
If you choose to grow them in containers, make sure to use a growing medium that’s formulated for container vegetables, rather than ordinary garden dirt.
Also, while they find part sun tolerable, they’re most productive in full-sun locations. And they’ll grow best in soil that’s moist, but not soggy.
If rain doesn’t provide about an inch of water during their prime growing season from spring through early summer, be sure to supplement it with drip irrigation or a watering can.
If you think of it, also feed the plants with a nitrogen-rich fertilizer at least once when they’re growing furiously in late spring.
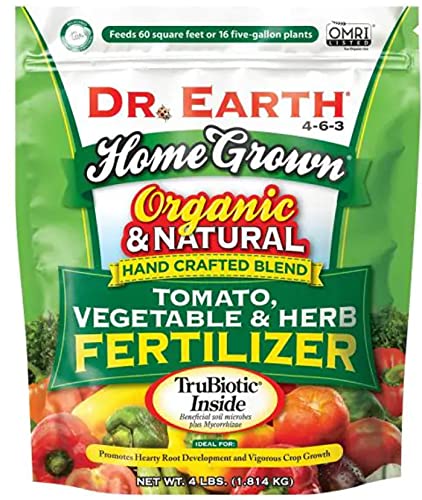
Dr. Earth Tomato, Vegetable, and Herb Fertilizer
Try Dr. Earth’s Homegrown Tomato, Vegetable, and Herb Fertilizer, available from Amazon, or a similar product.
You can skip this step if your chives are growing in nutritious soil, like a mix that’s mostly composted manure.
For pot-bound chives, increase the fertilizer frequency to once a month after they’re a few inches tall. The nutrition from the small amount of soil that fits in a container becomes depleted rapidly.
Remember, mulch is your friend here. It will help to retain moisture and limit weed growth. Apply a layer of untreated pine straw, grass clippings, or dead leaves once after transplant, and again in midsummer.
As for long-term maintenance, it’s a good idea to deadhead the flowers so the plants can concentrate their energy on producing more tasty leaves, not seeds – unless you’d like to save them, which we’ll cover a bit later in this guide.
And you can keep the established clumps productive by dividing them at least once every three or four years, as described above in the propagation section.
If you’ve bragged on your tasty, vigorous garlic chives even a little, by the time you get around to dividing them, you’ll have plenty of folks clamoring for a division to grow in their own pot or garden!
Or, you can offer up the starts to a community garden or a local club’s swap or sale and spread the love.
Growing Tips
- Plant in well-draining soil in an area that receives full sun, or use supplemental grow lights indoors.
- Mulch in the spring to retain water and suppress weeds.
- Divide clumps in the spring to prevent overcrowding.
- Deadhead spent flowers before they start forming seeds.
Where to Buy
While there are specific cultivars available, you’ll most likely come across generically-labeled garlic chives when you’re seeking seeds or starts.
If you’re fortunate, a local nursery or farmers market vendor may offer divisions of garlic chives. They offer the fastest harvest but cost a bit more than the seeds.
Happily, there are also online vendors that sell them as live plants.
Burpee is one of the few that offers a specific cultivar, ‘Geisha,’ which is available as part or all of a mix-and-match three-plant bundle.
Bare root live plants are also available to be shipped from Sunshine Box Group via Amazon.
If you want to get your hands on some seeds, you may be able to pick some up at a local swap, or buy some from a reliable vendor.
A. tuberosum seeds are available in different-sized packets and in one-pound sacks from True Leaf Market and in packets of 50 from Earthbeat Seeds.
Managing Pests and Disease
As you might expect of a plant that spreads via underground rhizomes and self-seeds if you don’t deadhead it, garlic chives are tough and largely untroubled by pests or diseases.
There are just a handful of bugs and issues to be aware of.
You can easily avoid most of them if you buy seeds and starts from reputable dealers, give the plants enough space, and practice good garden hygiene to thwart overwintering insect pests and the spread of soilborne diseases.
Here’s the shortlist:
Pests
This may be reason enough for some homeowners to choose to grow garlic chives: Deer tend to leave them alone, deterred by their oniony taste.
Rodents and rabbits may eat the leaves in desperation, but it’s not likely, and you can always fend them off by using row cover or fencing if push comes to shove.
As for insect pests, they’re not all that common. If your plants are attacked, one of these three bugs is likely to be the culprit:
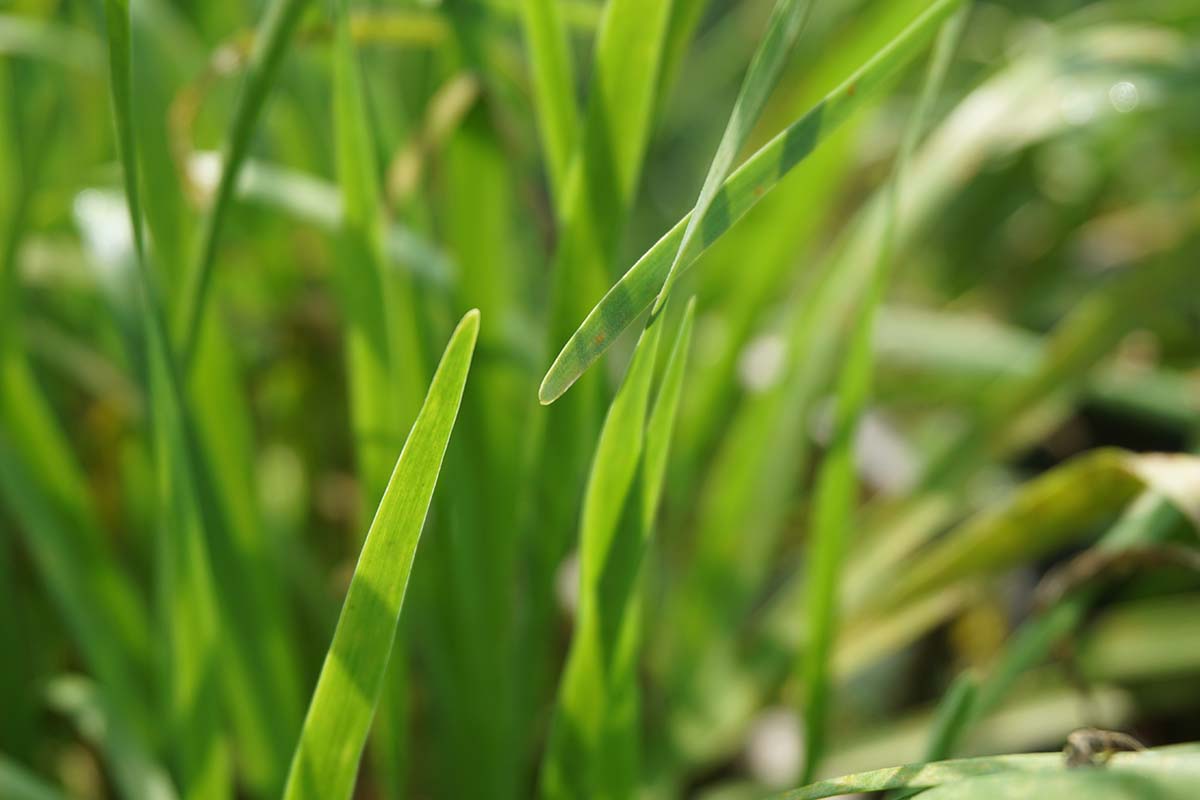
Allium Leaf Miners
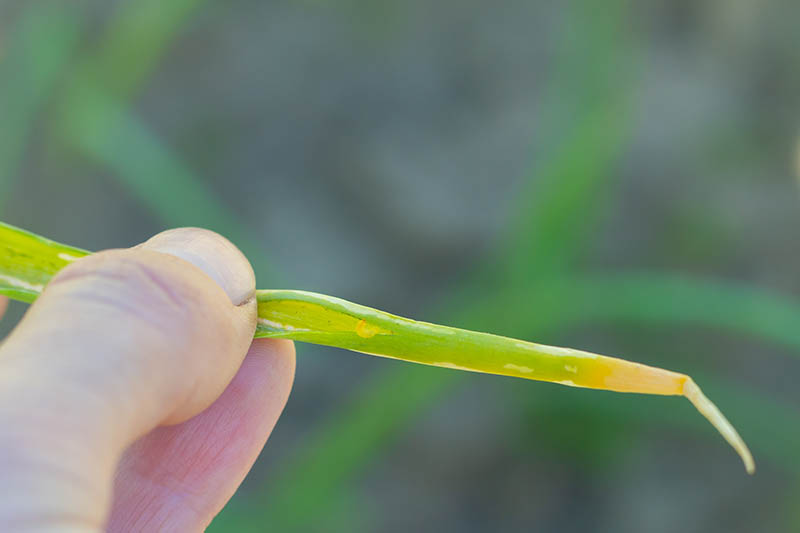
Allium leafminers, Phytomyza gymnostoma, cause the most harm at the maggot stage of their life cycle. They tunnel into chive leaves, gobbling tissue as they go.
You’ll know (or at least suspect) a leaf miner infestation by the curvy, light-colored trails that you see on the leaves.
These particular leaf miners are an invasive species that’s not to be confused with the native American serpentine leaf miner, Liriomyza trifolii, or the vegetable leaf miner, L. sativae. Those two inflict little damage and can be ignored.
P. gymnostoma, though, can devastate all the alliums they come in contact with, both by consuming the plants and by creating a gateway for fungal and bacterial infections.
The first line of defense against allium leaf miners is destroying garden debris at the end of each season.
If you live in an area where these insect pests are prevalent, consider planting chives under row cover up to the time you’d like the flowers to be pollinated.
Growing them as annuals that you can rotate to a different area of the garden may be a good choice if these pests are a recurring problem for you.
Look to our guide for more ways to detect, prevent, and treat allium leaf miners.
Onion Maggots
Even though chives have only slight, tapered, bulbous roots, onion maggots (Delia antiqua) can still present a problem.
The adult flies lay eggs, several hundred per female, that hatch into tiny white larvae that bore into and feed on the tiny bulbs.
Symptoms include yellowed or wilting leaves or stunted growth.
Prevention is key with onion maggots, which can’t be eliminated with insecticides.
Keep in mind that they’re most prevalent during cold, wet springs, so postponing transplanting until after June 1st is helpful. Also, consider using row covers or other barriers in the early part of the season.
Remember, the pupae commonly overwinter in the soil. Try floating row covers to keep the flies from laying eggs, and remove all volunteer wild onion plants from the garden plot, as they can harbor the bugs and eggs.
At season’s end, move the chive plants either to a container or to the compost, to deprive the maggots of a source of food when they first hatch in spring.
Thrips
Onion thrips (Thrips tabaci) are one of the 5,000 species in the Thysanoptera order.
They will proliferate on a variety of host plants that aren’t related to garlic chives, and move on to your prized herbs next.
You may notice discoloring or scarring on the blades if thrips have taken up residence.
The best way to keep thrips under control is to avoid watering plants from overhead, and plant A. tuberosum far from the grain crops where thrips commonly proliferate. They prefer grain, but they’ll eagerly switch over to alliums if the opportunity presents itself.
Practicing integrated pest management can also help.
Learn more about detecting and preventing thrips infestations in our guide.
Diseases
There are only a handful of conditions that might adversely affect garlic chives. If your plants start languishing, there’s a good chance one of these three is the cause:
Damping Off
This ailment is most likely to strike when conditions are moist and cool. It’s pretty unappealing.
One of two types of fungi, either Rhizoctonia or Fusarium species, or a type of water mold in the Pythium genus, will attack roots, causing them to become gray and slimy.
If newly germinated seedlings are afflicted, they topple over and die, while damping-off stunts the growth of larger seedlings.
Planting chives in well-draining soil can help prevent this disease. For other prevention and coping strategies, check out our guide to damping off.
Downy Mildew
Caused by the water mold Peronspora parasitica, downy mildew creates little yellow spots on the top of a plant’s leaves.
Downy mildew creates cosmetic damage, and the spots keep getting bigger, to a point where they may kill off the plant because it can no longer photosynthesize properly.
This is another disease you can prevent by planting chives in well-draining soil and avoiding overhead watering, since downy mildew occurs most often when the weather is cool and conditions are moist.
It’s also crucial to pull up and trash any plants that have been infected. To treat downy mildew, foliar fungicides may work.
Pink Root
The Phoma terrestris fungus causes pink root, which sounds pretty but is actually destructive and ugly.
The fungus colonizes the plants via their root tips, causing stunted growth. There’s a good chance that infected seedlings will die.
Because the fungus can survive even if it’s buried beneath 15 inches of soil, the key to preventing pink root is to rotate all allium crops from year to year.
Avoid planting chives, onions, or garlic in the same spot two years in a row, especially if any of them had this disease. Growing your herbs as annuals may be a good idea if this is a known issue in your garden.
Saving Seeds
Even if you initially bought transplants to grow, there are benefits to saving some seeds to grow in the future.
For one, you’ll have seeds from plants that are adapted to your specific growing conditions if you’d like to sow more. And you can also save numerous seeds to grow as microgreens, or to share with friends.
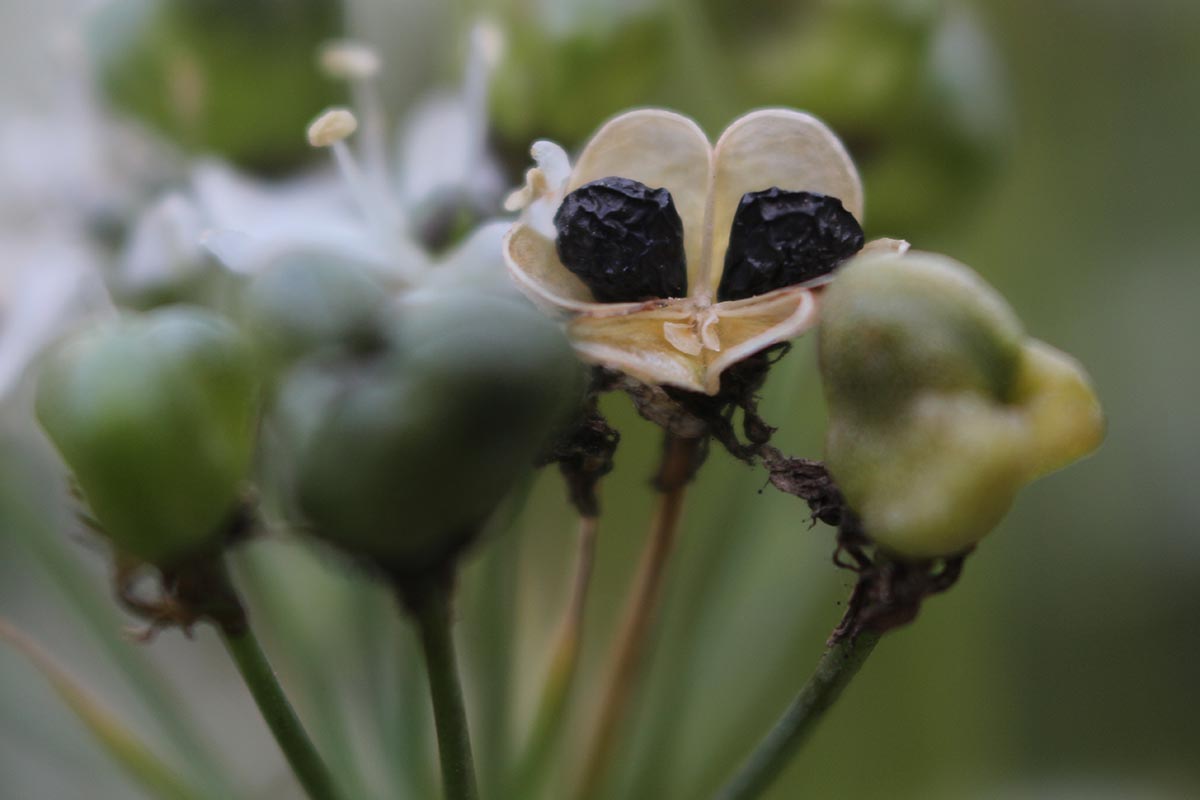
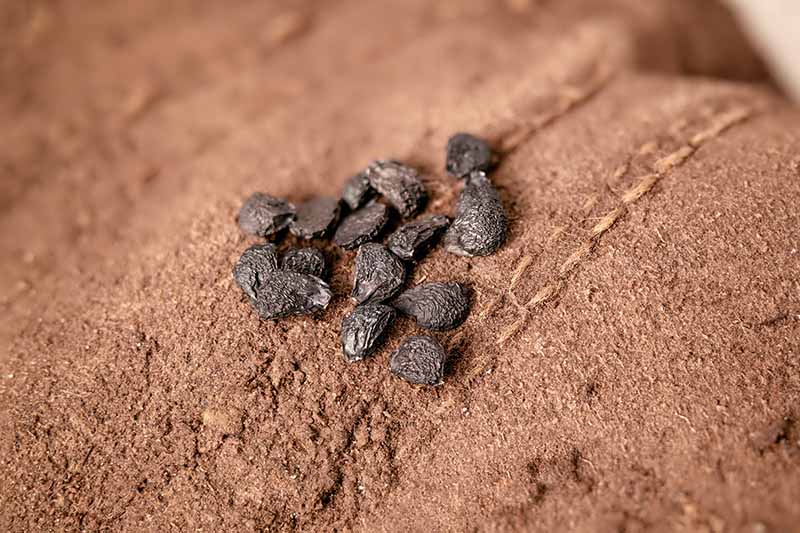
Start by letting at least one clump of garlic chives flower and then develop seed heads.
The blossoms will eventually start drying and develop papery brown seed pods with dark black seeds showing inside.
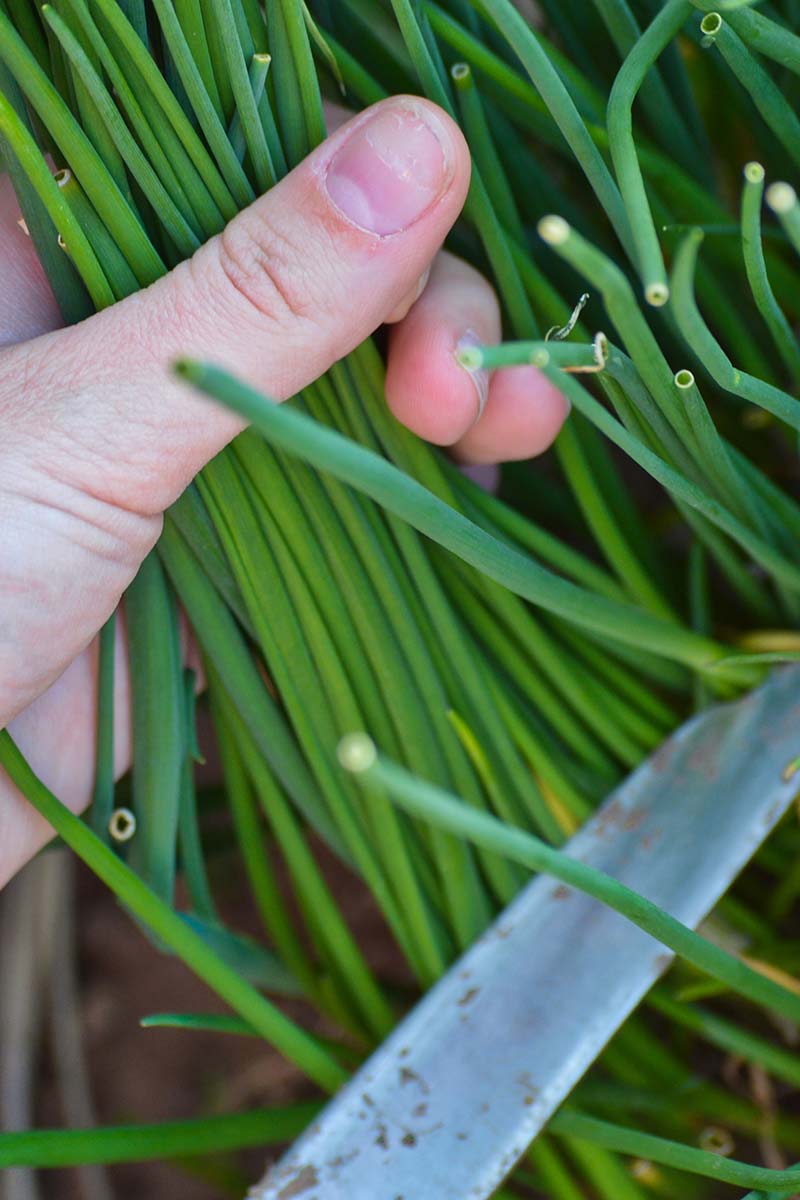
Ideally, you’ll harvest these seeds before they burst from the plants and scatter into the soil. Use scissors to remove the dry seed heads, and then gently use your fingers to collect the seeds from the heads.
Harvesting
You can pick chives a few blades at a time, leaving the rest of the plant behind to keep producing.
Just be sure to wait until the leaves are at least six inches tall, which usually takes about 80 days from direct seeding, or a month from transplanting divisions.
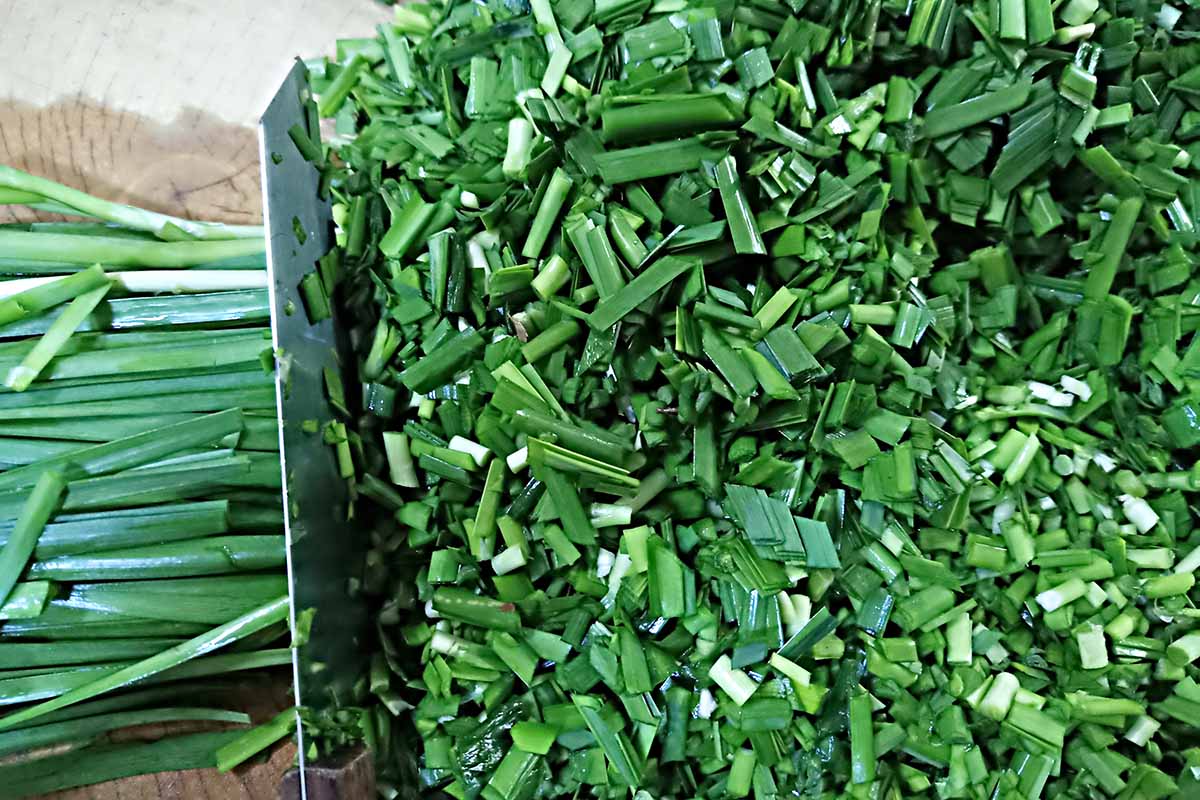
Snip the leaves with clean scissors or slice them off with a paring knife.
I’d discourage you from trying to pull the leaves off the plants with your hands, though. You can easily uproot the whole plant or bruise the base with aggressive tugging.
If you want the plant to keep growing, only pick the outer leaves, and leave the center to regenerate. You’ll be amazed at how fast new chives grow in cool spring weather.
If at all possible, keep picking at least a few leaves consistently, at least once a week during the late spring and summer. This will keep the plants growing vigorously.
To pick the edible blooms, snip them off at the base when they’re just starting to bloom.
It’s also an option to cut the entire plant at once, leaving only the bottom two inches of the broad leaves in place to grow back.
You can harvest all the leaves simultaneously when you’re growing garlic chives outdoors as annuals too. Either uproot the whole clump and then sever the roots once it’s out of the ground, or make a horizontal cut across the soil line.
But do make sure to either till in or pull up the portions of the plant you opt not to harvest. Left to rot in the soil, they can draw all sorts of insect pests or harbor soilborne pathogens that will hang around for next year’s crop.
To me, it makes good sense to plant several garlic chive plants so there’s always one ready to pick, and a couple that can keep growing until they’re needed.
You can also divide a clump from the garden at the season’s end, pot it up, and bring it into the house to enjoy throughout the winter, snipping what you need just as you would outdoors.
Just remember, it will need strong light from a sunny window or supplemental grow lights.
And now, let’s eat! Chive recipes and cooking ideas are coming right up.
Preserving
Once you’ve used or given away all the chives you can harvest without sacrificing future production, consider preserving some to use in the cold months.
You can dry or dehydrate these chives, though they do lose a bit of their flavor that way.
My preferred method is to chop and dry clean chives and then freeze them in small portions, just a couple of tablespoons. I can then add to a simmering soup or savory stew without thawing first.
If you have a bountiful supply, you can’t go wrong by making a big batch of herb butter or chive pesto and freezing that.
Sourdough cheese and chive biscuits also freeze well. Find a recipe for them at our sister site, Foodal.
Recipes and Cooking Ideas
If you cook lots of savory dishes, you’ll never run out of ways to use fresh chives. Start with the traditional treatment of chopping these garlicky herbs to top the sour cream on baked potatoes, but don’t stop there!
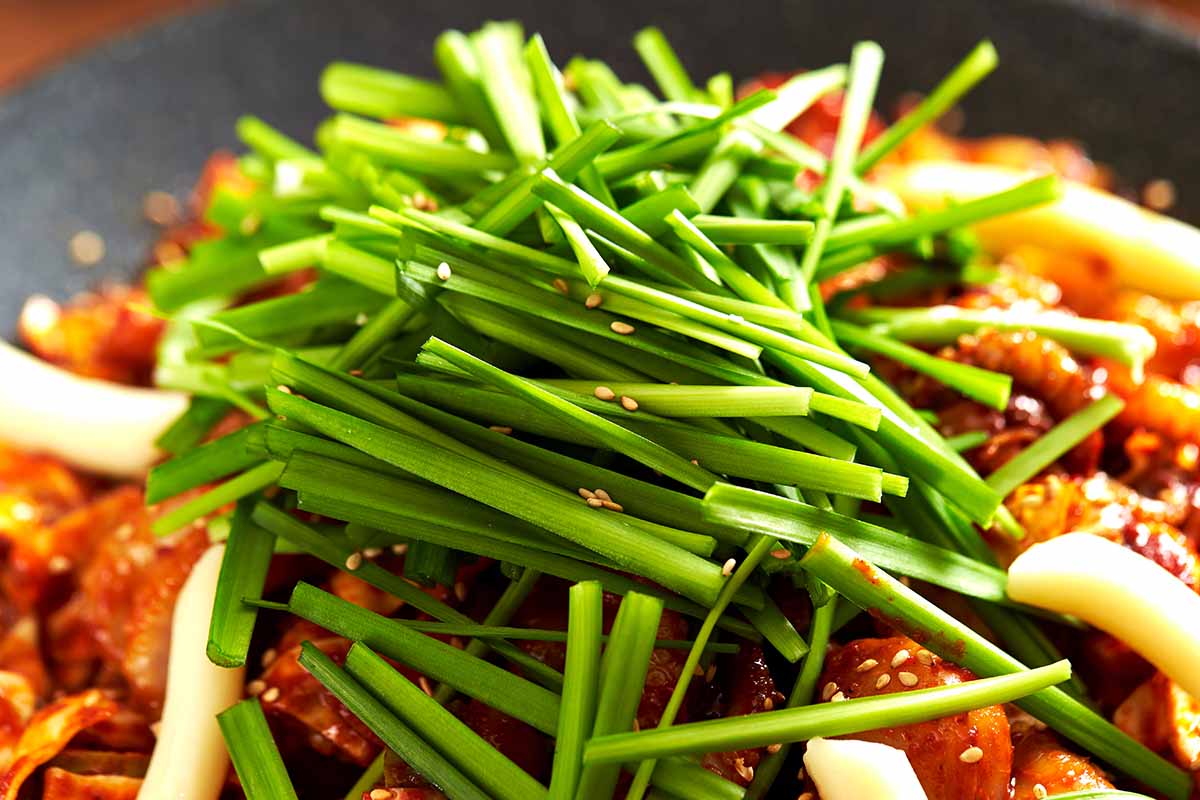
Chopped chives stirred into melted butter enhance steamed vegetables, for example, and they liven up spring salad mix or vinaigrette, too.
They’ll go limp and lose that nice bright green color if you cook them too long, but they’ll be crisp and just a little garlicky added in the last minute of cooking stir-fries, scrambled eggs, clear soups, and rice pilaf.
Or try them in a recipe that’s been designed to showcase their light, vegetal flavor.
Foodal’s take on an asparagus and mozzarella omelet is just such a dish, and there are endless ways to vary it with other vegetables that complement garlic chives, like mushrooms, broccoli, or whatever’s fresh and on hand.
The taste is paramount, but chives are healthy, too. Learn more about the health and cooking benefits of chives on Foodal.
Quick Reference Growing Guide
| Plant Type: | Bulbous perennial herb | Tolerance: | Cold, drought, part sun |
| Native to: | Himalayas to China | Maintenance: | Low |
| Hardiness (USDA Zone): | 3-9 | Soil Type: | Fertile, rich in organic matter |
| Season: | Spring and early summer (leaves); late summer and fall (blooms); year-round (indoors) | Soil pH: | 6.0-8.0 |
| Exposure: | Full to part sun | Soil Drainage: | Well-draining |
| Time to Maturity: | 85-90 days | Attracts: | Bees, beneficial wasps, butterflies, other pollinators |
| Spacing: | 8-10 inches | Companion Planting: | Carrots, kale and other brassicas, lettuce, potatoes, roses, tomatoes |
| Planting Depth: | 1/4 inch (seeds); even with soil line (transplants) | Avoid Planting With: | Beans, peas, and other legumes; other alliums including garlic and onions |
| Height: | 18-24 inches | Family: | Amaryllidaceae |
| Spread: | 4-6 inches | Genus: | Allium |
| Water Needs: | Moderate | Species: | Tuberosum |
| Common Pests: | Allium leaf miners, onion maggots, thrips | Common Diseases: | Damping off, downy mildew, gray mold, pink rot, rust, smut, white rot |
A Kiss of Green Garlic Flavor Any Time
There’s yet another benefit of growing this particular herb: It spreads so readily and is so simple to transplant that you’ll have plenty of starts to share. That’s a great way to bond with fellow gardeners!
Or, if your friends are not into kitchen gardening, you can excuse them from any of the labor and share just the harvest, or a dish or baked good you make with homegrown garlic chives as an ingredient.
Make the rounds at the office or your neighborhood with chive muffins or herb butter featuring the flowers or leaves and you’re bound to make some new connections, maybe even friends!
If you still have questions or perhaps growing or cooking suggestions, be sure to add them to the comments section below.
And for more herbaceous growing information, check out these chive guides next: