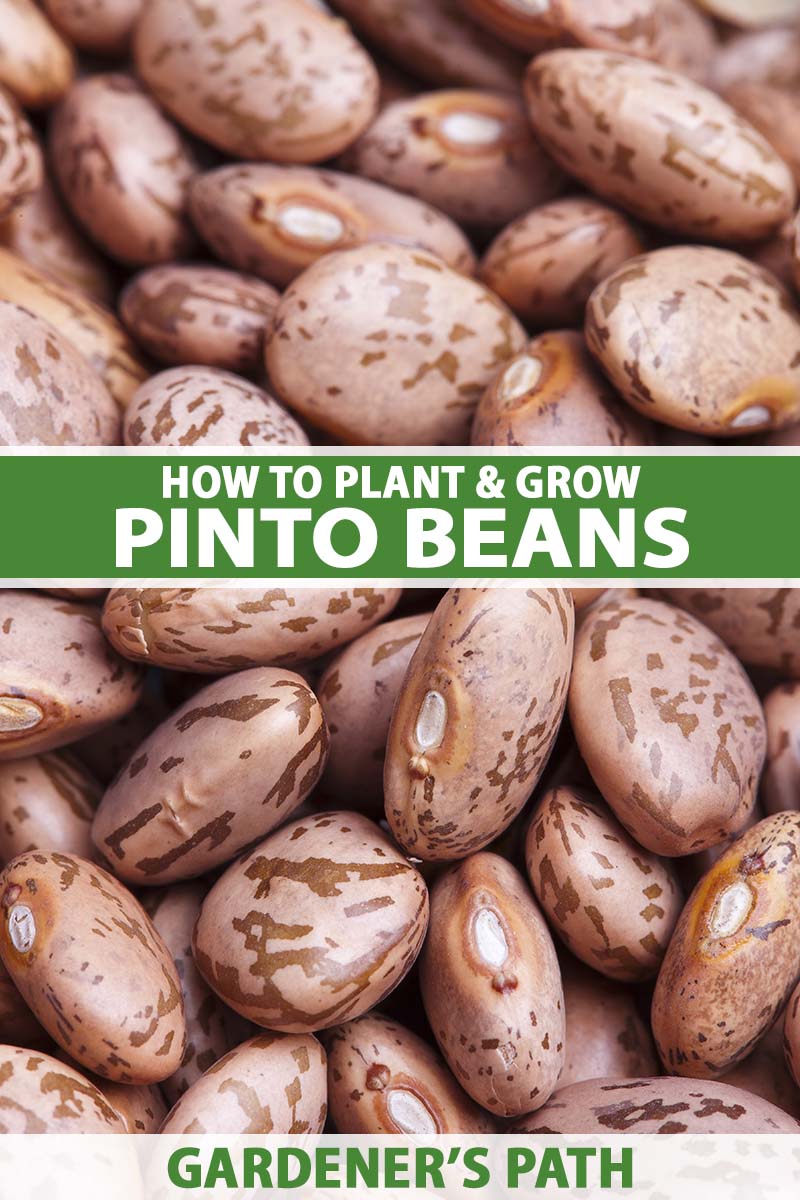
Phaseolus vulgaris ‘Pinto’
Beans, beans, the musical fruit! The more you eat, the more you… will want to grow your own. Not as catchy, but definitely more relatable for those with green thumbs.
Trying to grow more of what you eat? Then look no further than the humble pinto bean.
We link to vendors to help you find relevant products. If you buy from one of our links, we may earn a commission.
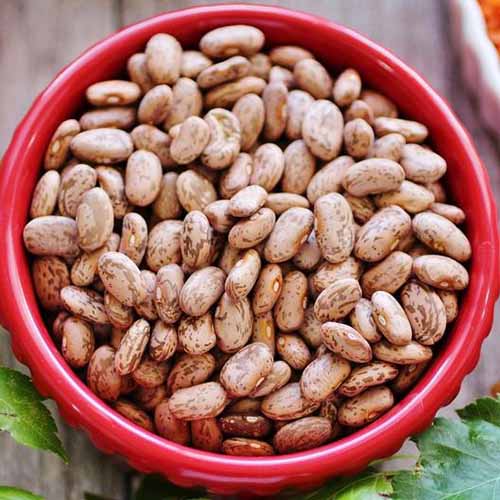
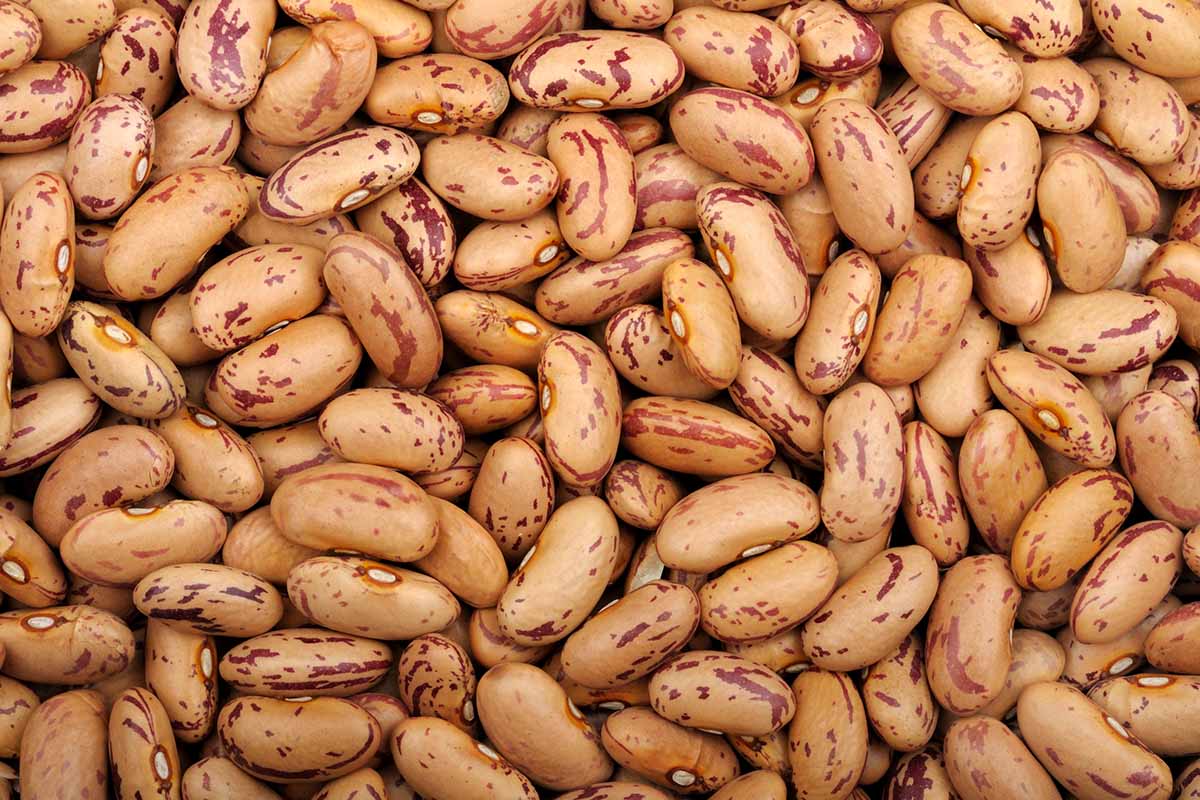
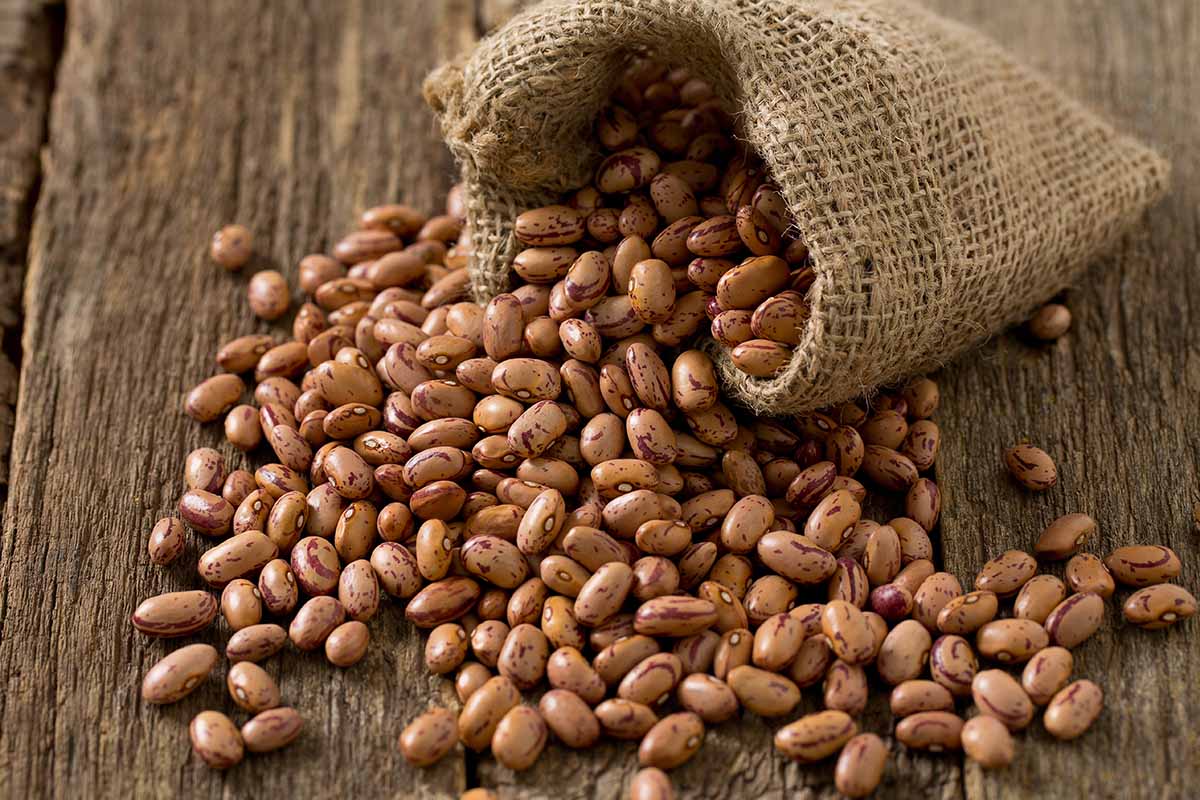
For fans of burrito bowls and veggie proteins, the pinto bean is a nutritional superfood. Known worldwide for its light brown hue and versatility in Mexican cuisine, this tasty legume is a fine addition to anyone’s garden.
Whether you’re a beginner when it comes to beans or learned at growing legumes, this guide has all the information you need to cultivate your own pinto beans with ease.
Heads up, legume lovers. Here’s what awaits you:
What You’ll Learn
Let’s begin, shall we?
Cultivation and History
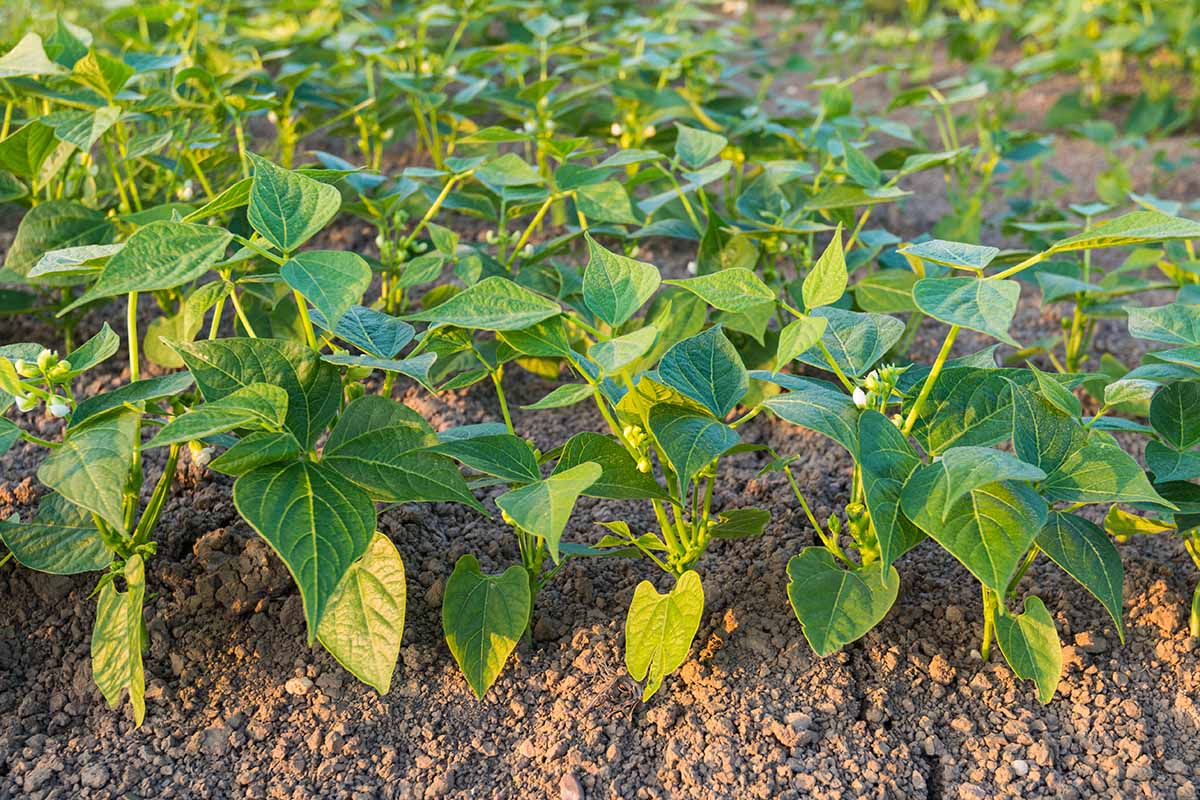
The pinto bean is a cultivar of the Peru-native Phaseolus vulgaris, alongside other familiar varieties such as black, navy, and kidney beans. The pinto in particular hails from Mexico, which explains its affinity for arid climates and full sun exposure.
Pintos come in bushy varieties and vining varieties. The former grows in a predictable and shapely mass, while the latter will keep growing longer and longer, often requiring the use of a fence, trellis, or teepee in order to support the legume as it grows.
Some varieties, aka half-runner vines, are a mix of both and can grow with or without external structural support.
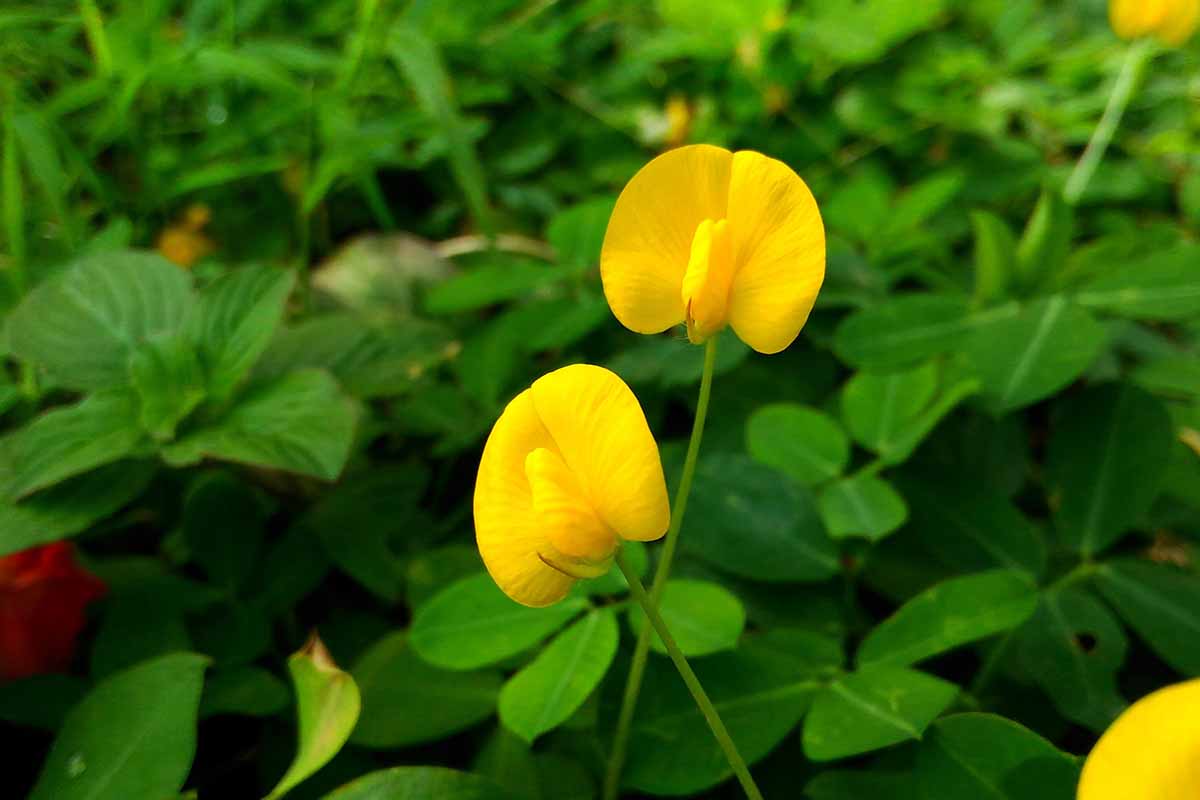
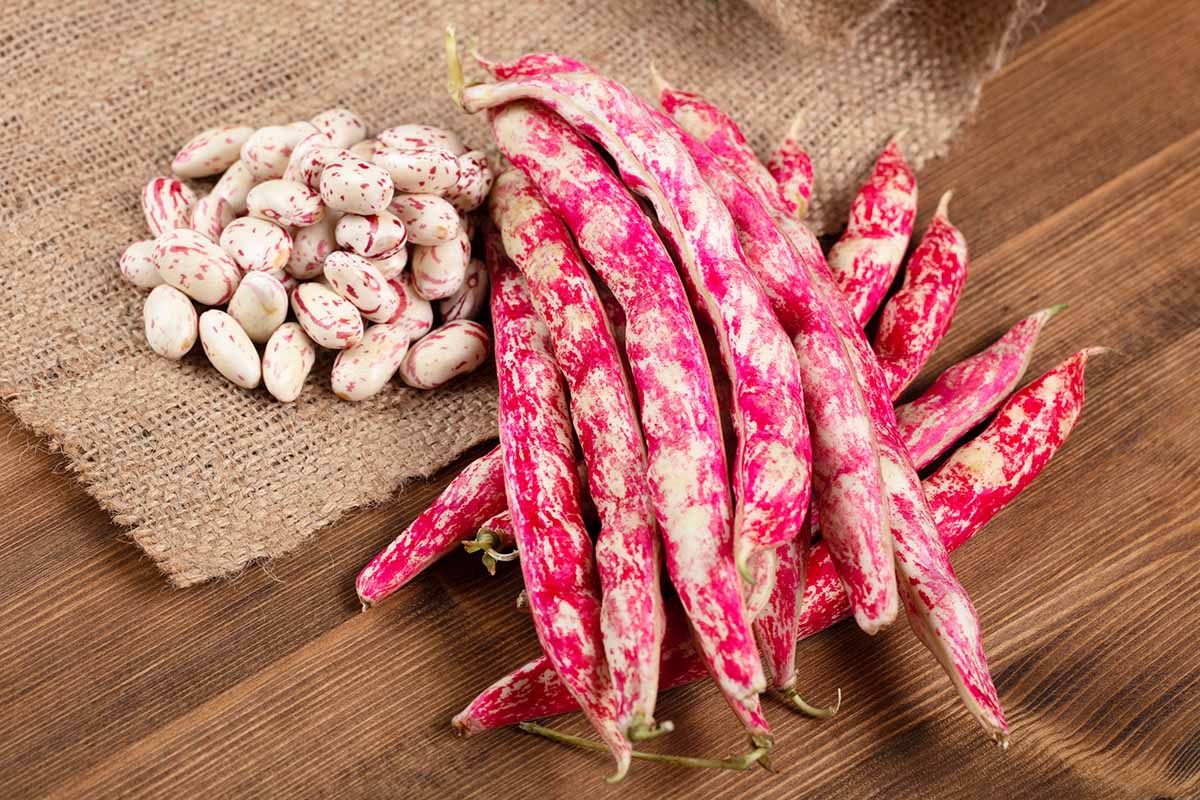
Either way, it has dioecious, yellow flowers and tan-mottled red seed pods. Some with a sensitive color palette would argue the red is more of a magenta… semantics!
The leaves are dark green and obovate, and the plant as a whole has an 18- to 20- inch height and a 16- to 20-inch spread… in its bushy form. In its vining form, its size is only limited by how much it can grow in a single season.
This plant has been cultivated by humans for more than 5,000 years, beginning with those indigenous to Mexico.
It later made its way down into Central and South America via Native American trade. In the 15th century, it was introduced to Europe by Spanish explorers coming back from their New World voyages.

From there, trade introduced pintos to Asia and Africa. Nowadays, they’re enjoyed by members of various cultures around the globe – especially in the United States, where it’s the most-consumed dried bean in the country.
How to Sow
Legumes don’t usually do so well when they’re transplanted, so your best course of action is to propagate these guys by sowing seeds.
Your first step is to acquire said seeds. Luckily, Isla’s Garden has some non-GMO, heirloom ones available via Amazon.
Eden Brothers sells some good bush-type ones as well.
Before you can put them in the ground, though, you’ll need to prepare your planting location. Choose a flat, non-sloped area that receives full sun for at least six hours each day and is protected from wind.
Make sure the planting site has not been used to grow beans or other types of legumes in the past three to four rotations, in order to prevent excess soil nitrogen and the incidence of legume-specific disease.
Naturally, you’ll want to ensure that the land you select is free of disease in general. Prepare the planting area as described below in the section on soil needs.
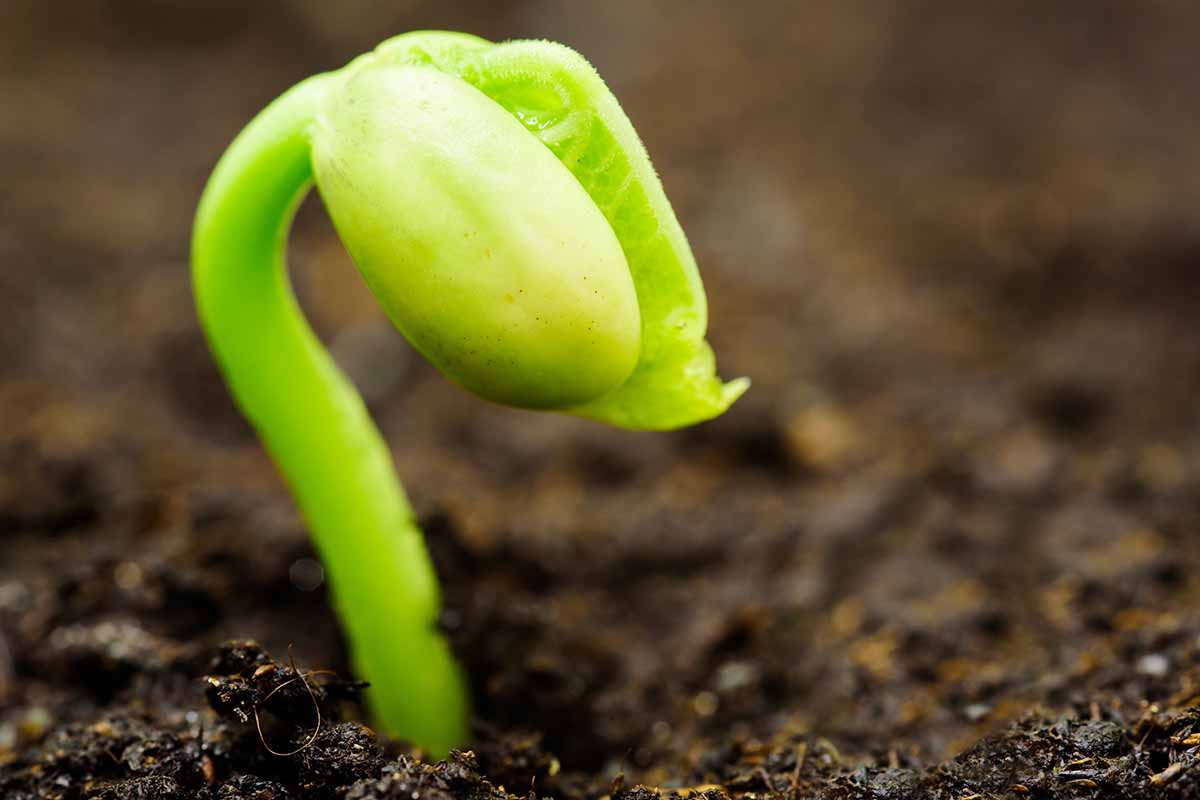
Next, you’ll want to consider timing. Wait to plant your seeds until four to six weeks after the final frost date in your area or when the soil temperature is above 60°F, whichever occurs last. The day before planting time, soak your seeds in water overnight.
Prior to planting, ensure that the planting area’s soil is free of weeds and has good drainage. In addition, inoculating your seeds with rhizobia will help kick-start nitrogen fixation.
When you actually plant your seeds, stick them with the “eye”– or hilum, for those who love botanical vocabulary – facing down into the soil, and be sure to stick every seed a good one and a half to two and a half inches deep.
This eye-down seed orientation will allow for the roots to actually grow further down into the soil, instead of coming out the side or growing up towards the surface.
When deciding just how deep to place the seeds, stick to the lower end of depth range if your soil has a higher clay concentration, the middle if it’s loamy, and at the high end if it’s got a high sand concentration.
In each row, leave three to four inches of space between each seed, along with two to three feet of space between the rows themselves.
For bushy pinto varieties, space them further apart to provide the necessary airflow between plants.
For vining pinto varieties, you can go with tighter spacing, but remember to provide some sort of structure for the legume to climb up as it grows.
Do so right away, so you can accurately give your seeds at least three inches of clearance from their trellis or support structure.
If you want to use containers for growing, ensure that they have holes at the bottom for drainage and are at least eight inches in diameter, if not greater.
A five-gallon bucket with holes drilled in the bottom is an inexpensive alternative. It’s even got that built-in carrying handle!
Water in your seeds immediately after sowing. Keep the soil moist until the seeds germinate, which should happen in about eight to 14 days.
How to Grow
Luckily, pinto beans aren’t all that high-maintenance. With a few simple actions and precautionary measures, you can coast until harvest, more or less.
Water Needs
After the seedlings become established, water needs go down. Pintos prefer it when the surrounding soil dries completely in between bouts of watering.
This is especially important for keeping P. vulgaris free of disease. If the roots are kept constantly wet, then the plants become susceptible to disease.
When watering, avoid watering in the evening and/or getting water on the leaf surfaces. Both faulty watering practices can leave plants prone to fungal infection.
Watering earlier in the day and watering the soil surface directly are effective ways to avoid potential pitfalls.
Soil and Fertilizer Needs
For pinto beans, a clay or silt loam with a pH of 6.0 to 7.0 would be your best bet. Proper drainage is important as well, so you’ll want to err on the side of silt over clay, given the choice.
If you’re stuck with clay, however, the addition of organic humus such as compost or well-decomposed manure will improve your soil’s capacity to drain, along with the side benefit of improving fertility!
Little supplementary fertilization is needed at this stage, especially for the home gardener.
Too much nitrogen can provide favorable conditions for disease pathogens, and too much phosphorus can result in iron deficiency, so those are important nutrients to monitor.
A great way to check your soil for nutrient deficiencies and toxicities, as well as soil pH, is to use Luster Leaf’s soil test kit! It’s available via Amazon.
Climate Needs
Full sun is a necessity, as are warm temperatures.
In addition, you might want to consider taking advantage of natural windbreaks such as lines of trees or shrubs, as a way to protect your pintos from harsh winds.
Growing Tips
- Keep your plot of pintos free of weeds for peak health and yields. Shallow and frequent weed cultivation is best.
- If funds are tight, or you hate online shopping, you can use the dried pinto beans found in grocery stores for planting!
- Putting down black plastic prior to sowing can warm the soil and move up your planting timetable.
Cultivars to Select
Even though pintos are a variety of P. vulgaris themselves, this legume has many cultivars of its own that have been bred for disease resistance or to enhance certain features.
Let’s examine a few of the top contenders.
Othello
‘Othello’ is a vigorous, upright vining variety, released in 1986 by the USDA Agricultural Research Service in cooperation with the Washington Agricultural Research Center.
This high-yield cultivar matures quickly and shows resistance to a variety of diseases such as Fusarium root rot, bean common mosaic virus, and curly top virus. Just like Shakespeare’s play, ‘Othello’ is a timeless classic.
Burke
From the breeders responsible for the ‘Othello’ variety, the ‘Burke’ cultivar was released in 1997.
‘Burke’ was created by crossing the ‘Othello’ and ‘Sierra’ varieties, in hopes of creating a super-legume that possessed all the disease resistance of ‘Othello’ and the special bean rust resistance of ‘Sierra.’
It has surpassed its parents in disease resistance, yield, appearance, and canning quality – the epitome of next-gen.
Quincy
Saving the best for last – ‘Quincy’ is a vining variety with resistance to bean common mosaic virus, curly top virus, and bean common mosaic necrosis virus.
It also matures a bit later than other pintos, taking at least 100 days to mature before it’s ready for harvest.
Its most notable strength, however, is in its tolerance to low nitrogen and low soil moisture. When under those stressors, ‘Quincy’ produces higher yields than both ‘Othello’ and ‘Burke,’ proving itself the toughest legume of the bunch.
Managing Pests and Disease
Pinto beans are a pretty low-stress addition to your garden – provided you protect them from pests and disease.
Herbivores
Deer, voles, and rabbits will all take little bites out of your pinto sprouts, if given the opportunity. Animals such as raccoons, woodchucks, and skunks won’t be as polite, and will devour them.
To keep these four-legged fiends from ruining your future harvest, installing fencing will do the job. Six-foot tall fencing will be high enough to keep out deer, and embedding the fencing six inches below the surface will deter any subterranean pests.
Read more about installing deer fencing in our guide.
Insects
Herbivores aren’t the only animals who’ll find your pintos appetizing. Insects will also munch on your plants, and can even spread disease at the same time.
Aphids
Aphids are identified by their two- to four-millimeter, soft bodies that are shaped like pears. Species can be either winged or wingless, and they may be colored green, red, yellow, gray, brown, or black.
These insects are sap-sucking pests that cause your legume’s foliage to curl, deform, and become discolored. They secrete honeydew that causes sooty mold, and are carriers for many viral diseases.
Aphids can be controlled by spraying the foliage with soapy water or water from your hose. In addition, the introduction of lacewing larvae or ladybugs to your plants can be an excellent form of biological control.
Learn more about how to control aphids in our guide.
Cutworms
Cutworms are two inches in length when fully grown, with smooth and relatively hairless bodies. They come in a variety of colors such as black, gray, brown, tan, or green.
Living up to their name, cutworms will feast on a plant by curling around the stem as they consume it, effectively “cutting” young plants right above the soil line.
Plant wilting is a helpful indicator that the cutworm has started to feed on the stem, which is also a way of detecting cutworms early.
You know you’ve got an infestation when you find plants that are cut off near the ground. Run a hand over the soil near the damage to check for nearby cutworms – they will curl into little c-shaped balls when agitated.
The cutworms can then be removed by hand and disposed of.
Frequently checking your garden can be helpful for staying on top of a potential cutworm problem. Surrounding your plots with a yard or so of dry soil will deter these pests, via a lack of yummy greenery to munch on.
Tilling your soil and keeping it free of plant detritus and weeds can kill larvae and reduce sites for future egg-laying.
Putting collars around the base of the stems can help defend against cutworms. Reusing paper towel tubes or toilet paper tubes is a cheap, DIY means of defense.
Check out our guide to learn more about cutworms.
Mexican Bean Beetles
Given the pinto bean’s nativity to Mexico, the Mexican bean beetle (Epilachna varivestis) is a logical adversary. It can be identified by its copper-colored dome shape, with eight black spots on each wing cover.
They look like ladybugs, but don’t be fooled—these pests will skeletonize the foliage of your P. vulgaris, turning the leaves brown and lace-like.
E. varivestis can be picked off the plant and disposed of, as can their eggs and larvae. The eggs are yellow, and laid on the underside of leaves in clusters of 30 to 40. Larvae are yellow and spiny, growing up to a half-inch in length.
It certainly doesn’t hurt to place some trap crops like nasturtiums, or deterrent plants such as rosemary and marigolds, around your legumes.
Get more tips on controlling Mexican bean beetles here.
Disease
Before we explore specific diseases, there are several general disease prevention tips worth knowing:
- Choose disease-resistant cultivars.
- Rotate legumes with other crops to reduce incidence of legume-specific disease.
- Avoid overhead watering and water close to the soil.
- Pull diseased plants right away and dispose of them in the garbage. Sterilize everything exposed to the disease that’ll be near healthy plants later, such as gardening tools, clothes, and footwear.
- Don’t harvest plants when they’re wet, as this may spread bean bacterial blight.
Now, onto specific pathogens.
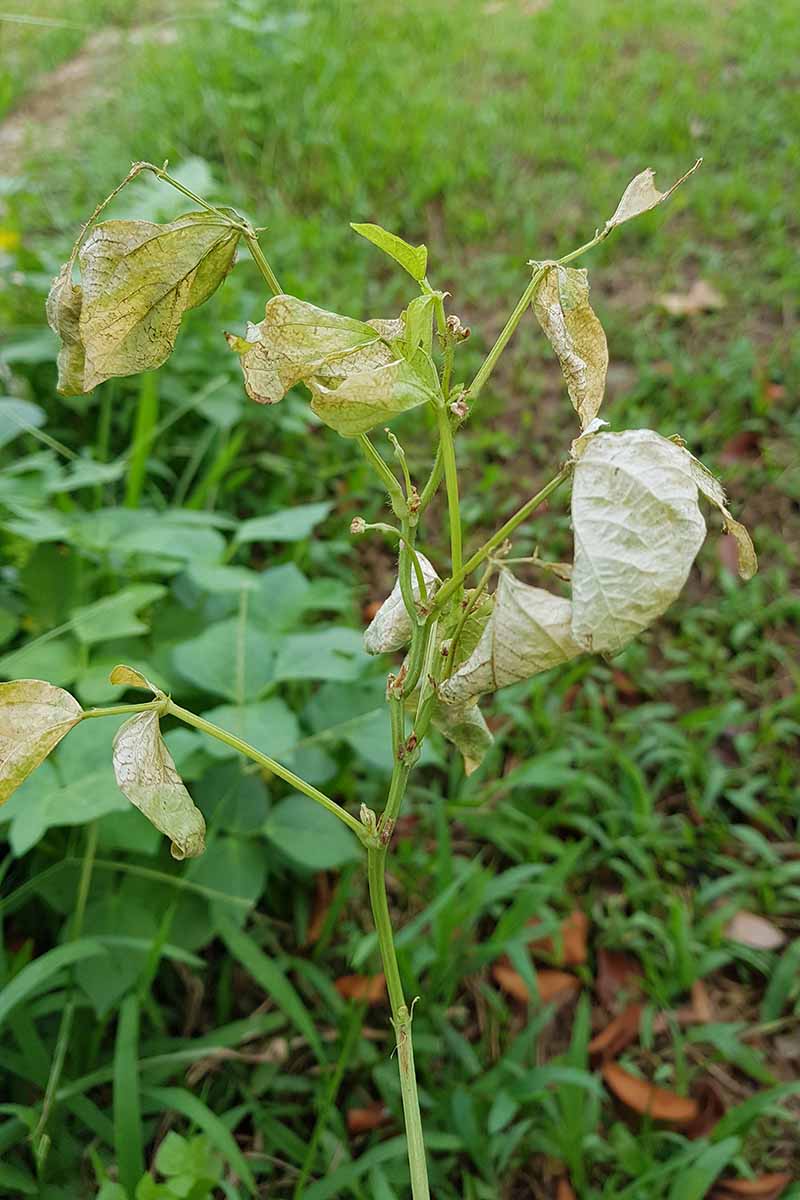
Anthracnose
Anthracnose will make its presence known late in the growing season, as the legume reaches maturity.
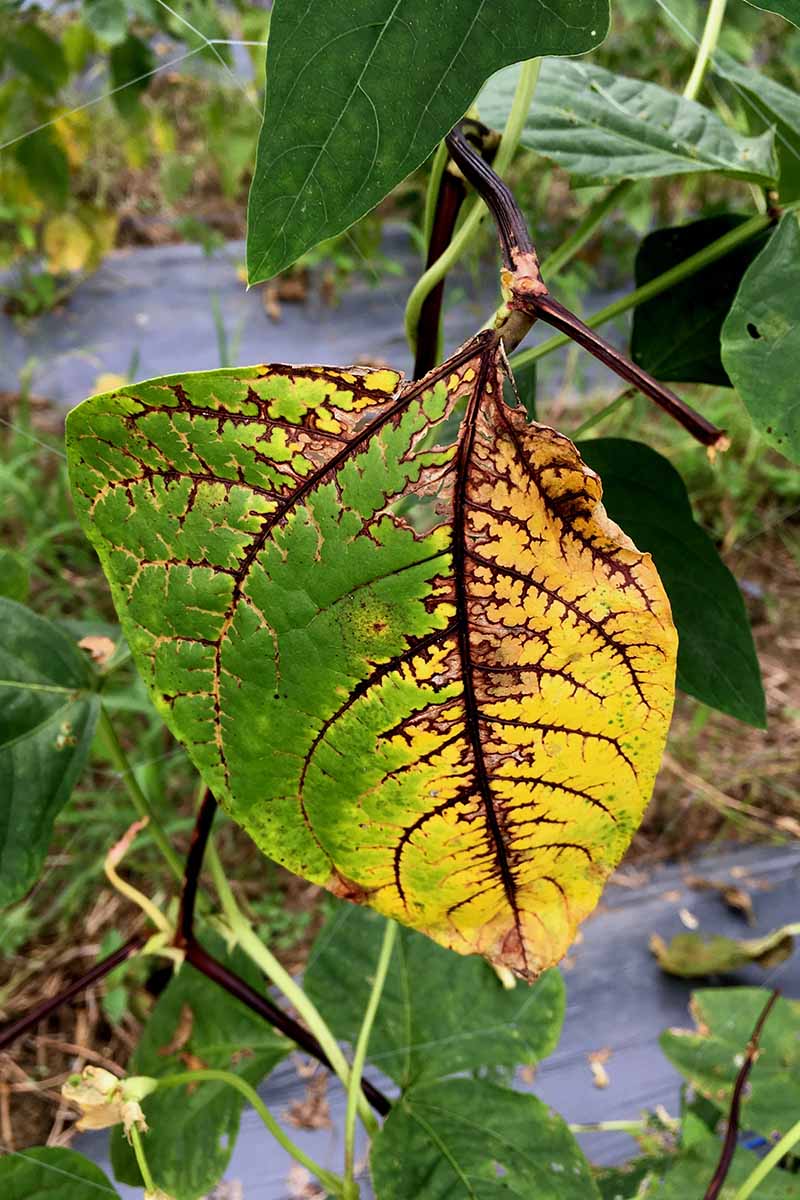
Irregular brown spots appear on the pods and stems in a haphazard fashion. Brown cankers that appear on the petioles, leaf chlorosis, darkened leaf veins, and reduced seed yield are additional symptoms.
Rotating with non-legume crops should help, along with using pathogen-free seed. Pull and destroy infected plants as soon as they pop up. Make sure to disinfect your gardening tools, as well.
Bean Common Mosaic Virus (BCMV)
BCMV symptoms include leaf crinkling, mottled leaf patterns, chlorotic spotting, and overall stunted growth. This virus is one of the diseases spread by aphids.
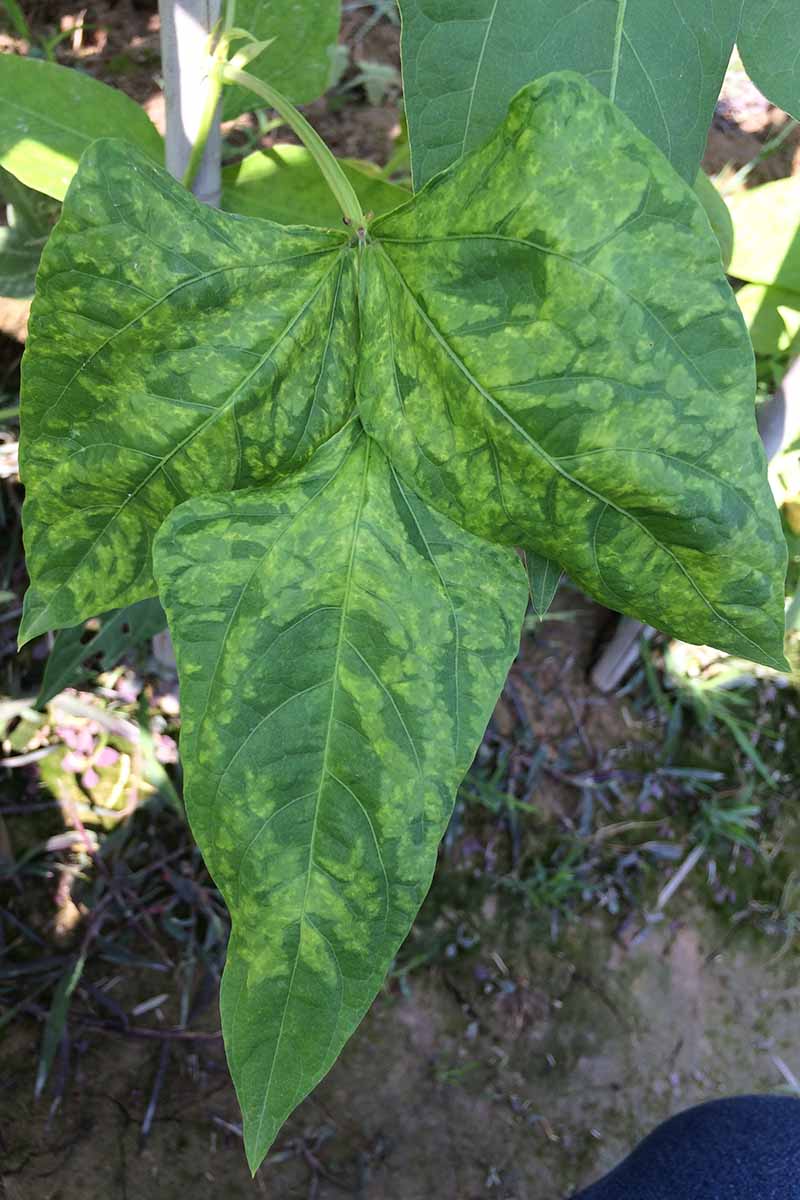
Immediate removal and destruction of infected plants is paramount to reducing further spread. Infected plant tissues aren’t even fit for composting, so send these pathogen-riddled plants straight to the fire or garbage.
Root Rot
Many different types of fungi can cause root rot, such as Fusarium, Rhizoctonia and Pythium species. Notable symptoms include stunted growth, leaf yellowing, and wimpy-looking root systems.
You’ll want to pull and toss infected plants when symptoms become apparent.
Rotating legumes with crops such as corn, alfalfa, wheat, and barley every four to five years can act as a deterrent against Fusarium root rot.
Planting seeds pre-treated with fungicides can also help, along with planting high-quality seeds in general.
Harvesting and Preserving
Pintos take anywhere from 75 to 100 days or so until they’re ready for harvest, depending on the variety.
Once the seed pods turn a dry yellow-tan, start to crack open, and rattle when shaken, that’s when you know they’re ready. Be sure to wait until both the seed pods and the plants are dry prior to harvesting, as this will prevent the spread of disease.
If you’re harvesting bush types, all the pods will ripen at once. For vining plants, not every pod will be ready for harvesting at the same time, which means you’ll need to make a couple harvesting trips before the growing season ends.
It probably goes without saying that you don’t want to eat these seeds straight out of the pod… not without a solid dental plan, anyway.
Strip the pods from the plant, and pop them open by hand. For a more exciting, physically-exerting harvest, place the pods in a sack or pillowcase and begin to thresh, or crush them.
Stomping on the pods, hitting them with sticks, swinging the sack at things like it’s a pillow fight…there’s a variety of options here.
Once the seeds are out of the pods, check them for signs of disease or pest infestation prior to storage. Make sure they’ve dried fully, and Keep them in an airtight container in a place that’s dark and cool.
Pinto beans can also be a pressure canned for long-term storage.
Quick Reference Growing Guide
| Plant Type: | Annual legume | Tolerance: | Heat, drought |
| Native to: | Mexico, Central America, South America | Maintenance: | Low |
| Hardiness (USDA Zone): | 2-11 | Soil Type: | Clay or silt loam |
| Season: | Summer | Soil pH: | 6.0-7.0 |
| Exposure: | Full sun | Soil Drainage: | Well-draining |
| Time to Maturity: | 75-100 days | Companion Planting: | Corn, squash, cucumber, celery, strawberries, leafy greens (plants that do well with a lot of nitrogen) |
| Spacing: | 3-4 inches (vining), 5-6 inches (bush) | Avoid Planting With: | Fennel, garlic, onion |
| Planting Depth: | 1.5-2.5 inches (seeds) | Family: | Fabaceae |
| Height: | 18-20 inches (bushy varieties) | Genus: | Phaseolus |
| Spread: | 16-20 inches (bushy varieties) | Species: | Vulgaris |
| Water Needs: | Moderate | Cultivar: | Pinto |
| Common Pests: | Aphids, cutworms, Mexican bean beetles | Common Diseases: | Anthracnose, bean common mosaic virus, root rot |
Well, It’s Bean Fun
Hopefully by now, you’re sold on the merits of growing your own tasty pinto beans. It’s an easy, low-maintenance way to grow more of what you consume, and the satisfaction of self-sufficiency can’t be beat.
Are you up for the challenge? Whether this is your first time growing pinto beans, or you’re seasoned in the ways of P. vulgaris, I’d be happy to hear about your experiences! Feel free to share them in the comments section below, along with any questions you may have!
If this guide aided you in growing your own pinto beans, feel free to peruse our other legume articles next:


This is a most informative and comprehensive guide for growing and harvesting pinto beans. Thank you for putting this together.
I once planted my beans with the eyes up and they harvested my crop in China that year. Lol. I kid. Over thirty years of gardening and I have never soaked seeds overnight or planted beans (or anything else) with the eyes down. When I read this I actually laughed. Soaking seeds sounds like a super bad idea except for seeds with extremely hard shells. And I’d nick them with a fingernail file before I’d ever soak them. Here’s why. Soaking seeds makes the germ (eye) soft and susceptible to damage. Just drizzle water on the planted seeds and they’ll… Read more »
Thanks for sharing your insights, Bob – not something I’ve ever done either! Since the radicle emerges from the scar or “eye,” many gardeners actually do take the time to do this to give their seedlings an extra boost. But you’re right that it isn’t necessary- unless we’re talking about gardening in zero gravity, they will orient themselves correctly with shoots up and roots down even if some extra effort is required to do so. Soaking can also help to speed germination.
My pinto beans as of yesterday. A 40 foot row, with two lines of plants about a foot apart. I deliberately crowded them in row with pants about 6″ apart. Next year I’ll spread them apart more and compare yields. Found some green worm today and sprayed with bT the second time this year. I spread granular 13-13-13 at a rate of half a pint for the 40′ row when the plants had their second true leaves. I normally don’t fertilize beans but this was a brand new bed with hardly any compost in it, black heavy clay, on the… Read more »
Picture didn’t load
Third attempt to upload picture.
Looks great! Remember that the beans will of course add additional nitrogen to the soil as well – something to keep in mind when you rotate crops.
Hi Bob, thank you for sharing, I managed to retrieve your picture. For some reason it uploaded but didn’t attach. The plants are certainly looking healthy!
Well… you have absolutely made my mind up. It sounds as though growing pinto beans is a real pain in the 🫏. So I bid you adieu.
Happy trails,
Lol. It really isn’t that bad. Even if you have pest or disease problems, it doesn’t usually affect everything.