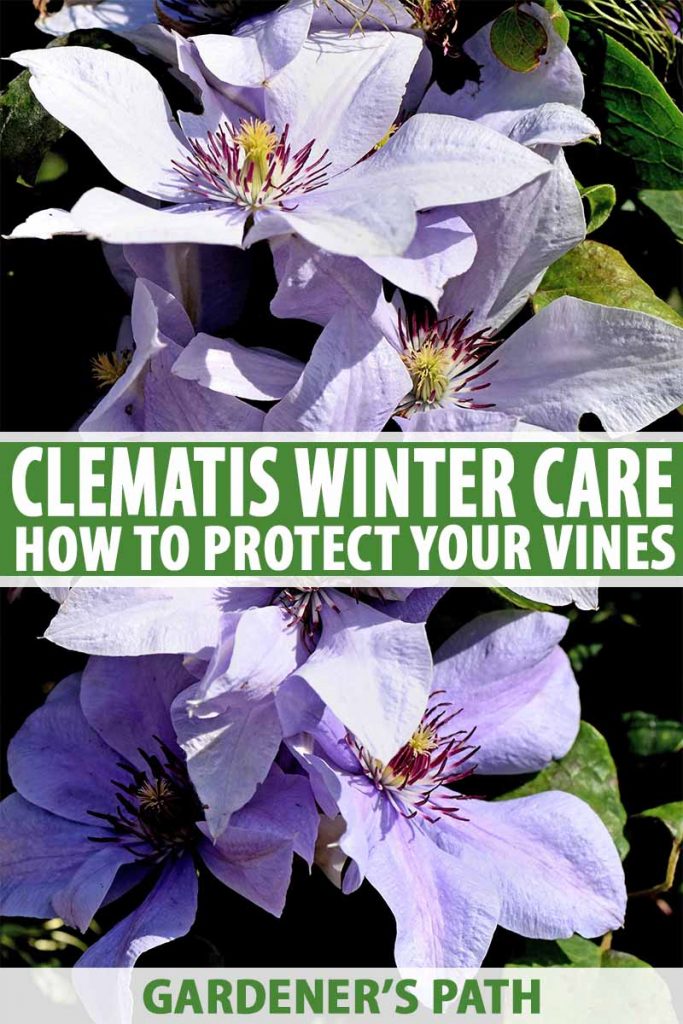

Clematis is rightly known as the queen of the vines for its regal performance in the garden.
It happily scrambles up and over arbors, pergolas, and trellises, as well as through other plants, creating beautiful walls of rich color.
A carefree perennial, the striking, star-like flowers bloom in shades of blue, pink, purple, red, white, and yellow from late winter into spring, summer, and early autumn.

But not all varieties of this showy climber are cold hardy, and many can benefit from some preventative winter care.
With protection from freezing temperatures and hard frosts, your vines will return with an abundance of flowers year after year.
Here’s what’s to come in our clematis winter care guide:
What You’ll Learn
Clematis Basics
As a perennial, clematis are vigorous vines that return yearly, growing from the same plant stock.
Hardy in USDA Zones 3 to 9, there are some species that are even suitable for growing in chilly Zone 2.

However, there are both hardy and tender varieties available, and not all will survive extended freezing temperatures.
For those living in colder regions, winter hardiness is an important characteristic to take into account when purchasing.
Clematis have three distinct blooming periods that correspond to their pruning groups, known as Groups 1, 2, and 3 (aka Groups A, B, and C).
Knowing what group your plants belong to is important before you start any winter pruning.
Group 1
Group 1 are the early bloomers that flower on old wood in winter and early spring, and they require no pruning.

Some species in this group can survive Zones 3 to 5, although many won’t flower as profusely in these areas – air and soil temperatures usually don’t warm up enough to coincide with their early bloom periods.
This group also includes evergreen varieties, which are the most susceptible to frost damage.
Find our favorite Group 1 cultivar selections here.
Group 2
Group 2 varieties bloom vigorously in spring, with a lighter second flush in summer. Flowers grow on old and new wood respectively.

These plants get only a light trim in early spring, then a harder pruning in summer to encourage a second set of flowers on new growth.
These plants can also underperform somewhat in cold zones, for the same reason as Group 1s – they need warm temperatures early in the year.
Typically, Group 2 varieties have two bloom periods, but in cold regions this is often reduced to just one set of flowers on old wood in early summer.
Find our favorite Group 2 cultivar selections here.
Group 3
Group 3 plants flower in late spring, summer, and into autumn, with flowers blooming entirely on new wood.
This group gets cut back hard in winter, so frost damage to stems is negligible – a bonus in cold zones.

Group 3 types also have the most suitable bloom period for colder regions, with flowers blooming in the warmth of early summer right up until first frost.
Here are a few tips if you have existing clematis plants and aren’t sure what group they belong to:
Group 1s often develop thick, woody base stems measuring two to six inches across. They don’t get pruned, which allows them to grow larger than those in the other two groups.
If you have plants like this and they bloom early, starting in late winter to mid-spring, they’re Group 1.
To distinguish Group 2 from Group 3, cut stems back hard in late winter to 18 to 24 inches, then note when they bloom.
If they flower in spring, rest, then flower again in late summer, they’re likely Group 2. If they have only one flush of flowers, they probably belong to Group 3.
Find our favorite Group 3 cultivar selections here.
Deadheading and Cleanup
Begin your winter preparation by snipping off spent blooms using sharp, clean pruners or scissors.

Remove any damaged or dead vines. Clean up and dispose of cuttings as well as any vegetative debris around the base of the plants.
Do this before the ground freezes, to prevent problematic bacteria and insects from overwintering there.
Read more about deadheading here.
Mulching
For frigid winters, or if you experience the occasional cold snap, your clematis will appreciate a generous layer of mulch. This insulates the roots, providing protection from drying winds and extreme temperatures.
After the ground freezes, lay down four to six inches of aged compost, evergreen boughs, grass clippings, hay, leaf mold, or rotted manure.

Spread it in a two-foot radius out from the stems, piling the mulch thickly around the base of the plant, making sure the crown is covered well.
When warmer temperatures arrive and the soil begins to thaw, gradually remove the mulch.
Begin by removing half, leaving some in place to protect against a late cold snap. Remove the rest once any risk of frost has passed.
Insulate the Crown
If your clematis belong to Group 3 and you live in a cold zone, you can provide extra insulation by building a “bird’s nest” over top of the crown with the dead vines.
Here’s how to go about this:
- After the ground freezes, cut the stems approximately three to four feet above the ground. This length allows plenty of room for buds to form in spring.
- Pull down the dead stems from their supports, piling them at the base of the plant.
- Compact the stems by hand into a dense nest and gently center the nest over the crown and remaining stems, until it resembles a large, upside-down bird’s nest. Extend the edges out two to three feet.
When the temperature warms up, remove the nest and dispose of the stems. Do this before buds set in spring to prevent damage to new growth.
Protect from Frost
Evergreen species in Group 1, the C. armandii, C. cirrhosa or C. forsteri varieties, are typically hardy in Zones 6 to 9.

However, should freezing temperatures set in for extended periods, their frost-tender leaves and stems can suffer extensive dieback.
If your region flirts with the occasional cold spell, it may be prudent to cover evergreens with burlap or a frost blanket.
Or, you can try a citrus growers’ trick and wrap the plants in mini Christmas lights.
They provide a little extra warmth until the danger of frost has passed, and add a twinkle to the winter garden! But this only works with old-fashioned lights as LEDs don’t emit any heat.
Also, planting evergreen species in sheltered south- or west-facing locations where they’re protected from harsh winds can help them survive inclement weather.
Container Care
Clematis can be overwintered in pots and containers, even in the coldest climates – providing they belong to the correct group for your zone, and your container is freeze-safe.
Most wood, plastic, resin, metal, or fiberglass pots should tolerate an extended freeze.
Containers that will not tolerate temperatures below 32°F, such as ceramic or terra cotta, need to be moved to a spot where they won’t freeze.

After the soil in the container freezes, mulch generously around the plant base, covering the entire surface with four to six inches of material.
It’s important to wait for the soil to freeze before mulching, because freezing isn’t the real problem for roots – it’s the cycle of freezing, thawing, and freezing again that causes damage.

Give containers made of resin, wood, or other materials an extra layer of insulation against extreme cold.
Stuff large landscape bags with leaves or another type of dry mulch, and wrap them around the containers. Secure with tape or twine.
Bubble wrap also provides insulation and can be taped around containers. This is a great way to reuse packing materials! Or, lean evergreen boughs or straw into an insulating stook.
A stook is made from bundles of long-stemmed grasses and grains or boughs that are secured close to the top, with the bottom fanning out into a cone shape.
Use twine to secure the top over the container and fan the bottom portions around the container like a skirt.

Placing pots against foundations, under evergreens, or tucked into evergreen shrubs provides light protection against frost, but not deep freezes.
Remove any wraps after the soil thaws and temperatures warm.
Read more about growing and caring for clematis in containers.
Brrr, It’s Cold Outside
Now that you know a little more about clematis winter care, will you be giving your vines some protection this year?
Remember to check for winter hardiness when purchasing plants, and provide insulation for the crown and roots.

With just a bit of help during the cold months, these delightful climbers will return in the spring to fill your garden with color – even in the coldest zones!
How are your clematis doing this winter? Did you provide any protection ahead of time? Let us know in the comments below.
Want to dig further into clematis care? Check out these guides next:


I bought a Clematis online and received a pitiful little plant that lost its leaves if you looked at it wrong. After several tries at getting it to grow I finally moved it inside with one little leaf on it to protect it from a freeze. Well it actually started growing and after putting it in the bathroom it is over 6” tall with multiple leaves on it. My questions are these, should I plant it in the ground if it continues to grow? And if so when should I plant it?
Sounds like you’ve got a spunky vine that wants to grow Sandra! And yes, planting outdoors is a good idea. Plant out in mid to late spring after the soil and air temperatures have warmed up, in a sheltered location protected from strong, cold winds. Key points to remember are: provide well draining soil, keep the roots cool, allow the vines to grow in the sun, and cut back hard after their first year’s flowers have finished. Be sure to check out our Complete Clematis Growing Guide for all the info you need on growing strong, healthy plants. And thanks… Read more »
Excellent information …thank you.
Hello – could this plant (in photograph attached) be clematis?
It is growing in a nearby garden, but I have no idea what it is.
Any help would be gratefully appreciated.
Hi John, no it’s not a clematis.
From the looks of the leaves and the clusters of small flower heads, I’m guessing it’s a viburnum, but not sure what cultivar.
Watch for the flowers to form berries over winter – their color, shape, and size will give a better indication of the species.
Thanks for asking!
Hi. I live in Nova Scotia, Canada.
I bought a clematis plant back in the late spring. It flowered in early summer and again in fall. I brought the plant into my apartment for the winter. I cut back the vines when all the flowers were gone.
To my amazement two weeks ago I noticed the plant is growing new shoots. One is about 30 inches high and very healthy green. Do I need to feed it plant food during the winter??? Here are a couple of pics…thanks…Pat Sidney
Hey Patricia, because of the warm indoor temperatures your vine thinks it’s spring and that it’s time to start growing again. If you want it to grow indoors, feed with a 5-10-5 fertilizer every 10 to 14 days – but flower production is typically less-than-stellar when grown indoors. It’s also important to keep the container away from heating vents to keep the roots cool. If you want to put it back outside in the spring, hold off on the fertilizer until winter is over. I also recommend you cut the new shoots back to about 12 inches until it goes… Read more »
My clematis is looking very sad with brown leaves. It is a viticella. I also have a small one, Mirabelle, also all brown. They have been lovely all year till now. There has been no frost to speak of, and both are mulched with pine bark. Is this Winter, or is it The End?
LOL, it’s not The End Mary, they’re just going dormant for winter.
Both of your vines are deciduous and lose their leaves over winter, so the browning is nothing be concerned with. But they will appreciate the bark mulch when frost does arrive.
And they both belong to pruning Group 3. Cut back in spring to 12 to 18 inches, cutting just above a strong set of leaf buds – your plants will soon be lovely again!
Thanks for your question!
I’m looking for a climbing clematis for train to climb a very large oak tree,after reading lot of material I’m lost kinda overwhelming lol can you help
Hey Zettie, can you tell us what hardiness zone you’re in? Also, when do you want your vines to bloom? Let us know and we can make some recommendations!
I have a late summer/autumn flowering clematis. Every year it has a mildew on it and this year is even worse. It’s even on the buds! Wonder what causes this??
Hey Audrey, sorry to hear about your mildew problem. It typically occurs in temperatures between 60 to 80 degrees F, and is more likely to occur in shady or overcrowded locations. The spores can be transmitted by insects, wind, or infected garden tools. If possible, remove any spore-hosting weeds and garden debris from the growing site and also remove any infected leaves or stems from your plant. If you plant sends up multiple shoots in spring, selectively remove a few by cutting back just above the ground. The aim is to improve air circulation, so choose a few strong stems… Read more »
Thanks for the information concerning winterizing my clematis. My husband and I have three of them and we really enjoyed them. We will take care of them.
Good to hear Maria, glad you found some useful info!
Lorna, I live in Ottawa, Canada – 4a(?) region. I purchased three clematis plants 6 summers ago. The following year there were only two plants and, seven summers later only one flowers moderately n an annually and moderately, primarily in July. The other plant has never bloomed and only replicates the previous years growth and height by the end of September. They are facing south, but the non blooming plant is shaded by a hot tub for most of the afternoon sun. I have two questions. 1) Should I transplant my non-blooming plant to a sunnier location next spring? 2)My… Read more »
Hi Stephanie, yes to both your questions. With a July bloom time, I suspect your plants are in Group 3, so a hard prune in late winter/early spring is required. Cut all stems back to around 12 inches, cutting just above a set of healthy leaf buds – remove all the old, dead material at that time. It looks like they spread quite nicely on your trellis, but I think a big part of the non-blooming problem is the afternoon shade for the one plant – transplanting to a sunnier spot could be helpful. You can transplant in early spring… Read more »
Ah, incentive to rake the yard! “Waxy, do it for the children!!!!” ????
Thank you for that very practical insulation tip!