
You may be all too familiar with this scenario. You have lovingly tended your tomato plants and watched the first delectable fruits of your labor develop…only to see them ruined by ugly brown patches on the blossom end.
This is the dreaded and misnamed blossom-end rot.
Why misnamed? Because this “rot” has nothing to do with an infection and everything to do with the misallocation of calcium in the plant. It’s not technically a “disease” at all, since no pathogens are involved.
But don’t just assume that your soil is low in calcium.
We link to vendors to help you find relevant products. If you buy from one of our links, we may earn a commission.
The problem may be due to other factors, like the amount of moisture available in the soil and the state of the roots.
The use of insecticides or fungicides will not solve this problem. Read on to learn how to prevent blossom-end rot from occurring, and whether there’s anything you can do once you find it on your tomatoes.
Here’s what I’ll cover:
What You’ll Learn
What Is Blossom-End Rot?
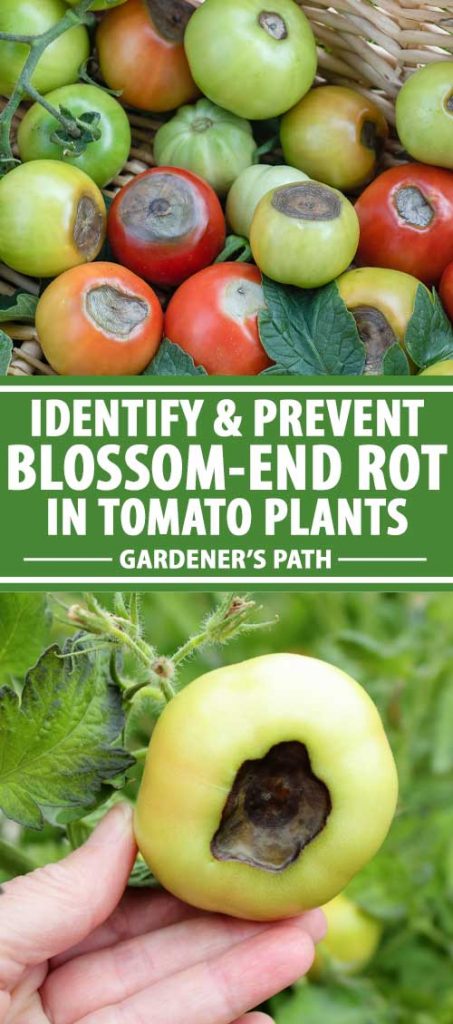
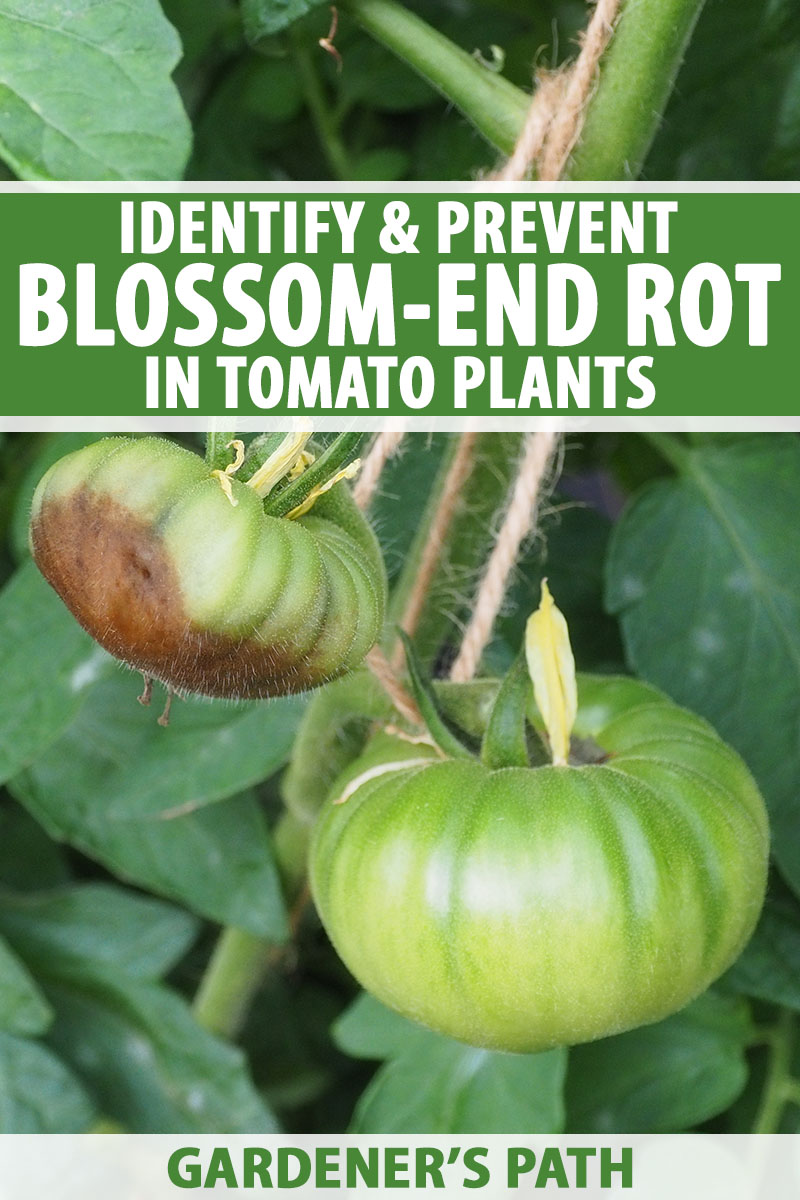
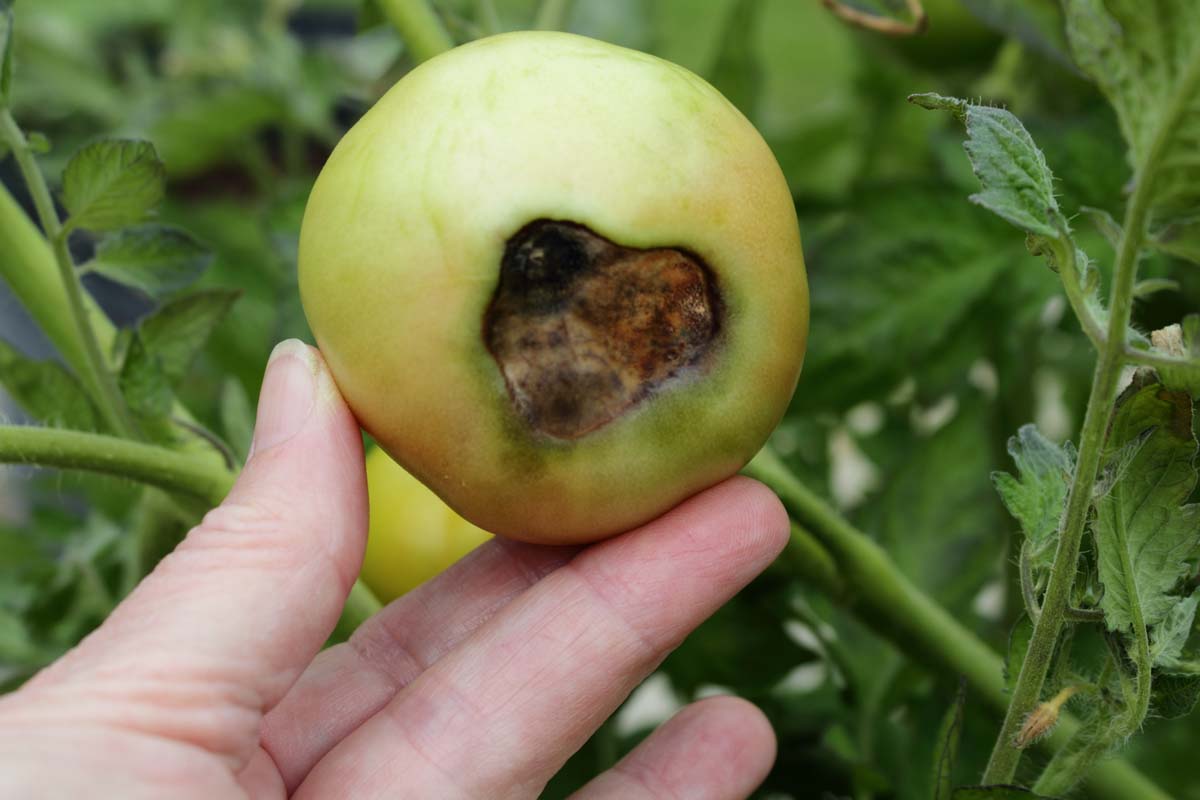
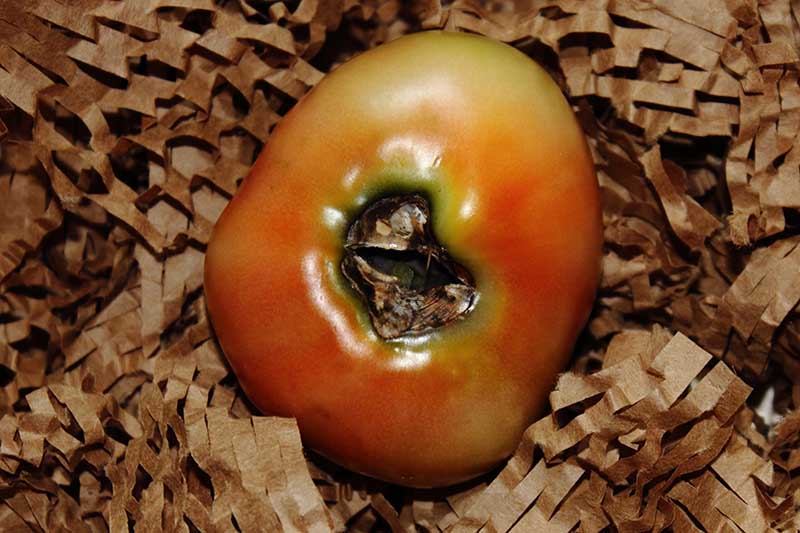
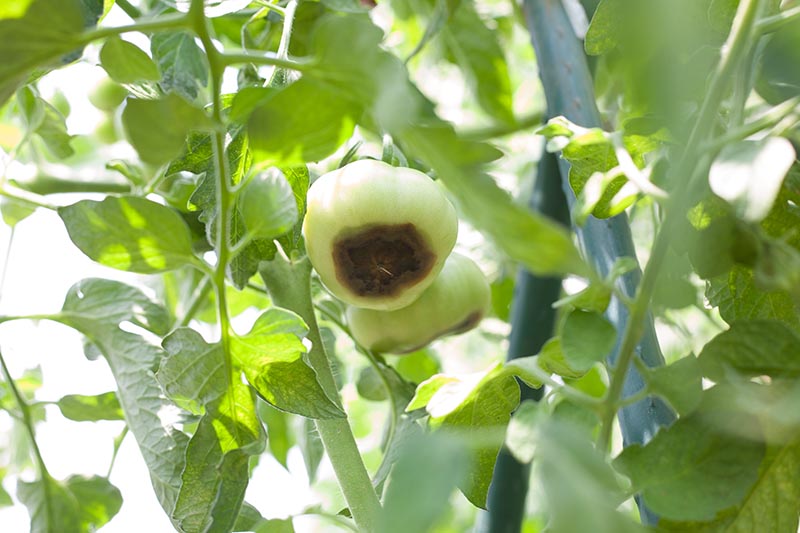
Blossom-end rot is the formation of lesions on the bottom of the fruit that can grow to cover as much as one-third to one-half of each tomato. The lesions start as small, water-soaked spots. They rapidly grow larger and turn dark as the fruit ripen.
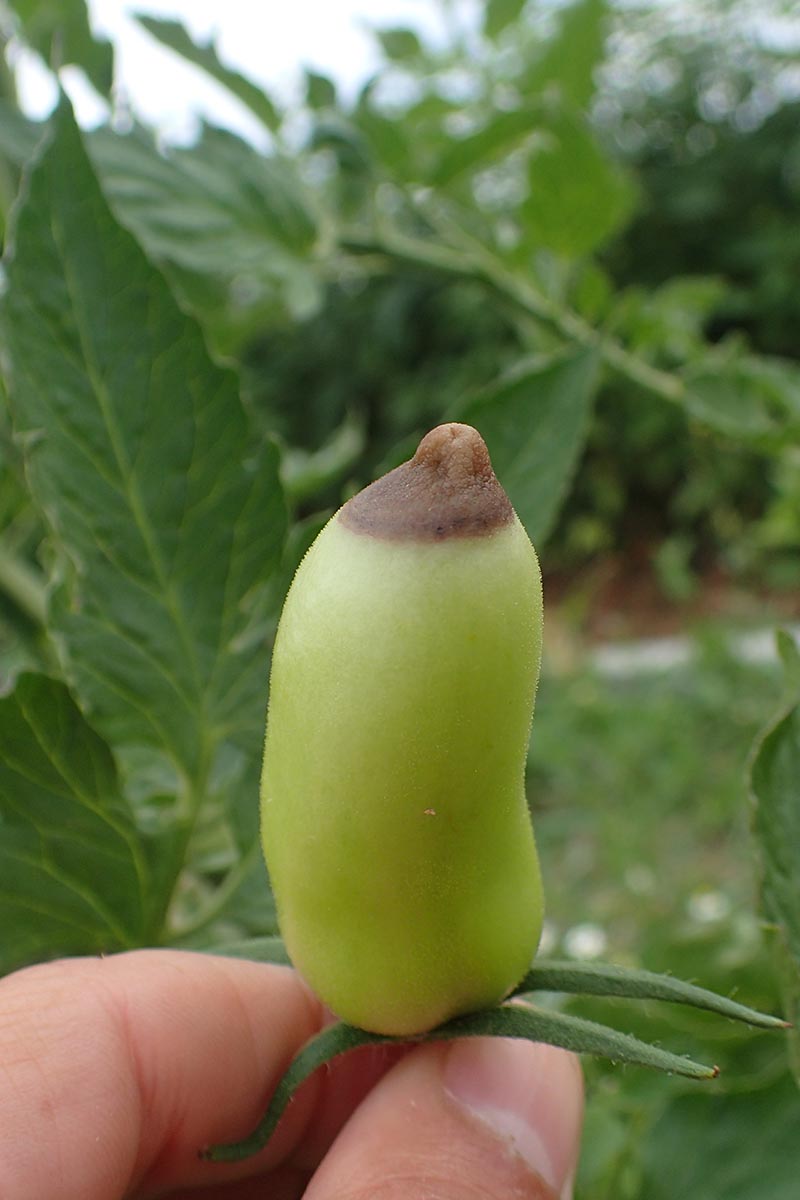
If the lesions get large, they dry out and flatten, turning black and leathery. It starts when the fruits are mature green and starting to ripen.
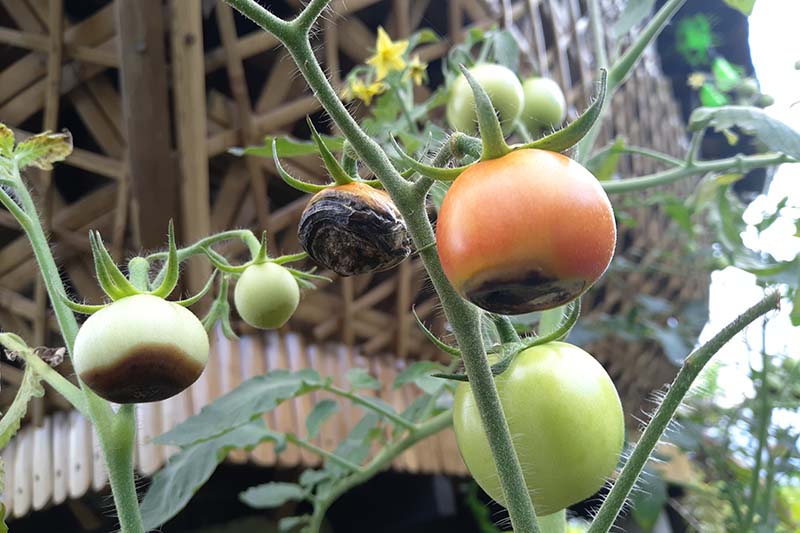
Often, this happens to the first tomatoes produced during the season, while those from later on may well be fine. This is particularly true for indeterminate varieties, since they produce tomatoes until the end of the season.
In contrast, if you grow determinate varieties that produce all of their fruit early in the season, you are at risk of losing your whole crop.
What are indeterminate and determinate varieties of tomatoes? We have a guide that answers that very question.
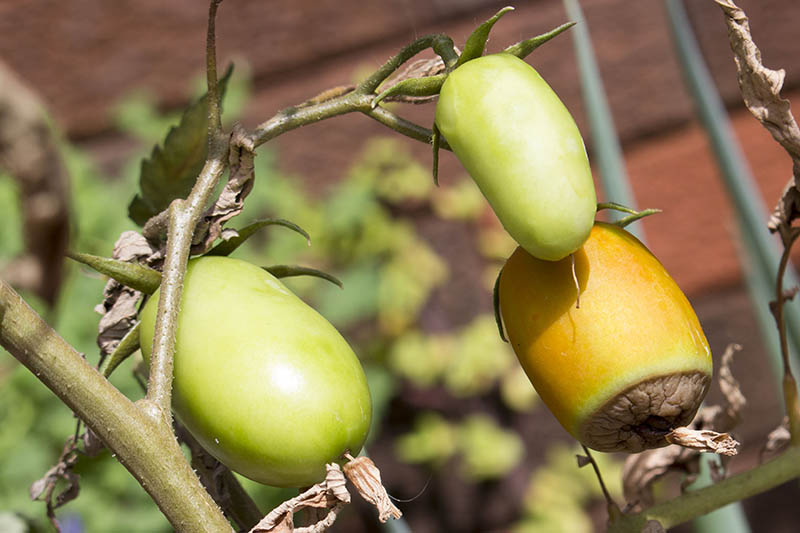
Blossom-end rot is more frequently seen in large plum or paste type cultivars, and is rarely a problem in small, cherry tomato varieties.
Rather than being a disease caused by a bacterial or fungal pathogen, this is a physiological disorder caused by insufficient calcium uptake.
One small solace is that the rest of the fruit remains edible, but you certainly couldn’t sell it if that was your goal. And cutting away the damaged portions is certainly less than ideal when you’d hoped to show off your homegrown crop in salads and on sandwiches.
While less common, this disorder can also afflict peppers, squash, watermelons, cucumbers, and eggplant.
Why Does It Happen?
I cannot overstate the importance of calcium to plants. It is critical that this nutrient be available to fruits while they are developing.

Calcium plays many roles in plant biology, but holding the cell walls together is a key one of these.
Think of pectin, and how it gels. Without calcium to hold the pectin in the cell walls together, the cells turn to mush. This is the process that happens when soft rot bacteria cause decay, but in this case, the plant causes itself to rot.
Confused? Don’t worry, I’ll go into more detail below.
Even worse, once the tissue has started rotting, bacteria and fungi can invade and make it even more severe.
Factors that affect the supply of calcium in a plant include:
- Root injuries
- Heavy applications of nitrogen fertilizer
- Fluctuations in soil moisture
Worse in the Beginning of the Season
You may wonder why the first tomatoes of the season, growing on plants that you have tenderly nurtured from seed or planted as seedlings, are rewarding you with damaged fruit.
There are several possible reasons for this.
One could be a problem with the roots. It is critical for tomatoes to have a well-developed root system.
The roots take up calcium from the soil, and ideally the calcium is delivered throughout the plant by the passage of water, via the xylem.
However, this mode of delivery does not always evenly distribute the calcium throughout the plant. Sometimes the calcium stalls in the stems or leaves, and never makes it to the developing fruit.
Tomatoes that have been planted in cold soil may not develop robust root systems.
Also, if the plants have been over-fertilized and have an abundance of foliage, they are more likely to develop blossom-end rot, as the leaves will compete with the fruit for calcium.
How to Avoid Blossom-End Rot
There are a number of cultural measures you can take to minimize the likelihood of being faced with deformed tomatoes at harvest time.
1. Wait to Plant
While you will be eager to start your tomatoes in the spring, you may be setting them up for blossom-end rot if you plant in cold soil, or clay soil that you haven’t amended correctly. Patience is a virtue, they say!
Wait until at least two weeks after your last frost date to plant them in your garden. If you don’t know when that is, you can find out in the Old Farmer’s Almanac.
It is also important the temperature of the soil is at least 60°F before you plant your seedlings outside. You can determine this by using a soil thermometer.
Seedlings should have at least two to three sets of true leaves and be hardened off before transplanting.
Check out our guide to learn more about how and when to transplant your seedlings.
2. Fertilize Properly
You want the pH of the soil to be between 6.5 and 7.5, so it can be a good idea to have your garden soil tested before you plant. The results will let you know whether you need to apply any amendments.
It is best to use fertilizers that are low in nitrogen, but high in phosphorus. Consider fertilizers with an NPK ratio of 4-12-4 or 5-20-5. If you plan to grow your crop in a container, choose a fertilizer that is specifically designed for growing tomatoes.
If you do apply nitrogen fertilizer, add calcium nitrate as well, and avoid nitrogen in the form of ammonia or urea.
Generally, a lack of calcium in the soil is not the problem – most soils already contain adequate calcium. The problem is that the calcium is not properly allocated throughout the plant tissues.
However, if the results of your test indicate that your soil is deficient, you will need to add calcium at or before planting time.
Amending the soil later, or spraying on plant foliage will not remedy the problem once it has taken hold.
Soils that have been heavily irrigated with poor quality water can develop with an overabundance of soluble salts. This is because tap water is often treated with chemicals that can upset the balance of nutrients.
This concentration of salts can increase the likelihood of plants developing this affliction, because the calcium in the soil becomes less available to the plants. Problem salts include ammonium, sodium, magnesium, and potassium.
3. Don’t Cultivate Too Closely
It can be surprisingly easy to damage the roots of tomato plants. This can even happen when you do something as seemingly harmless as adding stakes or cages to the ground.
It is best to add these when you first plant your tomatoes in your garden before the roots have spread.
Don’t cultivate the soil within one foot of the base of the plant. This is particularly important after plants have set fruit.
If you have in-ground vegetable beds or large raised beds, scraping lightly with a hoe should be enough to take care of any weeds.
4. Keep Soil Moisture Constant
Tomatoes need at least an inch of water a week during the growing season. This can be in the form of rain or irrigation.
Not sure how much precipitation you receive? A rain gauge can help.
If you provide supplemental irrigation, spray at ground level rather than watering the foliage. Use a soaker hose instead of overhead sprinklers. This will also help to prevent diseases like early blight.
If your tomato plants are in containers, you will need to water them more frequently. Ideally, they should be planted in plastic pots, so they will be less likely to dry out.
A 3- to 4-inch layer of mulch will also help to conserve moisture in the soil. After the plants have been in the ground for 3- 5 weeks, add an organic mulch, such as wood chips, grass clippings, or straw that is free of weed seeds.
Note that too much moisture can also be a problem. Heavy rains, particularly after a dry spell, can leach the calcium out of your soil, increasing the chances of this problem.
5. Provide Shade
If you have a home garden, you should consider shading your plants when your plants are being buffeted by hot, dry winds. Winds like these can dramatically decrease the moisture in the soil.
Even though they prefer a full sun location, if you live in a very hot climate, you may need to shade them from the sun even when there is no wind.
In fact, gardeners in hot climates routinely shade their tomato plants from 10am to 2pm during the summer months.
If your plants are small, this can be as simple as turning a chair upside down over them, or using some shade cloth.
If you have more of a plantation, you can buy a shade canopy, such as this one from Amazon.
Don’t Give Up!
While the appearance of heavily damaged fruit can be extremely demoralizing, don’t give up hope. If you are growing indeterminate varieties that produce fruit both early and late in the season, with regular watering the rest of your crop may be fine.
Plus, there are a number of ways you can prevent this problem from affecting the rest of your tomatoes.
Careful planning at planting time helps to give your tomatoes a boost that will help to ensure healthy growth and fruit production throughout the season, and paying attention to local weather conditions and moisture levels in the soil is a must.

Have your plants developed blossom-end rot? Did it affect your entire crop, and what changes did you make throughout the growing season? Have any tips to share? We’d love to hear from you in the comments below!
And for more articles on perfecting your tomato growing game, you’ll need these guides next:
very good
Hi John, Thank you so much! That is very kind of you to take the time to say, and I appreciate it.
I’m having an issue with tomatoes on the top of my plants, the newer ones, the older larger ones seen to be okay. When I noticed early on, I add lobster compost to the top of the soil (about three weeks ago) and this week added garden lime. I water them diligently and have good drainage – I don’t know what is going wrong 🙁
Hi Renee, I’m so sorry to hear that. Is there a chance that you could post a picture? Do the fruit have rings like a bullseye on them? It sounds like you are doing everything right, so to be honest, I am a bit puzzled.
Thanks for the information! I have container tomatoes. I have been amending the soil with calcium and fertilizer after I noticed blossom end rot. Not all of the tomatoes on the plant seem to have it. Do you remove the tomatoes that are infected?
Hi Sheralyn, I’m so glad that you found the information useful!
Blossom end rot is a physiological disorder and not a disease, so the tomatoes won’t be spreading any infection. The only problem is that they could get infected by secondary organisms like fungi or bacteria. It is probably best to remove them, so that doesn’t happen.
Hello Helga, Thank you for such great information, advice and encouragement! I have a elevated raised bed and my Big Beef tomato plant seemed to be doing well (although I am dealing with a sort of fungus on the lower leaves that has begun to spread upward). I have approximately 2 dozen tomatoes so far but noticed 2 of them (and a few more that appear to be at the very early stages) developed a strange condition at the blossom end. I searched on-line and none of the images I have found resemble my tomatoes—until I came across your article.… Read more »
Yes, it does look like your tomatoes have blossom end rot, and unfortunately, epsom salts tend to exacerbate the problem. What does the fungal issue look like? Do your plants have good drainage and proper airflow? Remove the affected leaves if you can, to prevent further fungal spread. Water consistently as needed, ensure that your plants are spaced properly, and avoid overfertilizing. With any luck, your plants will fare better later in the season, producing healthier fruit!
Thanks Allison. I only have 2 tomato plants in the raised bed (2’x4’); in the attached photo, you’ll see the Big Beef on the left has 2 main stems, one of which split into 2, so it has 3 stems total. The Black Cherry plant on the right has 2 main stems. I believe they have enough airflow and I haven’t watered them regularly in the last 5 weeks as we’ve had a very wet summer thus far (and the blossom end rot issues began about 3-4 weeks ago). Is there an organic fertilizer or soil amendment you can recommend… Read more »
Thanks for the additional details, Kim! I’d recommend pinching off the affected leaves, and removing the affected fruits as well if you wish, unless you’d prefer to let them mature – they’re still safe to eat if only mildly affected, just trim away the damaged areas. Unfortunately, it’s difficult to add calcium once the plants have already become established. Many gardeners (like Mike McGrath, host of You Bet Your Garden, and author of Growing Great Tomatoes) recommend adding dried crushed eggshells to the hole at planting time as a calcium supplement, to give plants what they need for the season… Read more »
Thank you very much Helga for a clear and informative explanation of everything blossom end rot. Being a serial failure at growing tomatoes in containers because of BER, I was just about toss in the towel again but, unlike previous years, it seems this year the affliction is limited (as opposed to all encompassing).
So I take that as encouraging. ;-). Learning as I go here so there’s always hope. I’ve bookmarked this page; next year when planting time rolls around I’m going to act on your recommendations.
Is there a good calcium fertilizer anyone can recommend? I even threw Tums in my containers this past summer and it actually reduced significantly the blossom rot. I’ve been struggling with this for years and wondering why my cherry tomatoes never had this. Thanks for answering that puzzle. I’d love a recommendation for a good fertilizer.
Happy to have found you.
Bonnie
Glad to hear the Tums helped! One of my favorite calcium-rich options is to add a handful of dried and crushed eggshells directly to each planting hole at the beginning of the season. You can read more about using eggshells in the garden here.
Other fertilizers recommended for use on tomatoes can offer a boost of calcium, such as Botanicare Cal-Mag Plus, or Bonide Rot-Stop. Both of these are available via Amazon.
so very helpful thank you
This is exactly what was happening to my tomatoes. Thanks for the help, I will take your advice and hope for better results next time. Would you consider watering 3 times/week too much in hot climates? (I live in southern Portugal, with warm/hot summers).
Best wishes to you in southern Portugal, Ole! I don’t think three times a week is necessarily too much, but you should base it on how much rain you’ve had and whether the soil is dry instead of just automatically watering. The goal is two inches–about five centimeters for you–of water per week. You’ll want to deep water the plants at the soil surface, not from overhead, supplying two centimeters at a time. I’m intrigued by what I imagine are scorching growing conditions and would love to hear what kind of tomatoes you are growing. Good luck with the blossom… Read more »
Thank you. Very happy to hear that the rest of the tomato is edible.
Yes, Ellen, that is always a relief to me, too. Thanks for reading and commenting.
Hi: I have 4 different varieties of tomatoes. I harvested seeds last year from plants that I bought that were listed as heirloom. They were large, sweet and juicy so I decided I would try therm. This year I bought plants from the store and planted them. I remembered my seeds and started them at the same time inside. They sprouted and quickly grew, I planted the seedlings when they were about 10 inches tall at the beginning of July. I live in southwest Ohio. All of the plants grew well, the ones I started from seeds got about three… Read more »
This does sound like blossom end rot, and the fact that this variety matured more quickly and the fruit was subjected to early season conditions that the other plants were not as affected by. Inconsistencies in watering are the culprit – did you have some unseasonably hot weather early on? Hope you enjoy the rest of your crop!