
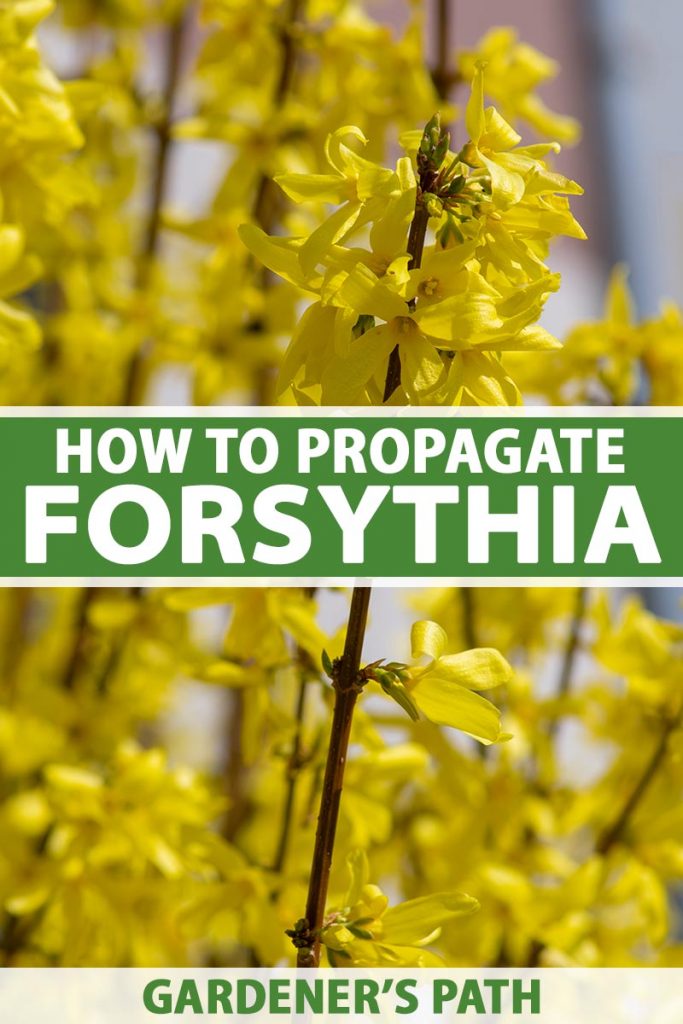
Forsythia is an iconic shrub in USDA Hardiness Zones 5-8, where its late winter to early spring blooms shatter winter’s icy grip with their bold yellow blossoms.
In our guide to growing forsythia, we discuss all you need to know to cultivate this classic in your landscape.

This article focuses on five easy ways to propagate more shrubs from the ones you already have.
Here’s the lineup:
What You’ll Learn
This is fun, so let’s get right to it!
If you already have a forsythia bush, you can easily make more with one of the following methods:
1. Air Layering
One way to start a new shrub is to force one of its stems, or canes, to sprout roots.
This technique works with any size bush that is over a year old, because it requires “old wood,” or last year’s growth that has hardened off.
Here’s how to do it:
- In the spring, select a cane that is almost finished flowering, but hasn’t leafed out yet.
- Choose a place where there is at least one leaf node, and the cane is straight and firm.
- As though you were whittling, hold a paring or pocket knife parallel to the cane, and starting about an inch below the leaf node, pare away a thin layer of the outer bark.
- Cut straight through the leaf node to create a flap of bark that is still attached at the upper end, just above the leaf node.
- Snip off all other leaf nodes, so that it is bare for six inches above and below the “wound” you created with your knife.
- Gently lift the flap and press some rooting hormone powder into the inner wood.
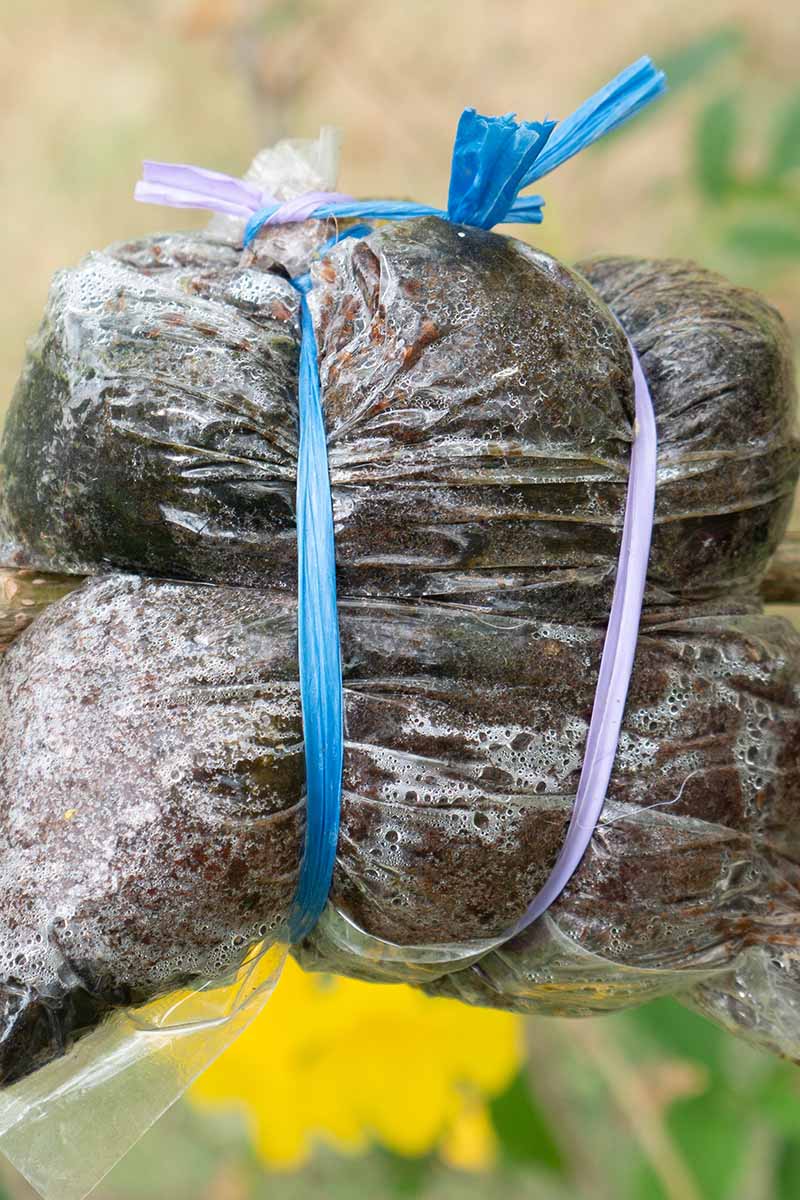
- Place a bit of sphagnum moss under the flap as well, and close it down.
- Wrap sphagnum moss around the wound site to achieve a thickness of about four inches, two above and two below. The length should be three to four inches.
- Cut a piece of black trash bag to a size of about five by five inches.
- Wrap the plastic around the moss bulge, overlapping it for complete coverage.
- Secure the plastic at each end with duct tape, for a snug package.
- In late summer, open the package, and you should find that the cane has grown roots. If it hasn’t, replace the plastic and tape, and allow them to stay in place until late next spring.

- Cut the rooted stem off at its point of origin.
- Make cuts in the rooted stem three to four inches above and below the sprouted roots.
- Plant the rooted stem two inches deep in soil that has been worked to a depth of six to 12 inches and drains well. It will sprout and have time to harden off before winter dormancy.
Provide an inch of water per week in the absence of rain until the first frost.
2. Division
Another way to make one shrub into two is by dividing it in the spring, after it flowers.
This method works best with small shrubs that have had a chance to establish themselves for two to three years. They have substantial hard wood and are able to withstand the shock of unearthing.
To divide a forsythia:
- Use a pitchfork to loosen the soil around the shrub in a circle about one foot out from the base.
- As you walk the circle, push the pitchfork in with your foot, and bend it back to loosen and lift the roots. Take it out and do the next section, until you have gone completely around.
- Lift the bush out and lay it on its side on flat ground.
- Use an axe or other sharp tool to chop through the crown, where the canes meet the roots, to create two independent shrubs.
- Replant where desired, taking care to set the crown at ground level, covering the roots with about two inches of soil.
- Maintain one inch of water per week in the absence of rain.
By fall, the young bushes will be well-established and ready for winter dormancy.
3. Soil-Rooted Stem Cuttings
This is my favorite way to make new forsythias from old.
It reminds me of a little story that you may already know if you follow my articles…
My sister-in-law was the first grandchild in her family, and her gardener grandfather loved it when she visited.
He’d give her a lollipop to eat, and when she was finished, they’d go out to the yard and “plant” the stick in the garden.
And – you guessed it – when she returned the next time, a fresh lollipop had “grown” and was waiting for her.
Rooting hardwood stem cuttings in soil is that easy!
Here’s how:
- In late fall, when shrubs are dormant, choose a sturdy cane.
- Snip off the top two inches to remove the weakest, narrowest part.
- Cut the cane at its point of origin, to remove it from the shrub.
- Lay the cane down and find the leaf nodes. These are not the flower buds, but the bumps where the foliage will sprout.
- You can get multiple cuttings from a long cane. Make your bottom cuts about a quarter of an inch below a leaf node, so that each stem section has a leaf node near its base. Make your top cuts a quarter of an inch above a leaf node, so that each has a node near its top, as well.
- Dip the base of each stem section into rooting hormone powder.
- Plant the cuttings in a container of compost or sterile potting medium, about four to six inches apart.
- Keep the container indoors or in a greenhouse.
- Maintain even moisture, but don’t oversaturate.
- When the danger of frost has passed in the spring, transplant the rooted stems to the landscape in groups of three to five, with about four to six inches between them, for a sturdy shrub base.
- Provide an inch of water per week in the absence of rain.
Another way that’s even easier is to use the clippings you have gathered when you prune your forsythia in the spring
Rather than throw them on the compost heap, use the firm “old” wood that was last year’s growth to make your cuttings.
- If the leaves have already sprouted, use them as a guide for cutting above and below the leaf nodes.
- Snip off the foliage to redirect energy toward root growth.
- Make your stem sections, and dip each into rooting hormone.
- Plant the hardwood cuttings directly into the ground in groups of three to five placed four to six inches apart.
- Keep the soil evenly moist.
When foliage sprouts, you’ll know you’ve got roots, and can water once a week if it doesn’t rain.
4. Water-Rooted Stem Cuttings
In addition to starting stem cuttings in soil, there’s another approach you can take.

While your forsythia is still dormant in late winter, you can cut stems to force indoors.
Choose long canes and place them in tall vases with four to six inches of water.
The warm home environment and the water will cause the stems to break dormancy and bloom.
When the flowers begin to fade, the leaves will sprout.
Be sure to keep fallen flowers and leaves out of the water, and change the water daily, for a healthy environment conducive to root formation.
When the danger of frost has passed, transplant rooted stems into the landscape.
Work the soil to a depth of six to 12 inches, until it’s crumbly.
Place clusters of three to five stems approximately four to six inches apart for sturdy shrubs.
5. Tip Layering
This method is so easy, weeping forsythia varieties do it all by themselves.
And, it’s really fun for gardening with children, because all it takes is bending a stem to the ground and keeping it there.

If your forsythia has gracefully arching canes with tips that drag on the ground, they are likely to self-root.
You can cut these fledgling bushes away from their mother by snipping the canes that join them at the point where they originate, to encourage a new, long cane to grow on the mother shrub.
Then, you can dig up the babies, cut the long canes to within a few inches from the rooted shrublets, and move them wherever you like.
For bushes that don’t reach the ground themselves, bend a cane, bury the top four inches of the tip in two inches of soil, weigh it down with a rock or brick, and it will grow roots.
How will you know?
When you lift the weight, the stem won’t budge, and it will likely have a flush of foliage at the tip.
It’s best to do this very early in the growing season, so you have time to get the baby transplanted and hardened off for winter.
If you get a late start, just leave everything where it is – rock and all – until next spring.
A Word on Seeds
Starting shrubs from seed takes a long time, but you can jump-start the growing process by starting seeds indoors at any time of year.
Some forsythia types do not produce seeds, as they are sterile hybrids. In addition, when there are viable seeds, they may not produce results that are identical to the parent shrub from which they came, either in vigor or characteristics.

That being said, for those who enjoy a challenge, you may want to try your hand at seed propagation.
Harvest your own seeds by collecting the brown pods that appear after the flowers finish blooming in the spring, just as the foliage is sprouting. If there are no pods, you have a sterile hybrid.
Inside each pod are a few teeny-weeny seeds that you can collect and store in an airtight jar for up to a year.
Sow them in sterile potting medium at a depth of one-eighth of an inch, with four to six inches between them. You can over-sow to increase the chances of germination and thin later if desired.
Place the seed containers in bright but indirect sunlight.
Some folks put plastic wrap over seed starter cells, or a plastic bag over a flower pot, to increase the ambient humidity and speed up germination.
Once the seeds sprout, remove the plastic, or the seedlings may overheat and die.
Keep the soil evenly moist, but not soggy, during germination.
Transplant the seedlings to the garden in late spring, after the danger of frost has passed.
Provide one inch of water per week if it doesn’t rain.
Punch Up the Color
If you already have a forsythia bush, why buy more when you can propagate your own? It’s cost effective, easy, and fun for the whole family.

Try your hand at air layering, dividing, rooting stem cuttings, and tip layering.
Take your forsythia display from okay to “No way!” with multiple shrubs for masses of yellow blooms that don’t just say spring, they shout it.
Have you tried any of these propagation methods? Let us know in the comments section below!
And for more information on cultivating forsythia in your landscape, we suggest you take a look at the following guides next:


Being a beginning gardener, photos would have gone far to help me understand this process. Disappointing.
Thanks for your message, Kathy! We hope to be able to add more images to illustrate the processes described in this article next year. In the meantime, please let us know if you have any specific questions. Happy to help!
I agree – visual learner here and would love pictures or videos to help understand the text better!
Loved this article! It was very helpful.
Hi Susan –
We’re happy you enjoyed the article and found it informative.
Thanks, I found the to be very helpful.
Hello ?this –
It’s always nice to hear that an article has helped a reader. Thanks for sharing.
I have two Forsythia bushes in a spot where they are hidden by my house and fence.I want to move them to another location, so I can enjoy them. They are older, so would be difficult to move. I am going to try air layering, soil rooting and water rooting of cuttings. I may try dividing the smaller of the two bushes. I will take photos and report back if I have success.
Hi Pam –
Thank you for sharing your exciting forsythia plans. Good luck. We can’t wait to see photos!
Do you have a printable version of these instructions? Thanks!
Printing from your browser’s version of “reader view” should provide a more print-friendly format.
Have you ever tried soil rooting in spring? I snipped a branch on a whim while hiking today (May 2nd, Zone 5b). Gonna give it a try!
Hi Karen –
Definitely! Post-bloom cuttings planted after the danger of frost has passed are very likely to root in the first year and flower in the second.