


Sambucus spp.
Elderberries (Sambucus spp.) are deciduous shrubs or small trees, with species native to Asia, Europe, and North America.
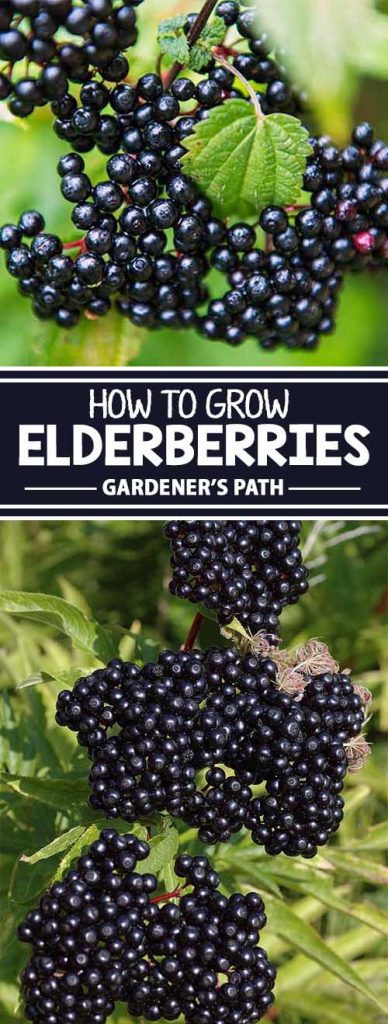
They produce clusters of beautiful flowers in spring, followed by black, purple, or red berries with a variety of medicinal and edible uses.
The multistemmed shrubs grow in ditches and disturbed areas across North America, feeding an abundance of wildlife, including foragers.

We link to vendors to help you find relevant products. If you buy from one of our links, we may earn a commission.
The berries are technically known in botanical terms as drupes, which refers to fruit that consists of a soft, fleshy outer part and a single seed protected by a shell inside.
Depending on the type and the growing conditions, they can grow as shrubs or multi-stemmed trees up to 20 fee tall, though they typically stay closer to 10 feet.
Some species and cultivars are exceptional as ornamentals while others are perfect for an annual berry harvest in USDA Hardiness Zones 4 to 9.
Obviously, I’m wild about elderberries, and I think everyone else should be, too. If you want to grow Sambucus in your landscape, buckle up, here’s what I’ll cover:
What You’ll Learn
There are two primary species of elderberry that are popular in cultivation.
The first is the American elderberry (Sambucus canadensis) and the second is the European type (S. nigra).
The American species is native to North America east of the Rockies, while the European type is indigenous to most of Europe as far east as Turkey, and has naturalized in temperate areas around the globe.
Less common in cultivation, you’ll find desert elderberry (S. mexicana), red or sacred elderberry (S. racemosa), blue elderberry (S. cerulea), and yellow (S. australisica).
Blue elderberry is found predominantly in the Pacific Northwest and California.
S. racemosa grows in the Pacific Northwest and Canada, and less commonly across the rest of the lower 48. Desert elderberry is found in the southwest.
Quick Look
Common name(s): Elder, elderberry
Plant type: Woody perennial shrub or tree
Hardiness (USDA Zone): 4-9
Native to: Asia, Europe, North America
Bloom time / season: Spring, summer, fall
Exposure: Full sun to part sun
Soil type: Loamy, rich, well-draining
Soil pH: 5.5-6.5, slightly acidic
Time to maturity: 5 years
Spacing: 8 feet, depending on cultivar
Planting depth: 1 inch (seeds), same depth as container (transplant)
Mature size: 20 feet wide x 20 feet high
Water Needs: Moderate
Taxonomy
Order: Dipsacales
Family: Adoxaceae
Genus: Sambucus
Species: Australis, canadensis, cerulea, ebulus, nigra, pubens, racemosa, sieboldiana, velutina
Sambucus species have become an important source of food for birds, mammals, and insects like the spring azure butterfly (Celastrina ladon).
Elderberries have been a valued source of food and medicine for humans, as well.
The plants were cultivated during the Stone Age across Europe and were important in ancient Greece and Rome.

Meanwhile, back in the Americas, indigenous people have historically valued the elderberry for its medicinal uses.
Elderberry extract is still used medicinally, you can buy it at most grocery stores and pharmacies to treat the common cold and flu, and as a health supplement.
The fruits are high in anthocyanins, chemical compounds that give certain veggies and fruits their dark purple appearance and are extremely nutritious.
The jury is still out on whether elderberries really can help with colds or flu, but we do know that they’re nutritious, so long as you prepare them in the right way and avoid the bad parts.
Speaking of the bad parts, the plant contains cyanogenic glycosides which makes it toxic for humans to consume. Never eat anything but ripe, cooked fruits, and flowers.
How to Grow
Elderberries, for the most part, aren’t completely self-fertile. They need a friend within 60 feet or so for pollination. If you only have space for one plant, you’ll still have flowers but no fruits.
If you don’t have space in your garden, you can grow elderberries in containers instead.
Let’s take a look at their cultural requirements:
Light
Elderberries are happy in full sun to partial shade. More important than light exposure is temperature, they prefer to be quite cool.
So if you live in a hot climate, give your elderberry a bit of shade instead of full sun, which can make the plants too hot.
Soil
Even though they have shallow roots that like to remain moist, elderberry plants must have well-draining soil.

If you have heavy clay, heap soil into a mound or ridge that is at least a foot above the ground – or grow in a raised bed.
The preferred soil pH is slightly acidic at 5.5 to 6.5, but they will tolerate outside of this range.
In the wild, you’ll find elderberry plants in all kinds of soil, from poor and depleted to rich and loamy. What they really need is moisture, which is why you find them in riparian zones.
Water
For the first year, you will need to be very on top of watering, keeping the soil consistently moist.
As the elderberry plant becomes established, it will be a bit more drought-tolerant and you can add water when the top inch of soil is dry.
Each year, heap about three inches of mulch around the base of the elderberry plant and as far out as the dripline.
This will suppress weeds, protect the shallow roots from damage, and help the soil retain moisture.
Fertilizing
I strongly recommend you test your soil before feeding your plants.
Then, amend according to the results. If your soil doesn’t show any major deficiencies, you can use a balanced fertilizer.

Feeding should start in the early spring and should be repeated at even intervals three or four more times, ending in early fall.
Learn about how to fertilize elderberries here.
Species and Cultivars to Select
If you primarily want the fruits, most gardeners agree that blue elderberries are far superior to American in flavor.
European types tend to be the best looking if you want a good ornamental option, and the flowers are the most fragrant.
We have a whole guide that covers some of the best elderberry varieties, including the classic ‘Adams,’ ‘Black Lace,’ ‘Lemony Lace,’ and ‘York.’
I’ll just add a few here that I think are also worth checking out:
Black Tower
Black Tower™, aka ‘Eiffel,’ has deep, dark burgundy foliage that appears almost black.
The leaves have finely serrated edges, offering texture and interest. Medium pink buds open to light pink flowers followed by blackish-red berries.

This cultivar grows to about eight feet tall and four feet wide, with a narrow, upright shape. It grows well in Zones 4 to 8.
You can find Black Tower™ in #3 containers available at Nature Hills Nursery.
Cut Leaf
Cut leaf elderberry (S. nigra f. laciniata) is glorious, covered in fern-like leaves.
The shrub can reach up to 15 feet tall and is absolutely cloaked in heaps of beautiful white flowers followed by black fruit.

This form was discovered in Germany hundreds of years ago and has gained quite the reputation as an ornamental for growing in Zones 5 to 9.
It was awarded the Royal Horticultural Society’s Award of Garden Merit in 1993.
Red
Red elderberries (S. racemosa) do, in fact, have red fruits, though they can darken to a deep purple.
Native to Europe, Asia, and North America, this species thrives in moist areas of forests, such as along streambeds.

The berries are sometimes described as toxic, even when cooked, but native people in the Pacific Northwest have long consumed them and continue to do so today.
But the fruits absolutely must be cooked, no exceptions.
The species grows in Zones 3 to 9, but check the particular cultivar to make sure it will grow in your area.
Pruning and Maintenance
I know it’s painful to do, but prune off any flowers that appear in the first year after planting. You want to encourage the plant to develop a healthy root system.

You should always prune out any dead, diseased, or deformed branches. Otherwise, you don’t need to do any pruning until the third year.
Then, in early spring, head out with some pruners and go to town. Elderberry plants can handle a heavy prune to encourage dense growth and fruiting.
Learn more about elderberry pruning here.
Propagation
There are a few ways to propagate elderberries, you can start from seed, take cuttings or divisions, or you can purchase a potted or bare root plant from the nursery.
From Seed
Inside each berry is a single seed. Note that plants grown from seed may not grow true to the parent, so bear that in mind before you start!
Wait until the berries are ripe, and squash them gently to extract the seeds.
Rinse and let the seeds dry out for a few days in a nice cool area.
Ideally, you’ll sow seeds outdoors in mid-fall so Mother Nature can provide the appropriate cold-stratification that they require.
If you want to start seeds indoors, you’ll need to cold-stratify the seeds for a few months before sowing.
To do this, put sand in a sealable bag or container and moisten it well. Mix the seeds into the sand and set the container in the refrigerator.
After three months, take the seeds out and sow them in five-inch containers filled with potting soil.
Sow one or two seeds per pot an inch deep and cover.
Water the soil and wait for a few weeks for the seeds to germinate. You should see growth within a month.
After germination, move the seedlings into a location with bright sunshine and keep the soil moist.
From Cuttings
Elderberry cuttings root reliably and unlike those started from seed, you end up with a genetic replica of the parent.
You can take hardwood cuttings in the winter or early spring and softwood cuttings in the summer before the fruit develops.
You’ll snip off a section and plant it in a potting medium or water to encourage it to develop roots.
After the roots form, you can put the plant in the ground.
Our guide to propagating elderberries from cuttings has all the details.
From Divisions
Most elderberries send out lots of suckers which you can dig up for propagation. Ideally you should do this when the plant is dormant, but the ground isn’t frozen.
Locate a healthy sucker, which is a stem and roots that emerge from the main plant. Gently dig down near but not directly underneath the stem you’re targeting.
Gently lift the section up with a shovel and snip away any roots that resist or are still attached to the main plant.
Transplant the removed section in a new hole. You want to bury it as deep as it was previously or just a few inches deeper.
Transplanting
Elderberry plants purchased from a nursery or garden center should be put in the ground in the fall or spring, though if you live in the colder end of the plant’s tolerance, spring is better.
Dig a hole slightly wider and the same depth as the root ball. Remove the plant from its pot, brush away the soil from around the roots, and spread them a bit.
Set the plant at the same depth as it was in the container, backfill with soil and water in well.
When planting bare roots, soak the entire plant in water for a few hours to rehydrate it.
Look for the lowest branch and plant it so that it is just above the soil.
Managing Pests and Disease
Herbivores are, hands down, the biggest obstacle between me and my elderberries.
Herbivores
Whether you consider them pests or welcome visitors, deer, elk, sheep, and other large mammals adore these shrubs.
So do birds, rabbits, mice, and other rodents.
To protect shrubs, build a tall fence to exclude deer and cover them in bird netting when they are in fruit.
Insects
There are a number of insects that will feed on elderberries, some more destructive than others.
Cane Borer
The elder cane or shoot borer (Achatodes zeae) is a night-flying moth that lays eggs in the stems during the summer.
Nine months later, the eggs hatch, and the larvae emerge, feeding on the shoots and stems. By late spring, they pupate and the adults emerge a few weeks later.
At first, the only way you’ll know they’re around is the small hole bored into the base of a shoot. If you open up the shoot, you’ll find an inch-and-a-half long, cream-colored, segmented worm with black spots and a black head.
They’re pretty impossible to treat. If you see evidence of cane borers, prune the shoots and canes as close to the ground as possible.
Then, in the fall, prune again to remove any you missed.
Elderberry Borer
Not to be confused with the elder cane borer discussed above, the elderberry borer (Desmocerus palliates) is the larvae of a beetle.
The cobalt blue and orange beetle grows to about an inch long. It only lives in the eastern part of the US, where it lays eggs in the soil at the base of the plant.
After the larvae hatch, they feed on the roots and shoots and then pupate. The adults then move to the flowers to feed.
The feeding causes yellowing, wilting foliage and weak, bending stems. The lenticels on the stems might become dark and swollen.
This is a native species with lots of natural predators and it has become quite uncommon in its range, so it isn’t usually a problem. If you do see the adults, you can hand-pick them and prune any damaged shoots.
Japanese Beetles
Japanese beetle (Popillia japonica) larvae overwinter deep in the soil and emerge in the spring, feeding on the roots.
They then pupate, and the adults emerge in late spring or early summer with a ferocious appetite. For the next 45 days, they breed and feed nonstop.
They eat the leaves and shoots, they devour the berries, and they can skeletonize an entire plant if left unchecked.
In the case of a small infestation, you can hand-pick the beetles and drown them in soapy water.
Learn more about Japanese beetle control here.
Disease
For the most part, you can avoid diseases by taking care not to damage your elderberry plants, keeping them well-spaced to maintain good air circulation, and by feeding and watering appropriately.
Here are a few problems to be aware of:
Canker
Canker is caused by various types of fungi, including those in the Cytospora, Diplodia, Nectria, Neonectria, and Sphaeropsis genera.
Regardless of the species, they all cause tip death and sunken cankers along the stems. The foliage might also wilt, turn brown, and fall off the tree.
These pathogens don’t respond well to fungicides, so the best option is to remove the symptomatic branches. If the trunk is infected, you’ll need to remove the entire plant.
Jelly Ear Fungus
If you say the words jelly ear fungus to a mycologist, they’ll celebrate. Auricularia auricula-judae is cherished both as medicine and food and has been for centuries.

This funky fungus does, indeed, look like an ear with a fleshy, gelatinous appearance and a skin-like hue.
Jelly ear fungus primarily feeds on Sambucus species, but you might also see it on beech, sycamore, and ash in shady, damp areas.
It grows on dead or dying wood. If you see the distinctive mushrooms, it means that part of the plant is dead or dying already.
There is no cure, so you’ll need to prune out any infected areas and remove the fruiting bodies as you see them.
Powdery Mildew
Powdery mildew is common in humid, warm areas with poor air circulation. If it looks like your elderberry plants have been dusted in a white or grayish powder, it’s likely powdery mildew.

The disease typically starts in the spring as the weather warms up and the humidity is high, and it intensifies over the summer.
Infected plants will have stunted growth and poor growth the following year. The disease can also cause leaf drop.
Fortunately, it responds well to treatment. Read our guide to powdery mildew to learn more.
Harvesting
You can harvest the flowers anytime they are open, but don’t take too many or you won’t have any berries!

Determining when to harvest the berries is easy.
Are they the right color for the species you are growing and are the birds acting like they’re at an all-you-can-eat buffet? It’s harvest time!
If the berries are hard and green or pale, they aren’t ready.
When they are ripe, snip the clusters of fruits off at the base and then remove them from the stems.

Instead of picking off each berry, freeze the whole cluster and then gently shake off the berries over a bowl.
Learn more about harvesting, preserving, and using elderberries here.
Recipes and Cooking Ideas
Let’s talk about the flowers, since they appear first. Elderflowers make a superb tea, and I love them dipped in a beer batter and fried up.

For the berries, jams and jellies are classic choices, and they shine when made into syrup or wine!
Read our guide to using elderflowers for food and medicine to learn more.
Health, Beauty, and Flavor
Elderberries are pretty enough to be solely grown as ornamentals but they also provide food in the form of fruits and flowers. And those fruits are packed with nutrients!

What are your goals for growing elderberries? Do you plan to make syrup, wine, or jam? Do you have any recipes you can share? Let us know in the comments section below!
If you’re interested in adding a few other berries to your garden, we have plenty of guides to set you in the right direction. Here is just a sampling:
I have a question I’ve been pondering the last couple days. Why is the nova variety recommended to be planted with York elderberries? Is there a reason I should choose nova over another variety?
Good question, Jodi. The experts seem to agree that ‘York’ serves as a good pollinator for ‘Nova,’ and ‘Johns’ is a good pollinator for the ‘Adams’ cultivars. This is based on their species, and bloom times as well. All of these are American types (S. canadensis) rather than being cultivars of the European species (S. nigra). And the two pairings are known for blooming at similar times, so their pollen will be readily available when it’s needed, boosting success rates and resulting in a better chance of getting a high yield.
I am an elderberry fanatic. Am surprised you didn’t mention the newer varieties, specifically Bob Gordon released in 2010. Its main advantage is that the head tips upside down when berries are ripe, offering bird protection for the berries.
Can you plant them from the berries themselves, like seeds?
Elderberry can certainly be propagated from seed, and this method is actually preferred for some ornamental varieties (see our article on the top types to plant in your garden for a few examples). But this is a bit of a lengthy and involved process if you plan to save your own seeds. Growing from cuttings is the preferred method, since the seeds are a bit reluctant to germinate, and planting the berries without any further preparation and hoping for the best will largely result in disappointment. Starting with cuttings instead, you will be able to skip cleaning, scarification, cold stratification,… Read more »
just like any other plant, yes.
I am new with Elderberries. When planting, what should you put in the soil to have a good start for the plant?
This all depends on what you’re working with, Kay! You’ll need a well-draining location, with a preferred soil pH of 5.5-6.6. If you’re starting with good soil, it couldn’t hurt to work in some rich manure or compost. And some experts recommend adding ammonium nitrate. The article above provides some more details. Good luck!
We planted our elderberry last year and it’s now covered with blooms. I’ve noticed that the older blooms are losing all their flowers and just empty stems are left. Shouldn’t they be forming berries? This is Central Texas in mid April. Other than the blossom drop, the shrub is growing very well. What can I do to ensure berry production?
Thanks for your question, Chris. There are a few issues that could be at play here. First, how old/large was the elderberry when you planted it, and what variety do you have? Though some will produce fruit in the first year after planting, others will take an additional year to get adjusted. In central Texas you’re probably in hardiness zone 7 or 8 – some types will do well there, given the proper conditions, while others prefer cooler climates. Double check to confirm that you have a fruiting variety of elderberry rather than elderflower, which is sterile and will not… Read more »
i grew up with these in north GA but im now in zone 9 FL and tried to grow them with no luck at all. any hints? or just too darn hot here.
Heat is probably the culprit, Joan. Do you know what type you tried to grow? They like shade, with cool and moist conditions, and require plenty of water when they are first planted. The ‘Adams’ or ‘York’ varieties may do well in your area, but they will need extra care and attention during periods of hot and dry weather, with regular watering and sun protection. Your soil may benefit from some amendments as well, depending on the type and pH level. Check out our article on elderberry varieties for some more suggestions: https://gardenerspath.com/plants/fruit/best-elderberry-varieties/.
I’m in Florida, zone 9 b, and last year I transplanted several elderberry trees from a wild grown area down the street.
Lessons learned: they can be grown in full sun in zone 9, but make sure they are watered regularly, or even better that you plant them in an area that is prone to flooding, and they prefer to be crowded to get some shade.
We had one bush die off because of the area being too dry, and one plant in full sun exposure, where the scorching sun almost burned off the berries.
I just purchased a black lace elderberry tree, and realized I need another elderberry to pollinate. Any suggestions on what would work best? I use the elderberries for Syrup to prevent cold and flu and boost immunity.
‘Black Lace’ (or S. nigra ‘Eva’ PP15575) will cross-pollinate with ‘Black Beauty,’ ‘Instant Karma,’ or ‘Laced Up.”
Check out our article on the best varieties of this type of berry for more tips.
Which two would be the best to grow for wine making in central Illinois?
Yum, elderberry wine! S. nigra and S. canadensis cultivars are most commonly used for this purpose, so you have some options. Most of Illinois is in USDA Hardiness Zone 5 so most varieties will do well there, given the proper growing conditions. Try ‘Adams’ and ‘York’ for a classic pairing, or check out some more of our favorite varieties here.
I did not realize they need some shade, I planted them in the middle of my yard full sun this spring,
My question is it possible to move them even though it is summer now they are about 2 feet tall?
Where are you located, Sherry? Some gardeners recommend transplanting only in the early spring when the plants are dormant, but others have reported that elderberry can be transplanted at any time of year. In your case, your plants are still immature and have yet to become fully established, making them easier to move overall, but you do run the risk of possible transplant shock. Since the bright, hot summer sun can shock plants with exposed roots, wait until an overcast, cooler day if possible and be sure to keep them watered well after replanting. Elderberries have shallow roots, so you… Read more »
Do the elderberries create a problem with the birds making a mess? Do they attract bears?
These animals love elderberries, so you should plant with caution if you’re located in bear country! As for the birds, this depends on what you would define as a “problem.” Native birds love them, so you’ll have to get to your plants quick if you want to beat them to harvesting what’s ripe.
Could I wrap them with tulle?
Yes, bird netting or something like tulle will work for protection from birds. Since this will make harvesting a bit more difficult, so some gardeners avoid it. But it’s worth a try!