

Anemone cylindrica
Native to the Canadian province I grew up in, and every province I’ve lived in since, candle anemone is one of those seemingly unexceptional plants that I would recognize everywhere but never took much notice of beyond that.
My siblings and I used the seed fluff to line the beds of the baby mice we found.
But after doing a bit of research, I realized our mouse bed fluff was from theAA same plant I saw on almost every hike in the backcountry of British Columbia and Alberta.
It seemed to exist everywhere, whether as a delicate flower adding a splash of white to a wildflower meadow’s kaleidoscope of colors, or a few fluffy seeds clinging to a dry stem on a windy ridge.

We link to vendors to help you find relevant products. If you buy from one of our links, we may earn a commission.
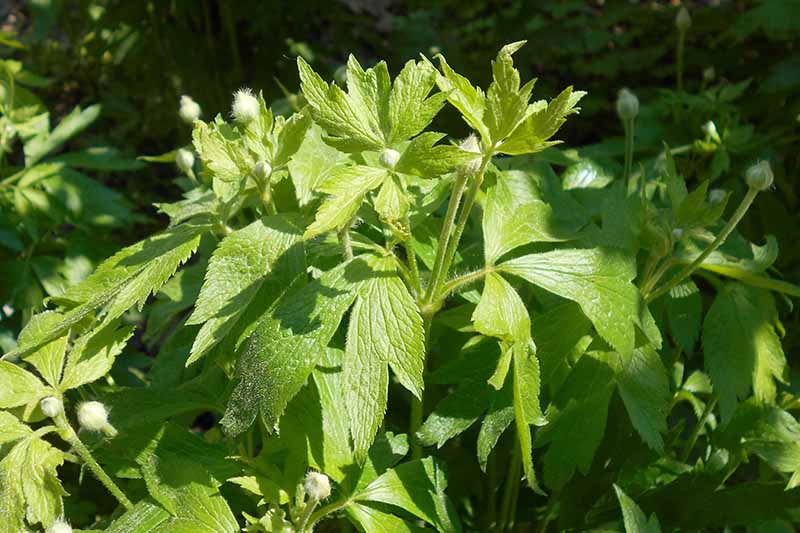
Its robustness translates well into the garden – it is a delicate looking plant that is surprisingly easy to grow. Plus, candle anemone is easy on the eyes.
It features small flowers on tall stems, floating above a sea of textured leaves, all in shades of green and white.
In my opinion, not all garden plants have to be extremely showy. Sometimes, a simple mat of green dotted with elevated white flowers is a treat for tired eyes.
If you agree, read on to find out how to grow and incorporate Anemone cylindrica into your garden.
Here’s what I’ll cover:
What You’ll Learn
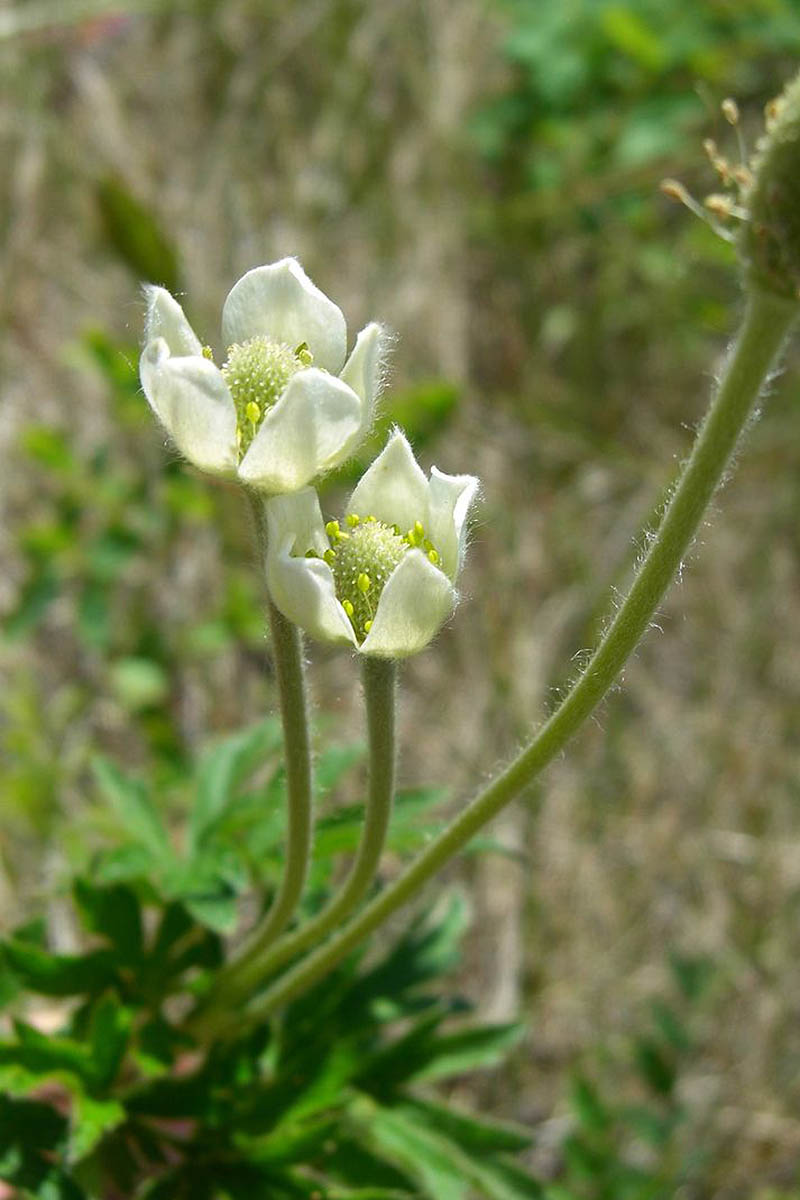
This unobtrusive plant doesn’t produce the showy blooms most Anemone species are known for.
However, it does feature a variety of textures, and year-round interest, with its small white flowers layered over green, deeply lobed leaves, and long seed heads that explode into woolly white fluff.
Quick Look
Common name(s): Candle anemone, thimbleweed, long fruited thimbleweed
Plant type: Herbaceous flowering perennial
Hardiness (USDA Zone): 3-8
Native to: Canada, North America
Bloom time: Summer
Exposure: Full sun to part shade
Soil type: Sandy, loamy, well draining
Soil pH: 6.0-8.5, slightly acidic to alkaline
Spacing: 3-6 inches
Planting depth: Surface sow (seed), depth of root ball (transplants)
Mature size: 27-60 inches wide x 12-24 inches high
Water Needs: Low
Taxonomy
Order: Ranunculales
Family: Ranunculaceae
Genus: Anemone
Species: Cylindrica
Candle anemone is also known as thimbleweed, but this common name is used for A. virginiana as well, so to reduce confusion, A. cylindrica is also called long fruited thimbleweed.
Its namesake: the cylindrical, thimble-shaped seed heads that grow twice as long as they are wide, and are distinctive from those of other anemone species.
As a member of the Ranunculaceae (buttercup) family, candle anemone is toxic to mammals, to be sure to keep children and pets from snacking on it!
The Omaha and Ponca tribes considered this native to be a medicinal plant and combated the mouth-tingling toxicity by cooking portions of the plant to use for treating a variety of ailments.

A wash made from the boiled and pounded roots was used on wounds for its antiseptic qualities, leaf poultices were used for soothing burns, and root teas were administered for headaches and dizziness.
Candle anemone is a perennial prairie plant, native to Canada and the continental US, with fibrous roots, sometimes producing short rhizomes. It thrives in dry open woods, slopes, pastures, and roadsides.
Beneficial insects such as tiny native bees and hoverflies visit the small flowers for their pollen.
How to Grow
Candle anemones are well-suited to low-maintenance landscapes, wildflower gardens, and naturalized settings. These perennials thrive in prairie-like conditions, showing off creamy-white flowers in late spring to summer followed by distinctive thimble-shaped seed heads.
With the right conditions, these rugged plants practically care for themselves and will bloom with greenish white flowers from the middle of spring to the end of summer.
Here’s what you need to know to ensure success:
Light
Candle anemones thrive in full sun and will produce the most robust blooms when they receive at least six hours of direct sunlight per day. In shadier spots, plants may become leggy and flower production can suffer.
While they can tolerate partial shade, especially in hot southern climates, aim for a sunny location whenever possible.
Soil
These prairie natives are well adapted to poor, dry, and rocky soils, though they grow best in loose, well-draining ground. Heavy clay can be a problem, particularly if drainage is poor.
If necessary, amend your soil with compost to improve drainage. They prefer a soil pH that is mildly acidic to slightly alkaline, typically between 6.0 and 8.5.
Temperature and Humidity
Candle anemones are hardy in USDA Zones 3 to 8, and they can withstand cold winters without trouble. These plants prefer dry air and are well suited to prairie or steppe conditions.
High humidity combined with poor air circulation can increase the risk of fungal issues, so avoid overcrowding them in garden beds.
Water
A.cylindrica is drought tolerant, and actually prefers drier, open areas. To decide when water is needed, check the soil about one or two inches down.
If the soil feels dry you may water, but if the soil is damp don’t bother because it won’t be appreciated.
In the absence of rain, water when the soil is dry to a depth of two inches.
Fertilizer
These plants are not heavy feeders and generally do not require fertilization.
If your soil is particularly poor, you can incorporate some well-rotted compost or a balanced, slow-release fertilizer in the spring.
Avoid high-nitrogen formulas, which may promote leggy growth at the expense of flowers.
Where to Buy
There are no cultivated varieties of A. cylindrica, and it can be difficult to find these plants in your local garden center.
You can find seeds in a variety of packet sizes available from Everwilde Farms via Amazon.
Maintenance
These plants will grow through the season and go dormant in the winter without much attention with regards to deadheading or trimming.
Once they do die back, you can remove the dead foliage if you wish. But the cottony seed heads can last throughout the winter, adding some interest to your garden through dormancy.
Propagation
You’ll want more than one of these plants: group plantings are how A. cylindrica shines out in the garden.

In nature, candle anemones rely mainly on dispersal of their seeds by the wind for propagation. However, mature plants can be divided and they can also produce offsets from their short rhizomes.
From Seed
Since these plants look great in big groups, sometimes even together with other anemones, you can allow them to spread their own seeds for a naturalized grouping.
Or you can collect the seeds once they’re fluffy and dry, and before they are spread by the wind.
If you decide to collect and save seeds, spread out the fluff on a tray out of direct sunlight and allow it to dry out well. Carefully remove the fluff from the seeds and store in a cool, dry, dark place.
The seeds need a period of at least 90 days of cold stratification to germinate. The easiest way to propagate via seed is to sow them out into your garden in the fall and allow the winter to do the work for you.
Here’s how:
- Before sowing, loosen the top inch of soil with a rake and make sure it is moist. Sow seeds three inches apart and cover very lightly with soil.
- Candle anemone does not respond well to transplanting. If you decide to keep the seeds and start them in the spring indoors, stratify the seeds for between 90 and 140 days in a tray or bag of moistened sand at 40°F.
- Once the seeds have been cold stratified, sow individually, spaced two inches apart, into a tray filled with moistened, well draining propagation medium and cover lightly.
- Place the tray in a warm (65-70°F), bright area and keep the medium moist by spritzing with water as needed.
After 20-25 days, you should see little green plants poking through the soil!
Once the little plants have three or four true, palmate (lobed) and healthy green leaves, carefully remove the seedlings and transplant into your garden as discussed below.
By Division
Candle anemones produce a mass of fibrous roots which can be divided into two or three new plants after several years of growth.
To divide into new plants, dig up your mature clump in the early spring. Carefully separate the tangle of roots to make new plants, each with their own crown and mass of roots. See below for specific transplanting instructions.
Candle anemone will sometimes reproduce vegetatively by growing offsets of its short rhizomes. These new plants can be separated from the parent and moved, or you can let them spread naturally.
Learn more about how to divide perennials in our guide.
Transplanting
Though they are not difficult to grow, candle anemones may not respond well to transplanting.
First, make sure you are planting in soil that drains well. They are prairie plants that do well in drier soils, and don’t appreciate wet feet.
Some nurseries ship or provide dormant, bare root plants packed in peat moss that you can order in the spring or fall, and plant immediately provided the soil is not frozen.
These instructions apply to both dormant bare root plants and plants you divide.
- Dig a hole deep and wide enough to accommodate the root size. Check your depth. The crown should not be lower than one inch below the soil surface.
- Orient the fibrous root mass vertically and pointed downwards, and hold up any rhizomes while backfilling with loosened soil. Lay and spread the rhizomes out horizontally about one inch below the soil surface and fill the rest of the hole with soil.
- Water thoroughly after transplanting. If warm and dry weather follows, check the soil moisture often and water as needed (see below for additional watering tips).
If you are planting your own seedlings, transplant in the spring after all risk of frost has passed. Always loosen the soil in the hole you dig to allow the roots to push into their new home.
Carefully remove the plant from its tray and insert into the hole, gently backfill, and water lightly.
Pests and Disease
This plant is deer and rabbit tolerant, and rarely has issues with foliar diseases.
If any bugs or slugs happen upon the plants and give them a chew, you can simply remove them by hand. Snacking pests might include slugs or snails, and we’ve got an article specifically on how to protect your garden from gastropods.
If the plants are looking sick, with pale or yellow leaves, the roots are likely suffering. The most common reason for this is overwatering. If you are providing supplementary water, reduce the frequency and amount or stop watering altogether.
Provide these plants with well draining soil from the beginning, and always check soil moisture before watering.
You can learn more about pests and diseases in our guide to growing anemones.
Best Uses
Because A. cylindrica isn’t a very showy plant, it looks best planted in big groups, used as a bedding plant and for borders, as a beautifully textured green ground cover, or as a specimen plant.
Plant this anemone in open areas, woodlands, and naturalized areas.
Easy on the Eyes, Easy to Grow
Candle anemone is an unobtrusive plant all around, being both low maintenance and blending into the garden with shades of green and white.

But it has some standout qualities, providing food for bees and other beneficial insects, adding layers and texture to the garden, and providing winter interest with its tufts of fluffy seeds.
Are you growing candle anemones in your garden? Let us know in the comments below, and feel free to share a picture!
And for more information on growing anemones in your garden, check out these guides next:


I have yet to see what you refer to as the fluffy stage of this plant. The photo on the seed packet shows what Im seeing right now, a white-ish capsule-shaped head. When do they become fluffy?
Also, other writers claim we should take the seed heads off as soon as they form and dry them in the sun so that the seed head will open and allow us to collect the seeds. It sounds like you recommend waiting until the seed head becomes fluffy. Is that right?
Thanks for all the information!
Hi Susan, here is your picture, it didn’t seem to upload properly. Sylvia will be along soon to help you out 🙂
Hi Susan, that long seed capsule you’re seeing now will become cottony, with the ripe, brown seeds attached, as it matures. The other writer’s method can work as well, especially if you don’t want to risk the plant seeding itself out (which, once its cottony, will happen easily with some wind). Waiting until the fluff appears ensures the seed has matured on the plant as long as it needed, though. I hope this helps!
How can you maintain or contain anemones from taking over my elderly parents’ front flower bed? Every fall when they die back they get complaints from their association. The lawn care the association is responsible for is limited to the grass. We have tried to remove them but only have minimal success. If there is a plant that will grow and fill it in or even overcome them we are open to that or any other ideas. They cannot do any of the work so we have to drive 1/2 -1 hr to even get there. Help!
Thanks for your message, Diane. It sounds like these anemones are happy where they’re growing, and eager to spread! Cutting them back annually in the fall may be your best solution to appease the association. If you’re unable to make the trip to do the yardwork, perhaps hiring someone local to the area could be an option? Removal will likely prove to be a difficult project since these plants both self-seed and spread via underground rhizomes. In addition to removing any unsightly browned foliage that would otherwise be left in place in the fall, cutting stems back before seeds are… Read more »