Are you planning to start seeds for your vegetable garden, flower border, or wildflower meadow?
In addition to seeds, there are a number of other must-haves – like growing medium and containers. But there are some optional supplies that can help with this project too!

We link to vendors to help you find relevant products. If you buy from one of our links, we may earn a commission.
Are you a newbie gardener?
If this is your first time starting seeds to grow vegetables or flowers, make sure you have all the required supplies before you sow.
Begin by reading this checklist, so you can gather the essentials well before you need them!
Ready to get started? First, here’s a quick overview of the checklist:
11 Supplies for Starting Seeds
1. Cold Frame
You don’t have to start seeds indoors – you could propagate them in a cold frame instead if your temperatures are right.
Set up your cold frame facing south where it will receive direct sunlight, providing your young seedlings with both light and heat.

A cold frame is ideal for propagating perennials or cool season crops.
If you’re starting warm season annuals, this setup works particularly well if you receive a lot of warming sunshine in the spring, but not so well if your spring weather is gloomy and rainy, or too cold.
You can use cold frames for warm season annuals if you can be sure the temperature will be between 50 and 95°F, with the ideal range for germination being 65 to 85°F.
Cold frames may come with built-in ventilation, or you can prop them open to ventilate and prevent interior temperatures from becoming too hot during the heat of the day.
You can purchase a cold frame, but you might want to make your own DIY cold frame or greenhouse for your backyard.
Learn more about using cold frames in the spring here!
2. Greenhouse
There are a few options you can choose from to create a humid, warm environment for young seedlings – and your choices range from the extremely low budget to the serious long-term gardening investment.
If you want the best setup of all for young seedlings, a greenhouse is the ultimate choice – and will give you the space to start an endless selection of plants.

If you’re lucky enough to already have a greenhouse as part of your gardening setup, that is ideal, since you can use it to provide the light, heat, and humidity they need.
You can learn more about how to start seeds in a greenhouse here and be sure to avoid the most common greenhouse mistakes.
Excited by the idea of this gardening in a greenhouse?
If the idea of setting up a greenhouse has your green thumb twitching, why not consider making a DIY greenhouse out of pallet racking?
3. Grow Lights
I typically grow my seedlings next to a couple of very sunny, south-facing windows. These provide plenty of sunlight and warmth for my plants as they grow and mature.

But not all climates or home situations will allow you to take advantage of free light and heat from the sun – so you might want to consider using grow lights.
Grow lights have an additional advantage, even if you do have a nice sunny window:
Since they are placed just a few inches above the plants, seedlings will generally grow stockier and bushier compared to their development next to a window.
Grow lights also encourage plants to grow straight up towards the overhead light source instead of leaning.
Plants situated next to a window often reach sideways towards the sun – a problem that can be remedied by rotating the plants regularly.

But they do tend to become leggier than those cultivated outdoors or with lights, even with regular rotation, as they reach toward the light.
You can learn more about how to use and choose grow lights here.
4. Heat Mat
A heat mat can help to keep the soil at the right temperature for germination.
Having a heat mat on hand is particularly useful for gardeners in cold or rainy climates who can’t rely on the sun to keep young plants or the soil pre-germination at the right temperature.
The soil temperature required for starting seeds depends on the type of plant, with species of tropical origin usually requiring warmer conditions.
Jump Start Windowsill Heat Mat
If it sounds like you could use a heat mat to help regulate the temperature in your propagation setup, the Jump Start Windowsill Heat Mat will warm the soil 10 to 20°F higher than the ambient room temperature.
You can find it available via Amazon.
5. Humidity Dome
If you want to keep your spending low for your gardening projects, you can create greenhouse-like conditions on the cheap by covering your seedling trays with a humidity dome.
You can even use plastic wrap or a transparent plastic bag for an easy DIY humidity dome.

A growing tray with a plastic humidity dome is another fairly inexpensive supply for starting seeds, especially if you’re not sure you want to invest in expensive equipment for the long term.
These germination stations come with a flat for holding seedling trays, and a plastic dome to retain heat and humidity.

12-cell Growing Tray with Plastic Humidity Dome
You can purchase a 12-cell growing flat with a drip tray and clear humidity dome from True Leaf Market in packs of five or 10.
Want more options?
You can always use a terrarium as a mini greenhouse – place it next to a sunny and warm south-facing window.

My young seedlings get plenty of light, warmth, and humidity this way, and as a bonus it keeps them protected from my curious cats!
6. Plant Markers
Plant markers are a must-have if, like me, you plan to start seeds for your own personal mini nursery each spring, growing several different varieties of vegetables, flowers, and herbs.
Without markers to label them all, how will you keep track of your seedlings?

If you are only propagating one variety of one type of plant, you can probably get by without plant markers.
However, using plant markers gives you a clear visual sign of what variety you are cultivating and the sowing date (excellent items to note in your gardening journal, as well).
You can make your own out of used popsicle sticks, or you can buy markers intended specifically for this purpose – made out of metal, wood, or plastic.
While the wooden ones are biodegradable, they can start breaking down in the seedling pot, and can even become a source of fungal growth, especially in humid conditions.
The plastic ones won’t cause fungal problems, and have more reuse potential since they don’t break down.
Pack of 100 4-Inch Plant Markers
You’ll find a pack of 100 reusable four-inch plastic markers available via Amazon.
7. Pots or Trays
When choosing pots or trays, keep a few important points in mind:
- Two-inch pots are a good size to begin with. Repot into larger vessels as needed.
- Drainage holes are an absolute must!
- Square pots are more space efficient than round ones.
- If reusing pots or trays, clean and sterilize them before using.
There are lots of different types of containers or trays you can use for seed starting, from biodegradable options made from cow poop to flats with silicone cells that allow you to easily pop the seedling out without damage.
Our guide to choosing pots and trays for starting seeds has full details.
8. Seeds
The top supply for this project is of course, whatever you choose to sow!
By now you’ve likely perused your favorite seed catalogs and have an assortment of packets ready to sow.

If you’re wondering how many seeds to sow, I recommend reading the back of the packet for recommendations.
Some plants have lower germination rates than others, and for those, you’ll need to sow more.
I tend to err on the side of sowing more than I actually need.
If you were to sow only one seed and it failed to germinate, you’d be disappointed and wonder what it was you did wrong, when it could just be that the individual seed was not viable!
Planting a few extras will help you make up for any losses, particularly with plants known for having lower rates of successful germination.
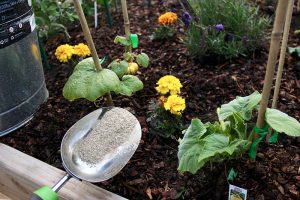
9. Seed Starting Mix
Another absolutely essential propagation supply is growing medium.
If you are sowing specialty seeds such as succulents, you’ll need to choose an appropriate starting mix for the species you’re growing.
But for most popular garden annuals and perennials, a soilless mix is the best choice, such as Rosy Soil Seedling Mix, available via Walmart.

Wondering if you can just use soil from your backyard to grow seedlings instead?
There are a few reasons why doing so may turn out to be a poor choice rather than an economical one, namely the presence of weed seeds, microbial organisms that cause damping off, and potentially poor drainage.
Our guide to choosing the best potting medium for seed starting has more information. (coming soon!)
10. Spray Bottle
While it’s possible to water your seedlings with a small watering can, jar, teapot, cup, or whatever else is handy, using a spray bottle will give you much greater control over how much water you provide, and help to prevent damage to delicate seedlings.

Correct watering is such an important aspect of propagating seeds that I consider a spray bottle to be a required supply, on equal footing as a good quality growing medium!
You can use a plain plastic spray bottle or a glass one.
If you plan to repurpose an empty household spray bottle, select one that has never contained harsh chemicals, as residues can damage young seedlings.
You can find glass spray bottles available for purchase from Amazon.
11. Widger
When removing young seedlings from their trays to transplant, you will need some way to lift them out without pulling on the stems.
A widger solves this problem!

To use, you stick the widger into the soil and under the roots of the seedling to lift it out of its tray – and out it comes without damage to the roots.
As a DIY alternative, you could also use a small spoon, a popsicle stick, or a plant marker to lever your plant out of its growing cell.
Give Your Seedlings a Fresh Go
Now you know what supplies to use to give those young plants the best possible beginning.
From essentials like pots, medium, and seeds, to those “nice-to-haves” like cold frames or greenhouses.

Do you have any other favorite supplies for starting seeds that you’d like to share with our readers? Drop your ideas in the comments section below.
And if you have any questions, leave them there as well and we’ll be happy to help you troubleshoot!
Looking for more information about propagation? We have more reading for you right here: